Table of Contents
Advertisement
Quick Links
Download this manual
See also:
User Manual
Advertisement
Table of Contents

Related Manuals for Gefen EXT-MINIDVI-241N


Summary of Contents for Gefen EXT-MINIDVI-241N
- Page 1 Mini DVI Switcher EXT-MINIDVI-241N User Manual...
- Page 2 Notice Gefen, LLC reserves the right to make changes in the hard ware, packaging and any accompanying doc u men ta tion without prior written notice. Mini DVI Switcher is a trademark of Gefen, LLC All trademarks are the property of their respective owners.
-
Page 3: Table Of Contents
TABLE OF CONTENTS Introduction Features Panel Descriptions Connecting and Operating the Mini DVI Switcher RMT2-IR Installation IR Code Conf guration Specif cations Warranty... -
Page 4: Introduction
IR remote that comes with it, or any universal remote you program to work with the Switcher. Our Commitment Gefen will always offer the f nest quality product at the best possible price. Included in that price is a lifetime of support from a team of outstanding engineers. How It Works Simply connect your DVI display to the Switcher's display output. -
Page 5: Features
FEATURES Features • Saves money on hardware—no need to purchase multiple DVI displays. • Saves space—a single DVI display • Saves time—no need to disconnect and reconnect DVI devices—everything is always connected and accessible. • Maintains high resolution video—beautiful, sharp DVI resolutions up to 1080P are easily achieved. -
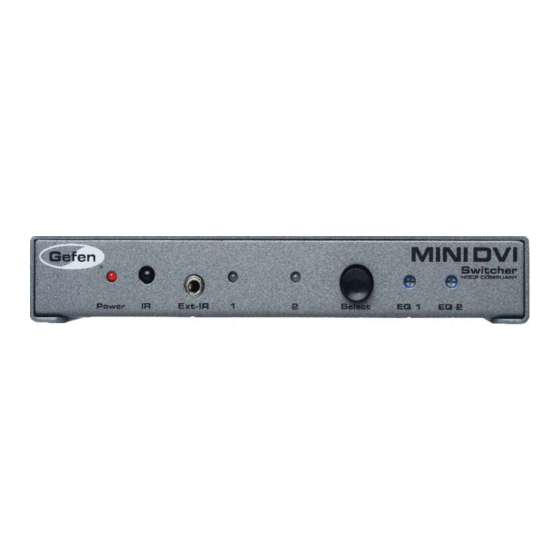
Page 6: Panel Descriptions
PANEL DESCRIPTIONS Front IR eye Connects to IR Selects port 1 extender or port 2 Power LED Indicates if port 1 or Indicator EQ Trim pots for port 2 is selected each channel Back Connects to Connects to 5VDC DVI Inputs DVI display power supply... -
Page 7: Connecting And Operating The Mini Dvi Switcher
CONNECTING AND OPERATING THE MINI DVI SWITCHER How to Connect the Mini DVI Switcher to your devices 1 Connect the supplied DVI cables from the DVI sources into the DVI Switcher Input. 2 Connect the cable from your display (monitor or projector) into the DVI Out of the Mini DVI Switcher. -
Page 8: Rmt2-Ir Installation
Note: The 3.5 mm mini-stereo jack located on the front of the unit is used to con- nect the optional IR extender (shown above). It can also be used for connecting a cabled contact closure remote control (such as Gefen's EXT-RMT-2). -
Page 9: Ir Code Configuration
IR CODE CONFIGURATION Why would I need to change the remote channel? In some instances, the Mini DVI Switcher may use IR codes that conf ict with other IR remote control devices. The unit may switch inputs when another brand IR remote control is used or the RMT-2IR may cause other brand IR controlled devices to behave unexpectedly. -
Page 10: Specif Cations
SPECIFICATIONS Video Amplif er Bandwidth ................. 165 MHz Input Video Signal ..................1.2 volts p-p Input DDC Signal ..................5 volts p-p (TTL) Single Link Range ..................1920p x 1200 DVI Input/Output Connector Type ................DVI-D Power Consumption ................15 Watts (max.) Power Supply ...................... -
Page 11: Warranty
Gefen warrants the equipment it manufactures to be free from defects in material and workmanship. If equipment fails because of such defects and Gefen is notif ed within two (2) years from the date of shipment, Gefen will, at its option, repair or replace the equipment, provided that the equipment has not been subjected to mechanical, electrical, or other abuse or modif cations. - Page 12 Rev A1 20600 Nordhoff St., Chatsworth CA 91311 1-800-545-6900 818-772-9100 fax: 818-772-9120 www.gefen.com support@gefen.com This product uses UL listed power supplies.
Need help?
Do you have a question about the EXT-MINIDVI-241N and is the answer not in the manual?
Questions and answers