Advertisement
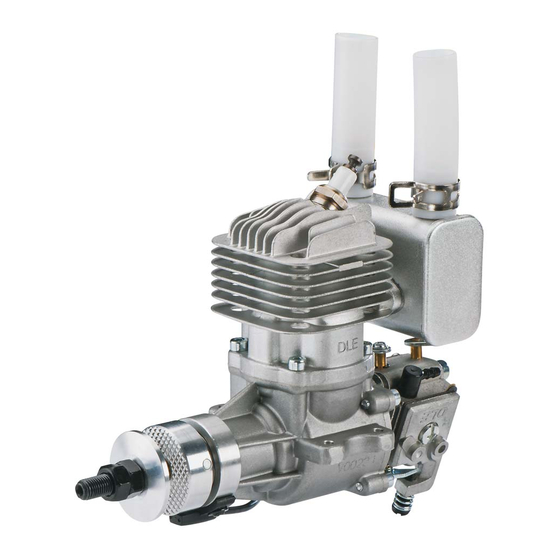
DLE - 20RA
Operator's Manual
Specifications
Recommended Propellers:
Spark Plug Type:
Diameter × Stroke:
Compression Ratio:
© 2014 DLE, distributed by Hobbico.
Displacement:
Performance:
Idle Speed:
Ignition Style:
Carburetor:
Weight:
Fuel:
™
20 cc [1.22 cu. in.]
2.5 HP / 9,000 rpm
1,700 rpm
Electronic Ignition
14 10, 15 8, 16 6, 17 6
CM6
(Gap) 0.018in.– 0.020 in. [0.45mm – 0.51mm]
1.26in. [32mm] .98 in. [ 25 mm]
10.5:1
DLE with Manual Choke
Main Engine − 1.7 lb [660g]
Muffler − 2.8 oz [80 g]
Electronic Ignition − 4.6 oz [130 g]
87− 93 Octane Gasoline with a 30:1
gas/2-stroke (2-cycle) oil mixture
DLEG0420 Mnl
Advertisement
Table of Contents

Related Manuals for DLE DLE-20RA


Summary of Contents for DLE DLE-20RA
-
Page 1: Specifications
Main Engine − 1.7 lb [660g] Muffler − 2.8 oz [80 g] Electronic Ignition − 4.6 oz [130 g] Fuel: 87− 93 Octane Gasoline with a 30:1 ™ gas/2-stroke (2-cycle) oil mixture © 2014 DLE, distributed by Hobbico. DLEG0420 Mnl... -
Page 2: Parts List
Safety Tips and Warnings ● This engine is not a toy. Please place your safety and the safety of others paramount while operating. DLE will not be held responsible for any safety issues or accidents involving this engine. ● Operate the engine in a properly ventilated area. - Page 3 ● For your safety and the safety of others, please do not stand in front or in line with the propeller when the engine is running. Keep onlookers away from the running engine, especially small children. ● Always use a balanced spinner and a balanced propeller. An unbalanced spinner and propeller combination will cause high levels of vibration and may cause the propeller shaft to break.
- Page 4 ● To avoid permanent damage to the electronic ignition system, NEVER rotate the propeller on your DLE engine with the electronic ignition system switched on and the plug not installed in the plug cap. ● If you choose to use the optional TX activated gas engine kill...
-
Page 5: Installation Instructions
Installation Instructions Prepare the engine for installation 1. Check to see that all screws and bolts are tight. Check carefully for any cracks, broken or missing parts. Tighten or replace any damaged or missing parts before proceeding. 2. Install the silicone wire cover over the pick up lead coming from the engine (cut the excess silicone wire cover) and connect the lead to the pick–up lead from the Electronic Ignition Module. - Page 6 Switch (Not included) Charge Lead Battery Lead Ignition OPTO Gas Engine Kill Switch Battery Lead (DLEG9205, not included) KILL SWITCH Rx Batt Ignition Lead Ignition Control Switch Wire (To On/Off Switch) Tachometer Lead/ RPM Signal Output ELECTRONIC IGNITION SYSTEM Tachometer (Not included) DLEG5525 Pick-Up Sensor Wire...
- Page 7 Be sure to use threadlocker. Installing the DLE-20RA on Your Airplane Note: The DLE-20RA must be installed on at least a 1/4" [6 mm] quality 5-ply plywood fi rewall. The fi rewall must be securely glued to the airplane.
- Page 8 exits the engine compartment or the fuselage; most vent lines exit at the bottom of the fi rewall).You can fi ll the tank by using the carburetor line as fi ll line if you have access to it or install a third line to be used as fi...
- Page 9 Components for the non-metallic linkage can be purchased at your local hobby shop. 7. Once the throttle servo is installed it’s a good idea to deactivate the throttle return spring with a pair of needle nose pliers. Gently grab the spring and remove it from tension on the throttle lever. Deactivating the spring will remove the load or stress on the throttle servo.
-
Page 10: Install The Propeller
14. Please ensure the sensor wire is supported as close to the sensor pick-up as possible. Flight loads may cause stress and damage to the wire where it enters the sensor body. 15. Make sure the cowl is secured to the airplane and that the spinner back plate to cowl clearance is at least 1/8"... -
Page 11: Starting Procedures
There are two recommended ways to start the DLE-20RA: A. Manual Starting Note: When hand starting the DLE-20RA, use a thick glove or heavy duty starter stick to protect your hand. 1. The propeller should be installed on the drive washer so that it is at the one o’clock position and near the beginning of the... - Page 12 B. Electric Starter Starting 1. A 24 volt electric starter is recommended to start the DLE-20RA. Make sure you use a high quality, lightweight aluminum spinner. 2. Have someone help you hold the airplane while you start it. 3. Close the choke on the carburetor and open the throttle slightly from the idle position.
-
Page 13: Engine Troubleshooting
Engine Troubleshooting If your engine fails to start after the preceding starting procedures please check the following. Symptom Diagnosis Ignition battery Charge or voltage low replace battery Battery wires faulty Replace wires or or loose re-connect/check connections Engine does not fire Faulty spark plug Replace spark plug... - Page 14 Adjustment of the Engine Each DLE Engine has been factory preset. However, higher elevations will infl uence the performance of the carburetor. To obtain optimum output of the engine, slight adjustment of the carburetor may be necessary. For safety reasons do not adjust the carburetor while the engine is running.
- Page 15 Smooth acceleration and deceleration is an indicator of proper engine performance. Ignition Timing Adjustment The ignition timing is preset on the DLE-20RA at 46° before Top Dead Center (TDC). The ignition timing can be advanced or retarded slightly by loosening the (2) ignition sensor phillips head screws and sliding the sensor to the full extent clockwise (47°...
- Page 16 DSC Charge Adapter (FUTM4243) can be mounted in the fuselage and allows easy external plug-in of the Digital Tachometer. Many of the DLE Ignition modules have an additional lead to plug into the optional tachometer. If your ignition module does not have this additional lead, the digital tachometer can still be used.
-
Page 17: Engine Maintenance
Engine Maintenance Please clean the fuel fi lter in the carburetor periodically. Failure to do so may result in mis-calibration of the needle adjustments. In order to do this it is necessary to remove the phillips head screw which secures the Carburetor Filter Cover and the Carburetor Filter Gasket. Use only carburetor cleaner to spray the opening around the fi... -
Page 18: Order Number
Warranty Information The DLE-20RA has a two year limited warranty through Hobby Services beginning at date of purchase. Please retain your receipt as your proof of purchase. Contact Us Hobby Services 3002 N. Apollo Drive Suite #1 Ph: 217-398-0007 Champaign, Il 61822 Fax: 217-398-7721 E-mail: hobbyservices@hobbico.com... - Page 19 57 mm 25 mm 56 mm 4.20 mm...
-
Page 21: Replacement Parts
Replacement Parts Stock Mfg Stock Description 1 DLEG2301 20-V1 Propeller Washer 2 DLEG2302 20-V2 Propeller Drive Nut 3 DLEG2303 20-V3 Propeller Drive Hub 4 DLEG2304 20-V4 Bearing Front 5 DLEG2305 20-V5 Crankcase 6 DLEG2306 20-V6 Connecting Rod 7 DLEG2307 20-V7 Bearing Rear 8 DLEG2308 20-V8... - Page 22 Notes...
- Page 23 DLE-20RA Mounting Pattern with DUBG1307 Engine Mount 2.75 in. [ 70 mm] 2.75 in. [70 mm]...
Need help?
Do you have a question about the DLE-20RA and is the answer not in the manual?
Questions and answers