
Related Manuals for Jensen JTA-455


Summary of Contents for Jensen JTA-455
- Page 1 3-SPEED STEREO TURNTABLE WITH METAL TONE ARM AND BLUETOOTH TRANSMIT JTA-455 USER MANUAL PLEASE READ THIS USER MANUAL COMPLETELY BEFORE OPERATING THIS UNIT AND RETAIN THIS BOOKLET FOR FUTURE REFERENCE...
-
Page 2: Important Safety Instructions
WARNING TO PREVENT FIRE OR SHOCK HAZARD, DO NOT USE THIS PLUG WITH AN EXTENSION CORD, RECEPTACLE OR OTHER OUTLET UNLESS THE BLADES CAN BE FULLY INSERTED TO PREVENT BLADE EXPOSURE. TO PREVENT FIRE OR SHOCK HAZARD, DO NOT EXPOSE THIS APPLIANCE TO RAIN OR MOISTURE. The Caution Marking and Rating label are located at the bottom enclosure of the apparatus. - Page 3 17. Use replacement part as specified by the manufacturer. 18. Upon completion of any service or repairs to this product, ask the service technician to perform safety checks. 19. Power Sources - This product should be operated only from the type of power source indicated on the marking label.
-
Page 4: Compliance With Fcc Regulations
COMPLIANCE WITH FCC REGULATIONS FCC ID RQU-TT-933BPC This device complies with Part 15 of the FCC Rules. Operation is subject to the following two conditions: (1) this device may not cause harmful interference, and (2) this device must accept any interference received, including interference that may cause undesired operation. -
Page 5: Dear Jensen® Customer
The serial number of this product is found on its back cover. You should note the serial number of this unit in the space provided as a permanent record of your purchase to aid in identification in the event of theft of loss. Model Number: JTA-455 Serial Number: ____________________... -
Page 6: Accessories Included
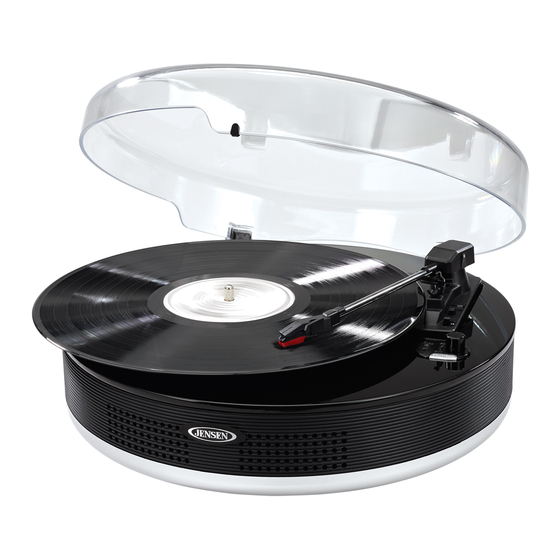
ACCESSORIES INCLUDED Application CD USB cable 45 RPM Record Adapter User Manual LOCATION OF CONTROLS 1 DUST COVER 2 ANTI-SHOCK LOCK DOWN SCREW 3 45 RPM ADAPTER 4 AUTO STOP SWITCH 5 33/45/78 RPM SPEED SELECTOR 6 POWER INDICATOR 7 POWER ON/OFF AND VOLUME CONTROL KNOB 8 BLUETOOTH BUTTON 9 BLUETOOTH LED INDICATOR... -
Page 7: Bluetooth Connection
JTA-455. The Bluetooth LED indicator (#9) will start slowly flashing (1 time/second), indicating the Bluetooth transmitter is now in searching/connecting mode. The JTA-455 will remain in this searching mode for around 30 seconds. If the JTA-455 Bluetooth transmitter cannot find any previously paired Bluetooth speakers, it will enter pairing mode and the Bluetooth LED indicator (#9) will begin flashing at a faster rate (2 times/second). -
Page 8: Aux-In Operation
1. Use an audio cable (not included) with one 3.5 mm stereo plug on each end of the cable. 2. Plug one end into the AUX IN JACK (#13) on the JTA-455 and the other end of the cable into the Line-out Jack or Headphone Jack of your external audio device. It will automatically switch the unit to AUX mode. - Page 9 INSTALL THE USB DRIVE 1. Use the included USB cable to connect the turntable to your computer. 2. Your computer will detect the JTA-455 as a “USB PnP Audio Device” & start to install USB drivers for it automatically. 3. Waiting for the installation complete until your computer shows a pop up a message that it is installed properly and ready to use.
- Page 10 3. Select “Edit” and then click “Audio Properties“ towards the bottom of the menu to select “Audio properties” interface. 4. In the Sound Recording field, click the pull down menu to select “USB PnP Audio Device” Default device sound recording. 5.
- Page 11 RUNNING AUDACITY SOFTWARE Note: Please review the software license and distribution restrictions found on the software disc. Use of the Audacity software is subject to those conditions and restriction. For additional help with recording and editing music by using the Audacity software, please visit http://audacity.sourceforge.net/ 1.
- Page 12 4. Adjust the input and output volume by sliding the Input and Output Volume bars. Output Volume Input Volume 5. Click the record button to start recording, left and right tracks will show on your computer screen. If you cannot see the sound waves appear on the Interface when recording, adjust the Input volume bar.
- Page 13 EXPORT THE MUSIC FILES TO WAV OR MP3 FORMAT Once you have finished recording, make sure you save your recorded music to the computer. 1. Click File menu and move down to “Export” to convert the file to WAV format or MP3 format.
-
Page 14: Care And Maintenance
Fig.2 CARE AND MAINTENANCE 1. Avoid operating your unit under direct sunlight or in hot, humid or dusty places. 2. Keep your unit away from heating appliances and sources of electrical noise such as fluorescent lamps or motors. 3. Unplug the unit from the electrical power outlet immediately in case of malfunction. CLEANING THE UNIT •... -
Page 15: Troubleshooting Guide
TROUBLESHOOTING GUIDE SHOULD YOU EXPERIENCE DIFFICULTIES IN THE USE OF THIS PLAYER PLEASE REFER TO THE FOLLOWING CHART OR CALL 1-800-777-5331 FOR CUSTOMER SERVICE. PROBLEM POSSIBLE CAUSE SOLUTION AC power cord is not plugged into a Plug the AC power cord into a wall wall outlet or the connector is not outlet and plug the connector into the plugged into the power supply jack... - Page 16 90 DAY LIMITED WARRANTY AND SERVICE VALID IN THE U.S.A. ONLY SPECTRA MERCHANDISING INTERNATIONAL, INC. warrants this unit to be free from defective materials or factory workmanship for a period of 90 days from the date of original customer purchase and provided the product is utilized within the U.S.A. This warranty is not assignable or transferable.
Need help?
Do you have a question about the JTA-455 and is the answer not in the manual?
Questions and answers