Table of Contents
Advertisement
www.cembre.com
Cembre S.p.A.
Cembre Ltd.
Via Serenissima, 9
Dunton Park
Kingsbury Road, Curdworth - Sutton Coldfield
25135 Brescia (Italia)
Telefono: 030 36921
West Midlands B76 9EB (Great Britain)
Telefax: 030 3365766
Tel.: 01675 470440 - Fax: 01675 470220
E-mail: sales@cembre.com
E-mail: sales@cembre.co.uk
www.cembre.it
www.cembre.co.uk
Cembre España S.L.
Cembre AS
Calle Verano, 6 y 8 - P.I. Las Monjas
Fossnes Senter
28850 Torrejón de Ardoz - Madrid (España)
N-3160 Stokke (Norway)
Teléfono: 91 4852580
Phone: (47) 33361765
Telefax: 91 4852581
Telefax: (47) 33361766
E-mail: sales@cembre.es
E-mail: sales@cembre.no
www.cembre.es
www.cembre.no
Cembre S.a.r.l.
22 Avenue Ferdinand de Lesseps
91420 Morangis (France)
Tél.: 01 60 49 11 90 - Fax: 01 60 49 29 10
B.P. 37 - 91421 Morangis Cédex
E-mail: info@cembre.fr
www.cembre.fr
Cembre GmbH
Cembre Inc.
Heidemannstraße 166
Raritan Center Business Park
80939 München (Deutschland)
181 Fieldcrest Avenue
Telefon: 089/3580676
Edison, New Jersey 08837 (USA)
Telefax: 089/35806777
Tel.: (732) 225-7415 - Fax: (732) 225-7414
E-mail: sales@cembre.de
E-mail: Sales.US@cembreinc.com
20
www.cembre.de
www.cembreinc.com
Certified Quality
Certified Environmental
Management System
Management System
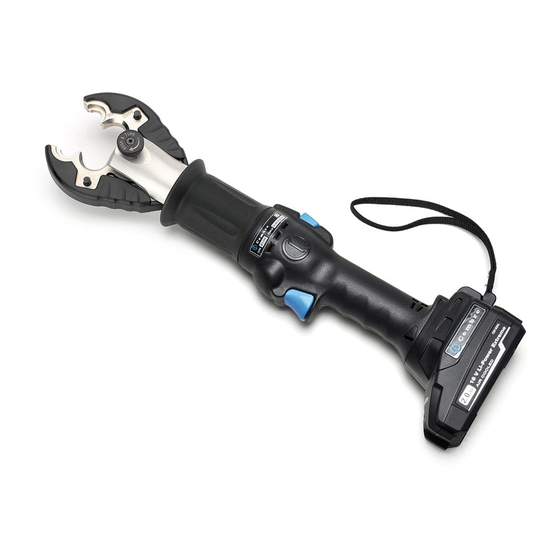
BATTERY OPERATED
HYDRAULIC CRIMPING TOOL
B54N-YD6
B54N-YD6-8
B54N-YK
OPERATION AND MAINTENANCE
MANUAL
1
13 M 160 U
13 M 160 U
ENGLISH
Certified Occupational
Health & Safety
Management System
PING TOOL
Advertisement
Table of Contents

Related Manuals for Cembre B54N-YD6


Summary of Contents for Cembre B54N-YD6
- Page 1 B.P. 37 - 91421 Morangis Cédex E-mail: sales@cembre.com E-mail: sales@cembre.co.uk E-mail: info@cembre.fr OPERATION AND MAINTENANCE www.cembre.it www.cembre.co.uk www.cembre.fr Cembre España S.L. Cembre AS Cembre GmbH Cembre Inc. MANUAL Calle Verano, 6 y 8 - P.I. Las Monjas Fossnes Senter Heidemannstraße 166 Raritan Center Business Park 28850 Torrejón de Ardoz - Madrid (España)
- Page 2 WARNING Before using the tool, carefully read the instructions in this manual. When operating the tool, keep hands away from the danger zone. See page 9. Do not short circuit the batteries. CDD6-8 jaw Do not destroy battery by fi re. Do not expose battery to water or rain.
- Page 3 TABLE 3 (JAW) Code N° Item DESCRIPTION B54N-YD6 54N-YD6 with D3 groove to accept h D3 groove to accept all "W" style crimping dies Ø + "BG" fi xed groove BG" fi xed groove CDD6 CDD6-8 CDK B54N-YD6-8 54N-YD6-8 with D3 groove to accept h D3 groove to accept all "W"...
-
Page 4: General Characteristics
BATTERY OPERATED HYDRAULIC CRIMPING TOOL TABLE 2 (ITEM 10) 1. GENERAL CHARACTERISTICS B54N-YD6 B54N-YD6-8 B54N-YK TOOL TYPE: Application range: suitable for installing electrical compression connectors for conductors up to 150 mm (300 MCM) Crimping force kN (sh ton): 54 (6) - Page 5 2. INSTRUCTIONS FOR USE The tool is equipped with automatic return of the dies once the crimping operation is com- pleted. The interchangeable crimping jaws have thermoplastic rubber covers on outside edges. Residual battery capacity level is automatically displayed after every cycle. The part reference “B54...”...
-
Page 6: Head Rotation
2.3) Compression TABLE 2 (ITEM 10 IN TABLE 1) Insert the conductor in the connector and press the operating button (3): the ram will gradually move forward until the two dies touch. It is recommended to keep operating until the maxi- mum pressure valve is activated and a "click"... - Page 7 TABLE 2 (ITEM 10 IN TABLE 1) 2.8) Crimping die assembles 2.8.1) Use of ”W” style crimping dies (B54N-YD6, B54N-YD6-8 tools) – Press pins (2) and insert “W” dies into their seats (see Fig. 4A). – To disassemble them simply press the pins and slip them from the jaws.
- Page 8 2.9) Jaw replacement Each tool is supplied with relevant jaws (see § 1). Jaws can also be supplied separately, for replacement pro- ceed as follows: – Push and turn clockwise the locking pin (9) so that the jaws are released. –...
-
Page 9: Using The Battery Charger
3.1) Using the battery charger TABLE 1 Carefully follow the instructions in the battery charger manual. 3.2) General information on how to use batteries In order to maximise battery life, please follow these rules: – Use the battery until the automatic residual energy display still has 1-2 LEDs showing: this means the battery is almost completely discharged and no loss in the life of the battery has been caused. -
Page 10: Spare Parts List
In the case of a breakdown contact our Area Agent who will advise you on the problem INTERCHANGEABLE CRIMPING JAWS and give you the necessary instructions on how to dispatch the tool to our nearest service Centre; if possible, attach a copy of the Test Certifi cate supplied by Cembre together with JAW TYPE GROOVES...
Need help?
Do you have a question about the B54N-YD6 and is the answer not in the manual?
Questions and answers