Avaya T3 Basic Operating Instructions Manual
Hide thumbs
Also See for T3 Basic:
- Operating instructions manual (184 pages) ,
- User manual (142 pages) ,
- Service manual (73 pages)
Table of Contents
Advertisement
Available languages
Available languages
Advertisement
Chapters
Table of Contents

Related Manuals for Avaya T3 Basic


Summary of Contents for Avaya T3 Basic
- Page 1 IP Telephony Contact Centers Mobility T3 Basic – Analog Phone Services Bedienungsanleitung Operating Instructions Notice d’utilisation Istruzioni d’uso Manual de manejo Bedieningshandleiding Руководство пользователя...
-
Page 2: Table Of Contents
Contents Important Information ..........Familiarizing Yourself with the Telephone Your Telephone at a Glance . -
Page 3: Important Information
Tenovis. It must not be connected directly to a public telephone network. Declaration of Conformity We, Avaya−Tenovis GmbH & Co. KG, declare that the T3 Basic telephone fulfills the basic requirements and other relevant provisions stipulated in the Directive 1999/5/EU (Radio and Telecommunication Terminal Equipment, R&TTE). - Page 4 Important Information Continued Material supplied Check that all the parts are enclosed after opening the package. It contains: − a telephone base − a receiver − a coiled cord for the receiver − a telephone line connection cable (UAE) − this instruction manual Notes on disposal he implementation of European law in national laws and directives obliges you to dispose of consumer goods appropriately.
-
Page 5: Familiarizing Yourself With The Telephone
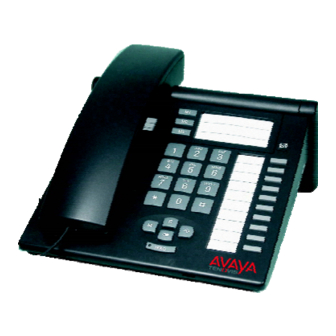
Familiarizing Yourself with the Telephone Your Telephone at a Glance Receiver hook One−touch (for wall installation) dialling keys Call indicator message waiting indication Labels for emergency numbers Flash time Ringing volume Indicator lamp Ringing muting function melody active Function keys for direct access to Digit keys with letters certain functions... -
Page 6: All Keys At A Glance
Familiarizing Yourself with the Telephone All Keys at a Glance Digit keys with letters: To dial phone numbers and enter letters/characters. Star and Hash: For special functions. Muting function: Switches off the microphone during a call so that the caller can no longer hear you. -
Page 7: Starting Up
Familiarizing Yourself with the Telephone Starting Up Connecting the telephone The telephone can be connected in just a few steps. It is then immediately ready to be used. Connecting the receiver and telephone with the coiled cord At the bottom end of the receiver: Insert the plug at the short end of the coiled receiver cable in the socket. -
Page 8: Connecting The Telephone To The Telephone Line Cable
Familiarizing Yourself with the Telephone Starting Up Continued Connecting the telephone to the telephone line cable Connect a plug at the end of the telephone line cable in socket 2. Then press the cable in the guide. Insert the plug at the other end of the telephone line cable in the wall socket / UAE. Setting the callback function (Flash time) Set the sliding switch at the side of the telephone to the “100 ms”... -
Page 9: Telephoning
Telephoning Telephoning as Normal Taking calls The telephone rings as soon as a call is received. The call can be taken by lifting the receiver. Incoming calls are also indicated by a flashing lamp (below the symbol). Making calls Lift the receiver and wait for the dialling tine. Dial the phone number you require. -
Page 10: Callback And Transferring Calls
Telephoning Telephoning as Normal Continued Callback and transferring calls Depending on the telephone line connection, it is possible to put a call in progress on hold to consult another subscriber or transfer the call to another subscriber. Also refer to the operating instructions for your telephone system. You are in the middle of a call. -
Page 11: Convenience And Special Functions
Telephoning Convenience and Special Functions One−touch dialling The telephone is equipped with 13 one−touch dialling memories ( ) in which to store frequently used phone numbers. You only then need to press the respective key to dial the phone number assigned to it. Storing and modifying one−touch dialling phone numbers Lift the receiver and wait for the dialling tine. -
Page 12: Ringing Tone
Telephoning Ringing Tone Setting the ringing tone volume The telephone has three different volume levels for the ringing tone (low/mid/high). Adjust the volume setting to the one required by means of the sliding switch at the side of the telephone. Setting the ringing melody The telephone has three different ringing melodies available for selection. -
Page 13: Refer Below As Necessary
Red LED lights up The a/b connection wires The a/b wires in the UAE continuously when in on the telephone line must be changed over. Standby. connection have been Please contact the Avaya− mistakenly swapped Tenovis Service department. over. -
Page 14: Index
Refer below as necessary Index Callback, 25 Callback function, 23 Faults, 28 Flash time, 23 Function keys, 20 Labels, 20, 23 Material supplied, 19 Message waiting indication, 20 Outside line, 24, 28 Receiver hook, 20 Redialling, 24 Ringing melody, 27 Ringing tone volume, 27 Starting up, 22 Telephone... - Page 15 Содержание Познакомьтесь с Вашим телефоном Внешний вид телефона ..........88 Обзор...
-
Page 16: Внешний Вид Телефона
Внешний вид телефона Фиксатор трубки (для инсталляции на стену) Клавиши прямого набора Индикатор вызова или сообщения на голосовом сервере Этикетки для экстренных номеров Уровень громкости звонка Мелодия звонка Длительность импульса Клавиша Индикатор удержания отключения повторного Цифровые клавиши с буквами для набора микрофона... -
Page 17: Обзор Всех Клавиш
Обзор всех клавиш Цифровые клавиши с буквами: для набора номера и ввода букв/символов. «Звезда» и «решётка»: для специальных функций. Выключение микрофона: выключает микрофон во время разговора, если вы не хотите, чтобы Вас слышали. Повторный набор: повтор последнего набранного номера, включая использованные... -
Page 18: Включение
Включение Подключение телефона Телефон подключается в несколько шагов. После этого он немедленно готов к работе. Подключение трубки к телефону Включите витой кабель стороной с коротким участком до вилки в разъём на нижней части трубки, а стороной с длинным участком – в разъём 1 на нижней крышке... -
Page 19: Подключение Линейного Кабеля К Телефону
Включение продолжение Подключение линейного кабеля к телефону Включите вилку линейного кабеля в розетку 2 на нижней крышке телефонного аппарата. Затем уложите кабель в кабельный канал крышки телефона. Включите другой конец кабеля в настенную розетку UAE. Настройка функции обратного вызова (Flash) Установите... -
Page 20: Работа В Нормальном Режиме
Работа в нормальном режиме Приём вызова При поступлении вызова телефон звонит. Вызов принимается поднятием трубки. Входящие вызовы индицируются также миганием светодиода Исходящий вызов Снимите трубку и дождитесь сигнала готовности станции. Наберите телефонный номер, используя клавиши 0..9. По окончании разговора положите трубку на рычаг. Повторный... -
Page 21: Расширенные Функции
Расширенные функции Набор одной клавишей Телефон оборудован 13 клавишами прямого набора и и , память которых содержит используемые телефонные номера. Для набора номера вы должны только нажать кнопку, в память которой этот номер занесён. Запись и изменение телефонных номеров на клавишах прямого... -
Page 22: Уровень И Мелодия Звонка
Уровень и мелодия звонка Установка уровня громкости звонка Аппарат имеет три различных уровня громкости звонка (низкий/средний/высокий). Регулировка уровня производится перемещением переключателя на правой боковой панели аппарата. Установка мелодии звонка Аппарат имеет возможность выбора трёх различных мелодий звонка. Выбор мелодии производится перемещением переключателя на... -
Page 23: Возможные Неисправности
целевых кнопок. Используя ползунок переключателя на боковой Некорректно время Не работает панели, настройте таймер Flash. клавиша Flash. Поменять провода Постоянно горит Неверная полярность телефонной линии в розетке красный индикатор. подключения UAE. Пожалуйста, телефонной линии. обратитесь в сервисный центр Avaya− Tenovis. - Page 24 0 800 266 - 12 19 © 2005 All rights reserved for Avaya Inc. and Tenovis GmbH & Co. KG. kundendialog-center @ avaya.tenovis.com 4.999.103.953 · 1.0 / 0705 · T3 Basic · de · gb · fr · it · es · nl avaya.tenovis.de...
Need help?
Do you have a question about the T3 Basic and is the answer not in the manual?
Questions and answers