Advertisement
Available languages
Available languages
Owner's Manual
4015-2 Yanokuchi, Inagi-city, Tokyo 206-0812 Japan
2005 KORG INC.
Printed in China
Thank you for purchasing the Korg DIGITAL TUNER
METRONOME TM-40.
Precautions
Location
Using the unit in the following locations can result in a malfunction.
• In direct sunlight
• Locations of extreme temperature or humidity
• Excessively dusty or dirty locations
• Locations of excessive vibration
• Close to magnetic fields
Power supply
Be sure to turn the power switch to OFF when the unit is not in use.
Remove the battery in order to prevent it from leaking when the unit
is not in use for extended periods.
Interference with other electrical devices
Radios and televisions placed nearby may experience reception
interference. Operate this unit at a suitable distance from radios and
televisions.
Handling
To avoid breakage, do not apply excessive force to the switches or
controls.
Care
If the exterior becomes dirty, wipe it with a clean, dry cloth. Do not
use liquid cleaners such as benzene or thinner, or cleaning com-
pounds or flammable polishes.
Keep this manual
After reading this manual, please keep it for later reference.
Keeping foreign matter out of your equipment
Never set any container with liquid in it near this equipment. If liquid
gets into the equipment, it could cause a breakdown, fire, or
electrical shock. Be careful not to let metal objects get into the
equipment.
THE FCC REGULATION WARNING (for U.S.A.)
This equipment has been tested and found to comply with the
limits for a Class B digital device, pursuant to Part 15 of the FCC
Rules. These limits are designed to provide reasonable protection
against harmful interference in a residential installation. This
equipment generates, uses, and can radiate radio frequency
energy and, if not installed and used in accordance with the
instructions, may cause harmful interference to radio communica-
tions. However, there is no guarantee that interference will not
occur in a particular installation. If this equipment does cause
harmful interference to radio or television reception, which can be
determined by turning the equipment off and on, the user is
encouraged to try to correct the interference by one or more of
the following measures:
• Reorient or relocate the receiving antenna.
• Increase the separation between the equipment and receiver.
• Connect the equipment into an outlet on a circuit different
from that to which the receiver is connected.
• Consult the dealer or an experienced radio/TV technician for
help.
Unauthorized changes or modification to this system can void the
user's authority to operate this equipment.
CE mark for European Harmonized Standards
CE mark which is attached to our company's products of AC
mains operated apparatus until December 31, 1996 means it
conforms to EMC Directive (89/336/EEC) and CE mark Directive
(93/68/EEC).
And, CE mark which is attached after January 1, 1997 means it
conforms to EMC Directive (89/336/EEC), CE mark Directive (93/
68/EEC) and Low Voltage Directive (73/23/EEC).
Also, CE mark which is attached to our company's products of
Battery operated apparatus means it conforms to EMC Directive
(89/336/EEC) and CE mark Directive (93/68/EEC).
IMPORTANT NOTICE TO CONSUMERS
This product has been manufactured according to strict specifica-
tions and voltage requirements that are applicable in the country
in which it is intended that this product should be used. If you
have purchased this product via the internet, through mail order,
and/or via a telephone sale, you must verify that this product is
intended to be used in the country in which you reside.
WARNING: Use of this product in any country other than that for
which it is intended could be dangerous and could invalidate the
manufacturer's or distributor's warranty.
Please also retain your receipt as proof of purchase otherwise
your product may be disqualified from the manufacturer's or
distributor's warranty.
Main features
The TM-40 tuner metronome allows you tune your instrument
using the internal mic or by connecting to the TM-40's INPUT jack.
Additionally, you can use the metronome for practicing as well as
operate the tuner and metronome either separately or simulta-
neously.
Installing batteries
1
Slide the battery compartment cover in the direction of the
arrow located on the back of the TM-40, and remove it.
2
Insert batteries, making sure to observe the correct polarity.
If the unit malfunctions try removing and then reinstalling the
batteries.
The included batteries are for the purpose of verifying
operation; they may have a shorter lifespan than normal.
When the batteries run down, a
battery symbol will appear in the
left of the display. When this
occurs, replace the batteries.
Using the stand
You can use the stand provided on the back of the TM-40 to tilt it
back at an angle for easy viewing.
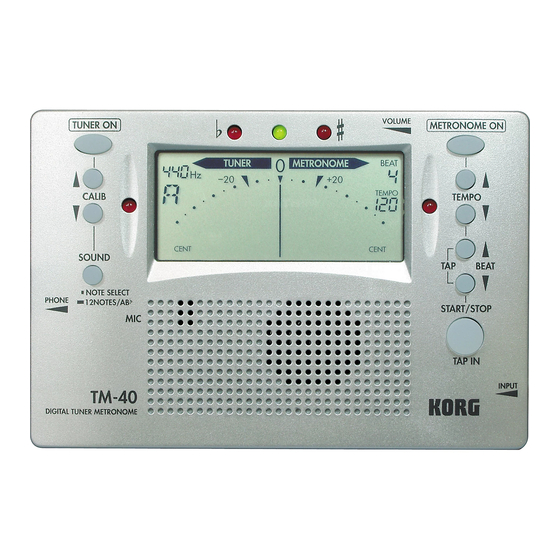
Parts of the TM-40
Volume
[TUNER ON] switch
[METRONOME ON] switch
Tuning Guide
TEMPO [▲], [▼] switches
CALIB [▲], [▼] switches
[SOUND] switch
PHONE jack
INPUT jack
Mic
BEAT/TAP [▲], [▼] switches
[START/STOP–TAP IN] switch
Turning the power on/off
To turn the power on
Press either the [TUNER ON] switch or the [METRONOME ON]
switch and the power will turn on.
When you press the [TUNER ON] switch, the TM-40 will enter
Meter mode, and the tuning meter will appear in the display.
The upper part of the display will indicate "TUNER."
When you press the [METRONOME ON] switch, the TM-40 will
enter Beat mode, and the metronome pendulum will appear in
the display. The upper part of the display will indicate "MET-
RONOME."
The TM-40 lets you use the tuner and metronome simulta-
neously by simply turning on both power switches.
To turn the power off
The power will turn off when both the tuner and metronome are
turned off.
Turning the tuner off
When the tuner is operating, press the [TUNER ON] switch to
turn off the tuner. The tuner will also turn off automatically if
not in use for twenty minutes.
Turning off the metronome
When the metronome is operating, press the [METRONOME
ON] switch to turn off the metronome. The metronome will also
turn off automatically if not in use for twenty minutes.
Connections
If you want to connect an instrument or contact mic etc.
If you want to tune an instrument with a pickup, such as an
electric guitar, connect a cable to your instrument, and plug the
cable into the TM-40's INPUT jack.
If you want to tune your instrument using a separately sold
Korg CM-100 contact mic, plug the contact mic into the TM-40's
INPUT jack.
If you want to tune without making any connections, you can do
so by using the internal mic.
The INPUT jack is only for a 1/4"mono cable. Stereo (TRS)
cables cannot be used.
Connecting earphones
You can connect 1/8" mini-plug earphones to the PHONE jack.
When plugged in, no sound will be heard from the speaker.
Use the volume control to adjust the volume of the earphones.
Using the tuner
Tuning while watching the meter (Meter mode)
1
Connect your instrument cable or contact mic to the TM-40's
INPUT jack.
If you want to use the internal mic, don't plug anything into
the INPUT jack. The internal mic can't be used when a plug
is connected to the INPUT jack.
2
Press the [TUNER ON] switch.
You will enter the Meter mode, and the tuning meter will appear
in the display. The upper part of the display will indicate
"TUNER," and the most recently specified calibration (reference
pitch) is shown at the left.
Advertisement
Table of Contents

Related Manuals for Korg TM-40


Summary of Contents for Korg TM-40
- Page 1 If the unit malfunctions try removing and then reinstalling the batteries. IMPORTANT NOTICE TO CONSUMERS You can use the stand provided on the back of the TM-40 to tilt it back at an angle for easy viewing. CALIB [▲], [▼] switches...
-
Page 2: Using The Tuner And Metronome Simultaneously
Default values: Tempo = 120, Time signature = four beats, Tempo setting type = PENDULUM STEP * Even if the pitch is within the range of detection, the TM-40 may be unable to detect the pitch if the sound contains numerous overtones (such as the low and high notes on an acoustic piano) or if the instrument has a rapid decay. - Page 3 à l'aide du microphone interne ou en le branchant sur la conséquent souffrir d’interférences à la réception. Veuillez dès lors prise INPUT du TM-40. De plus, vous pouvez utiliser le métronome faire fonctionner cet appareil à une distance raisonnable de postes pour vous entraîner et faire fonctionner l'accordeur et le métro-...
-
Page 4: Utilisation Du Métronome
* Même si la hauteur du son se trouve à l'intérieur de la plage de détection, il est possible que le TM-40 n'arrive pas à détecter la note si de nombreux sons harmoniques sont présents (comme des notes basses ou élevées sur un piano acoustique) ou si le decay de votre instrument est important. - Page 5 Mikrofon oder durch Anschluss an die INPUT- oder Fernsehgeräten Empfangsstörungen hervorrufen. Betreiben Buchse des TM-40 zu stimmen. Außerdem können Sie das Metro- Sie solche Geräte nur in einem geeigneten Abstand von diesem nom zum Üben verwenden, oder auch das Stimmgerät und das Erzeugnis.
-
Page 6: Verwenden Des Metronoms
So stellen Sie die Kalibrierung ein: CALIB [▲] oder [▼] Tempoeinstellungstyp = PENDEL-METRONOM SCHRITT * Auch wenn die Tonhöhe innerhalb des Erkennungsbereichs ist, kann das TM-40 nicht in der Lage sein, die Tonhöhe zu erkennen, wenn der Klang zahlreiche Obertöne (z.B. die niedrigen oder hohen Noten auf einem akustischen Klavier) hat oder das Instrument sehr schnelles Abklingen aufweist.
Need help?
Do you have a question about the TM-40 and is the answer not in the manual?
Questions and answers