Table of Contents
Advertisement
TheGigRig Pro 14
1.
2.
3.
4.
5.
6.
7.
8.
9.
10.
11.
12.
13.
14.
15.
16.
All rights reserved. Design rights claimed. Moral rights asserted. © May 2008
Introduction
Main Diagram
Quick Start
1.
3. Remote Switch 1 (normally closed)
4. Remote Switch 2 (normally open)
5. Output 1 Mute
6. Output 2 Mute
Aux. Out
Special Features
The Isolated Output (Out 2)
F.A.Q's (Frequently Asked Questions)
Safety
Thank you
Technical
The GigRig ltd Jan 2009
©
TM
Manual
Page 1
Advertisement
Table of Contents

Related Manuals for The GigRig Pro 14


Summary of Contents for The GigRig Pro 14
- Page 1 The GigRig ltd Jan 2009 © TheGigRig Pro 14 Manual Introduction Main Diagram Quick Start Effects Loops Control Functions: Post Volume 2. Pre Amp and Buffer 3. Remote Switch 1 (normally closed) 4. Remote Switch 2 (normally open) 5. Output 1 Mute 6.
- Page 2 The GigRig ltd Jan 2009 © 1. Introduction I would personally like to thank you for purchasing TheGigRig Pro 14 and would also like to congratulate you on having such great taste! TheGigRig Pro 14 is the ultimate floor based dynamic audio switcher/guitar, effects and amp management system.
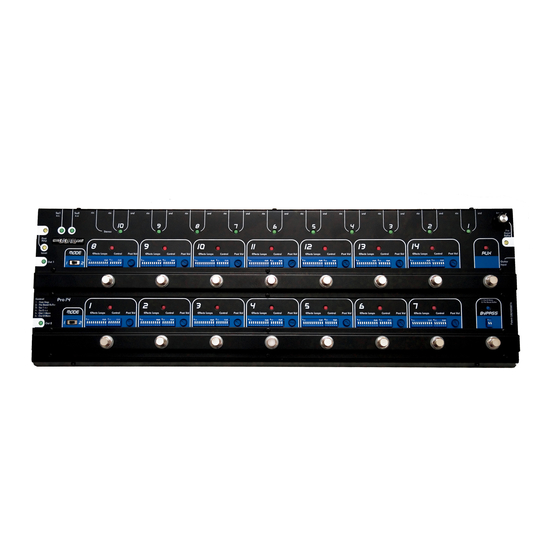
- Page 3 The GigRig ltd Jan 2009 © 2. TheGigRig Main Diagram 1. Strong metal housing (lid and tray construction) 2. Foot switch (16 strong foot or hand operated switches) 3. Control mini switches (10 mini switches) Replaceable. 4. Effects loops mini switches (6 mini switches) Replaceable.
- Page 4 The GigRig ltd Jan 2009 © 3. TheGigRig Pro-14 Quick Start Using TheGigRig couldn’t be easier. First, connect your Pro-14 to your amplifier before applying power. TheGigRig can supply power to your 9V effects pedals. See (24) above, 9V out.
- Page 5 The GigRig ltd Jan 2009 © When you step on the foot switch shown, effects loops 2, 6 and 10 will be ‘on’ as well as the pre-buffer function and output 1 will be muted. Remember, this is just a quick start guide. Because there are so many fantastic ways to use TheGigRig Pro-14 we suggest that you take the time to read through the manual and F.A Q.s.
- Page 6 The GigRig ltd Jan 2009 © 4. Effects Loops At the heart of the Pro-14’s unique audio switching capabilities are the 10 effects loops located on the back of unit. Each of these effects loops has a send (snd) and a return (rtn) except for loop 10 which has 2 returns for stereo effects.
- Page 7 For example, an acoustic guitar could be plugged into the RETURN of effects loop 1 and switch in or out using the GigRig. You can also use the isolated output 2 to send your acoustic directly into the P.A. without introducing hum.
-
Page 8: Control Functions
The GigRig ltd Jan 2009 © 5. Control Functions TheGigRig Pro-14’s unique control functions make it both powerful and flexible. Each of the 14 pre-sets has a row of six mini switches, which operate the control functions. These are: 1. Post Effect Loop Volume 2. - Page 9 The GigRig ltd Jan 2009 © Vintage fuzz’s and Treble Boosters can sound awful if they receive Buffered inputs; however, a buffer can improve the tone of some effects, not to mention driving the long cable between the Pro-14 and the amplifier.
- Page 10 The GigRig ltd Jan 2009 © 6. Mode Switches Both rails on TheGigRig Pro 14 have their own mode switches. The mode switch governs how each particular rail will function. Mode 1 is Single mode. When both rails are in single mode, only one pre-set can be activated at any one time.
- Page 11 Note, If the Aux out is used to drive a third amplifier, you may need an external ground isolation device to reduce hum. See the GigRig humdinger for a safe solution to Amp grounding and hum reduction.
- Page 12 True Bypass, buffered or gain, it’s completely up to you. 3. SW1 When this switch is on the GigRig Foot switch controller SW1 will be activated. For example this can be used to set a channel on your amplifier for your bypass sound etc.
-
Page 13: Special Functions
The GigRig ltd Jan 2009 © 9. Special Functions A range of special functions for the adventurous guitarist. Set the mode switch to 1 and hold down a foot switch for over 3 seconds to access the following special functions:... - Page 14 The GigRig ltd Jan 2009 © Hold down for 3 seconds to switch all pre-sets on the bottom bank to ‘on’. Tip. This is a useful test mode. When selected check to see that only the green output LEDs that have effects plugged in are ‘on’. Do the same using switch 13 for the top bank;...
- Page 15 Hold down for 3 seconds or above to enable the pop gate feature on the top bank. The GigRig will now mute out pops and clicks from old high gain your effects pedal when they are selected and de selected.
- Page 16 GigRig. The special functions will be defeated on the chosen rail. You can hold down both 1 and 8 together at power up to defeat all special functions. Powering the GigRig in the normal manner will return the GigRig to normal functionality with Special functions activated. Mixer Mode (bypass off) Access mixing mode by holding down the bypass switch when powering up your GigRig, then switch the top mode switch to mode2.
- Page 17 Using two amplifiers has always been an issue, because they both MUST be connected to mains ground. The GigRig Pro 14 has a very special output for your second amplifier, or any other earthed equipment. Only use output 2 when you have already used output 1. Now, Output 2 will not only prevent hum it will also give you, and your equipment, protection from over 1000V from front of house or other equipment mains faults.
- Page 18 1, to select the effects pedal combination for your sound. You can separate the two banks, top rail and bottom rail of the GigRig by simply inserting a shorted 3mm jack plug (connect both wires together) into any EXT input.
-
Page 19: Power Supply
The GigRig ltd Jan 2009 © 12. Power Supply Before powering TheGigRig, connect the output(s) to your amplifier(s) first. This prevents the buzz and thud sounds. It is not necessary to power down the TheGigRig when installing or removing new effects pedals; simply select bypass for silent installation. - Page 20 The GigRig ltd Jan 2009 © 13. FAQ’S We are constantly updating the FAQ’s on the website. Make sure you check it out. Here are just a few Q. What’s the best order to put my effects in A. The order that you place your effects makes a dramatic difference to your guitar sound.
- Page 21 The GigRig ltd Jan 2009 © Q. How do I justify buying TheGigRig Pro-14 to my partner? This is a very important question; every guitarist with a partner will know what I’m talking about. The tonal advantages that TheGigRig Pro-14 gives you must be heard to be believed and the amount of control it offers you is staggering;...
-
Page 22: Important Safety Information
Products now exist to safely solve hum problems associated with your amps. See our website. Amplifiers fitted with a ground switch. Under no circumstances should the GigRig be used with this type of amplifier. Some vintage amplifiers where fitted with a Ground switch to break earth loops and reduce hum. - Page 23 Opening the unit: Remove the Pre amp volume control before opening the unit! (The Warranty on a GigRig is not affected by opening this unit. The GigRig is designed for easy repaired and maintenance by any competent technician). Bypass mode: True bypass;...
- Page 24 The GigRig ltd Jan 2009 © Gain >X1 Attenuation - 60 dB Bandwidth 40 Hz to 50 kHz Flatness Flat to 30 kHz (studio quality) Transient response Dam fast op-amp Distortion Signal level dependent 2% Input impedance of pre-amp 500k Ohm...
- Page 25 Warranty: TheGigRig is covered by a standard warranty of one year from the purchase date; however, The GigRig Ltd will abide by the warranty period for electrical and electronic equipment stated within your country. (We support our customers, not just our products.) Disposal: TheGigRig contains no batteries or Lead.
Need help?
Do you have a question about the Pro 14 and is the answer not in the manual?
Questions and answers