
Related Manuals for Cocoon IT214054


Summary of Contents for Cocoon IT214054
- Page 1 WIRELESS ALARM KIT COMPLETE ALARM SYSTEM FOR HOME OR BUSINESS Model Number: IT214054 INSTRUCTION MANUAL...
-
Page 2: General Safety Instructions/Warranty/Support
For additional support including helpful guides and videos, visit the Cocoon support website at www.winplus.com.au/cocoon.html... -
Page 3: Product Specification
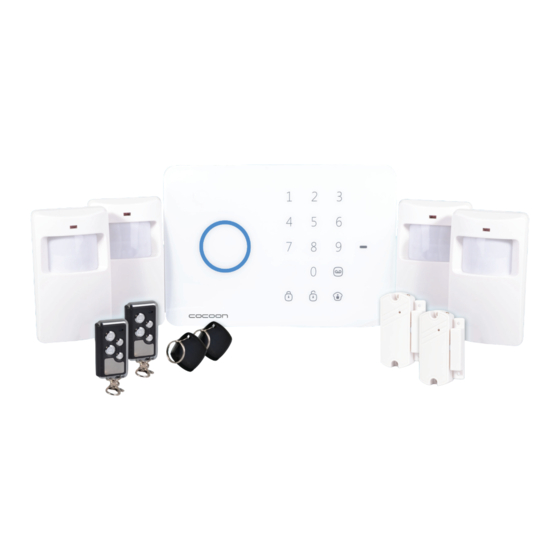
Product Specifications PArTs LisT: TEChniCAL sPECiFiCATiOns: Control Panel • 1 x Control Panel • 4 x PIR (passive infrared) Motion Sensors Power Supply: DC12V, 1000mA – Only use • 2 x Door / Window Sensors the power adaptor provided • 2 x Swipe Tags Backup Battery: 2x 3.7V, 850mAh Li-Ion • 2 x Keychain Remote Controls Internal Siren: 110dB... -
Page 4: Panel Layout
Panel Layout - Front sTATus indiCATOr TOuCh KEyPAd disArM hOME MOdE sWiPE rEAdEr/PLAy rECOrd VOiCE VOiCE MEMO MEMO After Sales Support Telephone: 1300 663 907 Internet: www.winplus.com.au... - Page 5 Panel Layout - Back TAMPEr LOud MiCrOPhOnE sWiTCh sPEAKEr BACK-uP BATTEriEs After Sales Support Telephone: 1300 663 907 Internet: www.winplus.com.au...
-
Page 6: Table Of Contents
Contents General safety instructions/Warranty/support Product specification Panel Layout Getting started installing your Alarm Installing the Control Panel Wall Mounting Stand Mounting Configuring your Alarm Setting Your Pin Armed Mode / Disarmed Mode / Home Mode Activating Swipe Tags Disarm with Swipe Tags Remote Control Voice Memos Accessories... -
Page 7: Getting Started
Getting Started 1. UNPACK Unpack the Cocoon Wireless Alarm Kit from the packaging and check you have all components. • 2 x Security Stickers • 1 x Control Panel (Batteries Incl.) • 2 x Swipe Tags • 1 x Power Adaptor (Batteries Incl.) -
Page 8: Arming The Alarm
Getting Started 6. PAiriNg the SwiPe tAgS A. Repeat step 4 then hold the Swipe Tag over the circle on the Control Panel B. The Control Panel will beep twice indicating it has paired successfully 7. PAiriNg the Pir SeNSor A. -
Page 9: Installing Your Alarm
Control Panel. WALL MOunTinG The Cocoon Wireless Alarm Kit Control Panel can be mounted on a wall for easy access. Remove the Control Panel and the Wall Mounting Plate from the packaging. -
Page 10: Stand Mounting
sTAnd MOunTinG If you do not wish to attach the Control Panel to a wall, you can use the stand mount. Remove the Control Panel, Wall Mounting Plate and the stand arm from the packaging. With the Wall Mounting Plate removed, slide the notched end of the stand arm into the slot at the top of the Control Panel. -
Page 11: Armed Mode / Disarmed Mode / Home Mode
ArMEd MOdE / disArMEd MOdE / hOME MOdE There are 3 modes available for the Cocoon Wireless Alarm System. Armed Mode All sensors are actively monitoring activity in your home. Once a sensor is triggered, the alarm will sound. Press the button to enter Armed Mode. -
Page 12: Activating Swipe Tags
ACTiVATinG sWiPE TAGs The Cocoon Wireless Alarm System comes with 2 Swipe Tags for easy disarming of the Control Panel. To pair the Swipe Tag to the Control Panel, enter your PIN (Default: 1234), then press the button. Within 15 seconds, place your Swipe Tag against the blue LED circle on the Control Panel. -
Page 13: Remote Control
COnTrOL The Cocoon Wireless Alarm System comes with 2 keychain remote controls for easy arming/ disarming of the Control Panel. Activating remote Controls To pair the remote control to the Control Panel, enter your PIN (Default: 1234), then press button. -
Page 14: Voice Memos
VOiCE MEMOs The Cocoon Wireless Alarm Kit features a voice memo function to leave a voice message for the next person to access the panel. Press to record a voice message up to 10 seconds in length. When you have finished recording your voice message, press to end recording. -
Page 15: Accessories
Accessories Pir sEnsOrs The Cocoon Wireless Alarm Kit comes with 4 x Passive Infrared (PIR) Sensors. These sensors detect movement by measuring changes in infrared energy levels caused by movement of an intruder within the field of vision. LEd indicators... -
Page 16: Pairing The Pir To Control Panel
Pairing the Pir to Control Panel To pair the PIR motion sensor to the Control Panel: Enter your PIN then press the button. Within 15 seconds, wave your hand in front of the sensor to trigger the PIR motion sensor. (The PIR motion sensor’s LED light will flash). The Control Panel will beep to indicate the PIR motion sensor is now registered to the Control Panel. -
Page 17: Mounting Location
Mounting Location When choosing a location to mount the PIR motion sensors, the below should be taken into consideration: • Mount the PIR motion sensor in a location which an intruder is likely to walk past. • Mount the PIR motion sensor in the corner of a room to maximize the sensor coverage, ideally at a height of 2m. -
Page 18: Mounting & Installation Instructions
Mounting & installation instructions: The Cocoon Wireless Alarm Kit includes mounting accessories for your PIR sensors. Choose a location for your PIR sensor. An ideal location is one that an intruder is likely to walk past. Determine installation height for the bracket to change the detection distance and angle. -
Page 19: Door / Window Sensor
/ WindOW sEnsOr The Cocoon Wireless Alarm kit comes with 2 entry contact sensors. These can be installed on doors, windows, drawers or any other object that opens/closes. The sensor will transmit a signal to the Control Panel when the magnet mounted near the sensor is moved away. -
Page 20: Pairing The Door / Window Sensor To The Control Panel
Pairing the door / Window sensor to the Control Panel Enter your PIN then press the button. Within 15 seconds, trigger the Door / Window Sensor, by separating the magnet from the sensor (the Door / Window Sensor’s LED light will flash). The Control Panel will beep to indicate the Door / Window Sensor is now registered to the Control Panel. -
Page 21: Mounting Instructions
Mounting instructions Open the battery compartment on the side of the Door/window sensor, and insert the 23A 12V battery Use the double sided tape provided to mount the sensor on the door frame and the magnet on the door. Make sure the magnet is on the correct side of the transmitter as shown in the diagram. -
Page 22: Advanced Settings
Advanced Settings WirEd inPuTs The Wireless Alarm System supports extra sensors such as smoke or gas detectors to be wired into the system, these operate in an always-on mode, regardless of the Armed or Disarmed mode on the Control Panel. A wired siren and an electronically controlled lock may be added to the system too, (these are not included and need to be purchased separately). -
Page 23: Changing Sensor Operating Modes
ChAnGinG sEnsOr OPErATinG MOdEs Each of the PIR motion and door / window sensors can be set to one of 4 modes, by rearranging the jumpers supplied inside the product housing. door / Window sensor: Default ‘Single Delay Mode’ Pir sensor: Default ‘Home Mode’ COnTrOL PAnEL sETTinG MOdE nAME disArMEd... -
Page 24: To Change The Operating Mode
To change the operating mode: Each PIR or Door / Window Sensor can be programmed to the operating modes on page 23. Follow the below steps to access the operating mode settings. Remove the screw from the bottom of the PIR Sensor or the screw on the back of the Door / Window Sensor. -
Page 25: Changing The Pir Motion Sensor Time Delay
Changing the Pir motion sensor time delay Each of the PIR motion sensors can be set to one of three time delays, (5s, 30s, 2mins) by rearranging the jumpers supplied inside the product housing. The default delay is 30 seconds. Remove the PIR motion sensor from the wall bracket. -
Page 26: Troubleshooting Guide
Troubleshooting Guide There is no power. Check the switch inside is turned to on. Check the power adaptor is connected to mains power The siren will not turn off. Enter your pin code and press the disarm button. Press the disarm button on the remote. -
Page 27: Repair & Refurbish Notice
Wireless Alarm Kit After Sales Support Telephone: 1300 663 907 Internet: www.winplus.com.au...
Need help?
Do you have a question about the IT214054 and is the answer not in the manual?
Questions and answers