Schlage BE469 User Manual
Touchscreen deadbolt with alarm
Hide thumbs
Also See for BE469:
- User manual (16 pages) ,
- How-to (6 pages) ,
- Installation instructions (5 pages)
Chapters
Table of Contents

Related Manuals for Schlage BE469


Summary of Contents for Schlage BE469
- Page 1 Touchscreen Deadbolt with Alarm Model BE469 User’s Guide Please KeeP THIs GUIDe You will need these ar m th Al lt wi ad bo u id ee n hs cr To uc e r’ instructions for future reference.
-
Page 2: Table Of Contents
Toll-Free Calling From: U.S.A.: (888) 805-9837 Canada: (800) 997-4734 Mexico: 018005067866 Visit our web site for videos, FAQs and more: answers.schlage.com ReGIsTeR YoUR PRoDUcT Document your purchase and register your warranty at RegisterMySchlage.com, or use the included registration card. WaRRaNTY aND Fcc/Ic sTaTemeNTs... -
Page 3: Lock Setup
locK seTUP Follow these steps to get your lock set up and ready to use. If you would like to use a home automation system to enable remote control of the lock, refer to enrolling on a Z-Wave Network on page 13. Decide what length you want the User codes for the lock to be. -
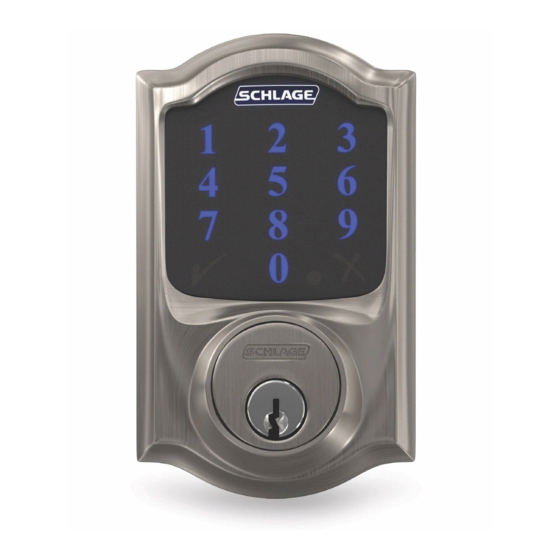
Page 4: Lock Parts
• The first button you will press when entering a User Code and in the programming process. • Press to exit programming mode immediately. Touchscreen • Remains unlit until the Outside Schlage Button is pressed. • Located on the outside of the door. • Used to enter codes for programming and unlocking. cylinder •... -
Page 5: Locking And Unlocking
UNlocKING L If you make a mistake while entering a User Code, press the Outside Schlage Button and then start again. locking from the outside 1. Press the Outside Schlage Button. 2. The lock will lock. The green check mark will light once. -
Page 6: Programming The Touchscreen
Delete all Removes ALL User Codes from the lock. User codes enable/Disable When enabled: Press the Outside Schlage Button to lock the lock & leave deadbolt. (Default setting). When disabled: Press the Outside Schlage Button and then enter a user code to lock the deadbolt. -
Page 7: Programming Procedures
Codes. If you change the User Code 2. If you make a mistake, press the Outside length, all existing User Codes will be Schlage Button to leave Programming deleted! Mode, and then start over. L Programming Mode will automatically time out after 30 seconds of inactivity. -
Page 8: Programming The Alarm
L Not sure your alarm is turned on? Simply press and release the Inside Schlage Button once. It will beep and light up to confirm it is activated. If it does not, try turning the alarm on again, and check the batteries. -
Page 9: Changing The Alarm Mode
changing the alarm mode After you power on the alarm, it will be preset to the Forced Entry mode, by default. If you want to change the mode, follow these simple steps: L The alarm must first be powered on before changing the alert setting! Press and release the activity button until the LEFT... -
Page 10: My Codes
Ingersoll Rand (NYSE:IR) advances the quality of life by creating and SCHLAGE and our family of brands—including Club Car®, Ingersoll Rand®, Schlage®, Thermo King® and Trane® —work together to enhance the quality and comfort of air in homes and buildings; transport 00000000 and protect food and perishables;... - Page 11 DaTe PRoGRammING coDe UseR Name UseR coDe Example: John Smith 1234...
-
Page 12: Factory Default Reset
5. To check that the lock was reset, press the Outside Schlage Button and enter one of the Default User Codes. See Default codes locations on page 10. 6. If the reset was successful, the lock will perform a setup routine. Wait until the bolt stops moving. -
Page 13: Z-Wave
2. Disconnect the battery connector. 3. While watching the inside Schlage button, reconnect the battery connector. 4. The inside Schlage button will blink if the lock is enrolled. PRoGRammING UsING Z-WaVe Many home automation systems support features of the deadbolt including locking, unlocking, and various other programming options. -
Page 14: Troubleshooting
1 beep Vacation Mode is enabled. Disable Green entered after Outside Vacation Mode. See Disable Vacation then Schlage button is mode on page 7. pressed. 1 beep Too many incorrect User Codes have been 1 Red entered. Wait 30 seconds and try again. - Page 15 Deadbolt requires two — Green Deadbolt/frame alignment is marginal. attempts to lock or Adjust door/frame for best operation. unlock. Browse to answers.schlage.com for help. Alarm will not sound. — — Turn on Alarm. Alarm sounds too Alarm — Sensitivity level is too high (at 1 or 2)
- Page 17 Cerrojo de pantalla táctil con alarma Modelo BE469 Guía del usuario coNseRVe esTa GUÍa Deberá consultar ar m th Al lt wi ad bo u id ee n hs cr To uc e r’ estas instrucciones en el futuro.
-
Page 18: Garantía Y Declaraciones De La Fcc/Ic
En virtud de los términos y condiciones de esta garantía, equipo genera, usa y puede radiar energía de radiofrecuencia Schlage extiende una garantía limitada de por vida sobre las y, si no se instala y utiliza siguiendo las instrucciones, puede piezas mecánicas y el acabado, así... -
Page 19: Instalación De La Cerradura
INsTalacIóN De la ceRRaDURa Siga estos pasos para instalar su cerradura y tenerla lista para usar. Follow these steps to get your lock set up and ready to use. Si desea utilizar un sistema de automatización del hogar para habilitar el control remoto de la cerradura, refiérase a Inscripción en una red Z-Wave en la página 29. -
Page 20: Piezas De La Cerradura
• Presiónelo para salir del modo de programación de inmediato. Pantalla táctil • Se mantiene apagada hasta que se presiona el botón Schlage exterior. • Ubicada en la parte externa de la puerta. • Se utiliza para introducir códigos de programación y desbloqueo. -
Page 21: Bloqueo Y Desbloqueo
BloqUeo Y DesBloqUeo L Si comete un error al introducir un código de usuario, presione el botón Schlage exterior y vuelva a comenzar. Bloqueo desde el exterior 1. Presione el botón Schlage exterior. 2. La cerradura se bloqueará. La cerradura se bloqueará. La marca de control verde se encenderá... -
Page 22: Programación De La Pantalla Táctil
La función de bloqueo automático ya debe estar activada. Mientras el cerrojo está temporalmente el bloqueado, presione el botón Schlage exterior y luego introduzca un código de bloqueo automático usuario de 4 a 8 dígitos para desbloquear el cerrojo. Después de cinco segundos, bloquee y desbloquee manualmente el cerrojo usando el pestillo giratorio. -
Page 23: Procedimientos De Programación
Códigos de usuario, se eliminarán 2. Si comete un error, presione el botón todos los Códigos de usuario existentes! Schlage exterior para salir del Modo de programación y luego vuelva a comenzar. L El Modo de programación caducará automáticamente después de 30 segundos de inactividad. -
Page 24: Programación De La Alarma
L Programe la alarma usando el botón Schlage interior que se muestra a continuación. L ¿No está seguro si la alarma está encendida? Presione y suelte el botón Schlage interior una vez. Emitirá un pitido y se iluminará para confirmar que está habilitada. -
Page 25: Cambio Del Modo De Alarma
cambio del modo de alarma Después de encender la alarma, estará preconfigurada en el modo de ingreso forzado, de manera predeterminada. Si desea cambiar el modo, siga estos pasos sencillos: L La alarma debe encenderse antes de cambiar la configuración de alerta. Presione y suelte el botón hasta que se Mantenga... -
Page 26: Mis Códigos
Ingersoll Rand (NYSE:IR) advances the quality of life by creating and SCHLAGE and our family of brands—including Club Car®, Ingersoll Rand®, Schlage®, Thermo King® and Trane® —work together to enhance the quality and comfort of air in homes and buildings; transport 00000000 and protect food and perishables;... - Page 27 FecHa el cóDIGo De PRoGRamacIóN NomBRe De UsUaRIo cóDIGo De UsUaRIo Ejemplo: Juan Pérez 1234...
-
Page 28: Restablecimiento De La Configuración Predeterminada
FáBRIca, a meNos qUe eNcUeNTRe los cóDIGos PReDeTeRmINaDos. 1. Desconecte las baterías. Consulte cambio de las baterías en la página 20. 2. Mantenga presionado el botón Schlage exterior. 3. Mientras mantiene presionado el botón Schlage exterior, vuelva a conectar las baterías. -
Page 29: Z-Wave
1. Retire la cubierta de las baterías. Consulte cambio de las baterías en la página 20. 2. Desconecte el conector de las baterías. 3. Mientras mira el botón Schlage interior, vuelva a conectar el conector de las baterías. 4. El botón Schlage interior parpadeará si la cerradura está inscripta. -
Page 30: Resolución De Problemas
Consulte Deshabilitar el y después después de presionar el roja modo de vacaciones en la página 23. botón Schlage exterior 1 pitido Se han introducido demasiados códigos de usuario rojas incorrectos. Espere 30 segundos y vuelva a intentarlo. - Page 31 — La alineación del cerrojo/marco es marginal. Ajuste la Verde dos intentos para puerta/marco para un lograr mejor funcionamiento. bloquearse o Visite answers.schlage.com para obtener ayuda. desbloquearse La alarma no sonará. — — Encienda la alarma. La alarma suena con Alarma —...
- Page 33 Pêne dormant avec écran tactile muni d’une alarme Modèle BE469 Guide d’utilisation coNseRVeZ ce GUIDe Vous aurez besoin de ces ar m th Al lt wi ad bo ee n u id hs cr To uc e r’ instructions pour consultation ultérieure.
- Page 34 Conformément aux conditions générales de cette garantie, en vue de fournir une protection raisonnable contre tout Schlage offre une garantie limitée à vie sur le mécanisme brouillage dans une installation résidentielle. Cet équipement et le fini et une garantie limitée d’un an sur l’électronique entraîne des usages et peut produire des radiofréquences;...
-
Page 35: Garantie Et Déclarations De La Cfc Et D'ic
coNFIGURaTIoN De la seRRURe Suivez ces étapes pour configurer votre serrure et l’utiliser. Follow these steps to get your lock set up and ready to use. Si vous désirez utiliser un système d’automatisation de domicile pour activer la commande à distance de votre serrure, consultez la section s’inscrire à un réseau Z-Wave à... -
Page 36: Pièces De La Serrure
• Appuyez pour quitter le mode Programmation immédiatement. écran tactile • Éteint jusqu’à ce que vous appuyiez sur le bouton Schlage extérieur. • Situé sur l’extérieur de la porte. • Sert à entrer les codes de programmation et de déverrouillage. -
Page 37: Verrouillage Et Déverrouillage
VeRRoUIllaGe eT DéVeRRoUIllaGe L Si vous vous trompez en entrant un code d’utilisateur, appuyez sur le bouton Schlage extérieur et recommencez. Verrouillage de l’extérieur 1. Appuyez sur le bouton Schlage extérieur. 2. La serrure se verrouille. Le voyant vert s’allume une fois. -
Page 38: Programmation De L'écran Tactile
Supprime TOUS les codes d'utilisateur de la serrure. d'utilisateur activer/désactiver le Si activé : Appuyez sur le bouton Schlage extérieur pour verrouiller le pêne verrouillage rapide dormant. (Réglage par défaut). Si désactivé : Appuyez sur le bouton Schlage extérieur et saisissez un code d’utilisateur pour verrouiller le pêne dormant. -
Page 39: Procédures De Programmation
2. En cas d’erreur, appuyez sur le bouton supprimés. Schlage extérieur pour sortir du mode Programmation, puis recommencez depuis L Le mode Programmation sera automatiquement le début. désactivé après 30 secondes d’inactivité. -
Page 40: Programmation De L'alarme
L Vous ne savez pas si l’alarme est allumée? Il suffit d’appuyer brièvement une fois sur le bouton Schlage intérieur. S’il émet un bip et qu’il s’allume, il est activé. Dans le cas contraire, essayez à nouveau de l’allumer, et vérifiez les piles. -
Page 41: Modification Du Mode D'alarme
Modification du mode d’alarme Une fois l’alarme allumée, elle est réglée par défaut sur le mode Accès forcé. Pour en changer, suivez ces étapes simples : L Avant de modifier les réglages de l’alarme, il faut l’allumer! Appuyez brièvement sur le bouton jusqu'à Maintenez appuyé... -
Page 42: Mes Codes
Ingersoll Rand (NYSE:IR) advances the quality of life by creating and SCHLAGE and our family of brands—including Club Car®, Ingersoll Rand®, Schlage®, Thermo King® and Trane® —work together to enhance the quality and comfort of air in homes and buildings; transport 00000000 and protect food and perishables;... - Page 43 DaTe coDe De PRoGRammaTIoN Nom D’UTIlIsaTeUR coDe D’UTIlIsaTeUR Exemple : Jean Dufour 1234...
-
Page 44: Réinitialisation Aux Paramètres Par Défaut De L'usine
N’aVeZ Pas TRoUVé les coDes PaR DéFaUT. 1. Débranchez les piles. Voir Remplacement des piles, page 36. 2. Maintenez le bouton Schlage extérieur appuyé. 3. Pendant ce temps, rebranchez les piles. 4. Relâchez le bouton Schlage extérieur. L si vous déplacez la serrure sur une autre porte, installez la serrure sur cette porte avant de continuer. -
Page 45: Z-Wave
Pour vérifier l’inscription : 1. Retirez le couvercle des piles. Voir Remplacement des piles, page 36. 2. Débranchez le connecteur de piles. 3. Tout en observant le bouton Schlage intérieur, rebranchez le connecteur. 4. Si la serrure est inscrite, il clignote. -
Page 46: Dépannage
Le mode Vacances est activé. Désactivez le verte , puis d'utilisateur après avoir mode Vacances. Voir Désactiver le mode rouge appuyé sur le bouton Schlage Vacances, page 39. extérieur. 1 bip Trop de codes d'utilisateur incorrects entrés. Attendez 1 rouge 30 secondes et essayez de nouveau. - Page 47 Le pêne dormant ne sort 1 long Réglez l'alignement du pêne sur le cadre de porte. rouge pas et ne rentre pas comme Pour obtenir de l'aide, consultez answers.schlage. prévu. com. Il faut deux essais pour réussir — verte L'alignement du pêne dormant sur le cadre n'est pas...
- Page 48 —que incluye notre famille de marques (dont Club CarMD, of brands—including Club Car®, Ingersoll Club Car®, Ingersoll Rand®, Schlage®, Thermo King® HussmannMD, Ingersoll RandMD, SchlageMD, Rand®, Schlage®, Thermo King® and y Trane®— trabajan en conjunto para mejorar la Thermo KingMD et TraneMD) collaborent pour Trane®...
- Page 49 Date White Paper r. Byun M. Sasso need 7-31-2013 notes title 1. printed two sides BE469 UG 2. printed black 3. tolerance ± .13 Creation Date number revision 4. printed in country may vary 7-31-2013 24060857 5. drawings not to scale Created By 6.
Need help?
Do you have a question about the BE469 and is the answer not in the manual?
Questions and answers
Accidentalmente desconfiguré mi código de programación y no encuentro como reconfigurarlo, podrían ayudarme por favor?
To reconfigure the programming code for the Schlage BE469:
1. Enter the current 6-digit programming code.
2. Wait for 3 orange flashes and 3 beeps.
3. Press the Schlage button.
4. Press "4" to enter the change programming code function.
5. Enter a new 6-digit programming code.
6. Re-enter the new 6-digit programming code to confirm.
You should see 2 green flashes and hear 2 beeps if successful.
This answer is automatically generated
I cannot get my lock to respond to any old codes and will not let me use the program code to reprogram new users' model BE469ZP any advice
To troubleshoot a Schlage BE469 lock that is not responding to old codes or allowing reprogramming:
1. Check Power: Ensure new, high-quality batteries are installed correctly. Reconnect the battery connector securely.
2. Factory Reset: Perform a factory reset. This clears all codes and settings. Follow the manual’s exact steps.
3. Keypad Test: After reset, press the Schlage button and enter the default programming code. If there is no response, the keypad may be faulty.
4. Manual Operation: Lock and unlock the bolt manually to ensure it moves freely and is not jammed.
5. Swap Keypad: If you have another BE469 lock, try swapping keypads to test if the problem is keypad-related.
6. Check for Beep and Light Codes: Look for red Xs or green checks with beeps. For example, 3 silent red Xs may indicate keypad or circuit failure.
7. Z-Wave/Hubitat Check: If using smart home integration, confirm the lock is included properly. If digital commands do not actuate the bolt but status updates show, the motor or internal electronics may be faulty.
If none of these steps help, the internal motor or control board may need repair or replacement.
This answer is automatically generated