Table of Contents
Advertisement
Advertisement
Table of Contents

Related Manuals for Pride Mobility Quantum Q6 Edge


Summary of Contents for Pride Mobility Quantum Q6 Edge
- Page 1 QUANTUM Q6 Edge...
- Page 2 The latest/current version of this manual is available on our website. This product is manufactured by: Pride Mobility Products Corp. 182 Susquehanna Avenue Exeter, PA 18643 Copyright © 2011 Pride Mobility Products Australia Pty. Ltd. INFMANU4123/Rev A/April 2011...
- Page 3 C O N T E N T S INTRODUCTION ..........................4 SAFETY ..............................5 III. YOUR POWER CHAIR ........................17 IV. ASSEMBLY ............................21 COMFORT ADJUSTMENTS ......................24 VI. BATTERIES AND CHARGING .....................31 VII. CARE AND MAINTENANCE ......................35 VIII.WARRANTY ............................41 Quantum Q6 Edge www.pridemobility.com...
- Page 4 Pride to enhance or preserve the safe use of this product.
- Page 5 Avoid exposure to rain, snow, ice, salt, or standing water whenever possible. Maintain and store in a clean and dry condition. Indicates flammable material. Do not expose to heat sources such as open flame or sparks. Do not transport batteries with flammable or combustible items. Quantum Q6 Edge www.pridemobility.com...
- Page 6 Do not use batteries with different amp-hour (Ah) capacities. Do not mix old and new batteries. Always replace both batteries at the same time. Do not place your power chair in freewheel mode while on an incline or decline. Explosive conditions exist! Corrosive chemicals contained in battery. www.pridemobility.com Quantum Q6 Edge...
- Page 7 - = Negative (Black) Terminal Post Connect Red wires to Red Positive (+) Terminal Posts. Connect Black wires to Black Negative (-) Terminal Posts. Contains Lead. Battery charger for indoor use only. Wire access point. For service use only. Quantum Q6 Edge www.pridemobility.com...
- Page 8 I I . S A F E T Y Disposal and recycling – Contact your Quantum Rehab Provider for information on proper disposal and recycling of your Pride product and its packaging. Wear safety goggles. Class II Equipment Manufactured in...
-
Page 9: General Guidelines
Pride products. Pre-Ride Safety Check Get to know the feel of your power chair and its capabilities. Pride recommends that you perform a safety check before each use to make sure your power chair operates smoothly and safely. -
Page 10: Weight Limitations
MANDATORY! Stay within the specified weight capacity of your power chair. Exceeding the weight capacity voids your warranty. Pride will not be held responsible for injuries and/or property damage resulting from failure to observe weight limitations. - Page 11 Doing so could cause instability in your power chair. Pride recommends that the maximum slope of an incline you attempt to safely ascend or descend on your power chair does not exceed 10.5% (6°). See figure 1.
- Page 12 Your power chair is designed to provide optimum stability under normal driving conditions — dry, level surfaces composed of concrete, blacktop, or tarmac. However, Pride recognises that there will be times when you will encounter other surface types. For this reason, your power chair is designed to perform admirably on packed soil, grass, and gravel.
- Page 13 WARNING! Not all lift systems/elevation products are rated for use with an occupied mobility device. Pride recommends that you do not remain seated in your power chair when it is being used in connection with any type of lift system/elevation product unless: That product is rated for occupied use by the manufacturer.
-
Page 14: Positioning Belts
Motor Vehicle Transport Pride recommends that you do not remain seated in your power chair while traveling in a motor vehicle. The power chair should be stowed in the boot of a car or in the back of a truck or van with batteries removed and/or properly secured. - Page 15 Pride recommends that the power chair user determine his/her personal limitations and practice bending and reaching in the presence of a qualified healthcare professional.
- Page 16 WARNING! Pride strongly recommends that you do not smoke cigarettes while seated in your power chair, although the power chair has passed the necessary testing requirements for cigarette smoking.
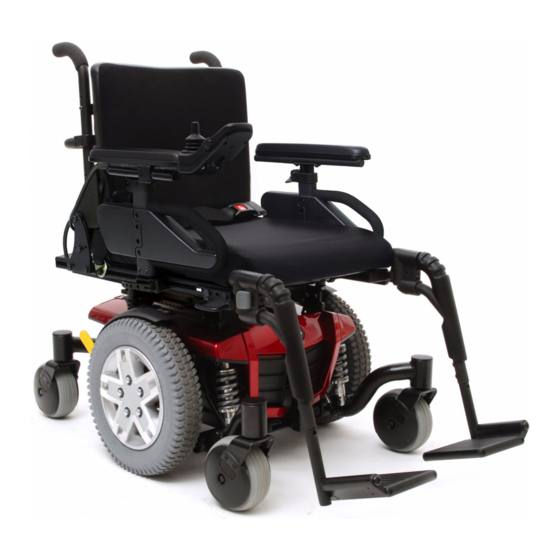
- Page 17 SEAT ASSEMBLY ARMREST ARMREST JOYSTICK CONTROLLER SEAT BASE POWER BASE ASSEMBLY CASTER WHEEL MANUAL FREEWHEEL LEVER SPRING SHOCK/ DRIVE WHEEL GAS DAMPER LOCATION FRONT RIGGING CASTER WHEEL (FOOT PLATFORM SHOWN) Figure 5. The Q6 Edge Power Chair Quantum Q6 Edge www.pridemobility.com...
- Page 18 Motor Connectors: This is where the controller connects to the motors. Battery Connector: This is where the controller connects to the batteries. Controller Power Module: This enables the controller to communicate with the batteries and the motors. www.pridemobility.com Quantum Q6 Edge...
- Page 19 Quantum Rehab Provider. CONTROLLER POWER MODULE CONTROLLER CONNECTOR TO BATTERY CONNECTORS MAIN CIRCUIT TO MOTOR BREAKER CONNECTOR QUICK RELEASE TO MOTOR BATTERY CONNECTORS CONNECTOR Figure 7. Q6 Edge Electrical Components Quantum Q6 Edge www.pridemobility.com...
- Page 20 WARNING! Do not use the freewheel lever handles as tie-down points to secure this product. MANUAL FREEWHEEL LEVER MANUAL FREEWHEEL LEVER Figure 8. Freewheel Mode (Drive Disengaged) Figure 9. Drive Mode (Drive Engaged) www.pridemobility.com Quantum Q6 Edge...
- Page 21 Replacement nylon insert lock nuts are available at local hardware stores or through your Quantum Rehab Provider. ARMREST ANGLE ADJUSTMENT CONTROLLER POSITION SEAT HEIGHT/ANGLE ADJUSTMENT FOOT PLATFORM ANGLE ADJUSTMENT FOOT PLATFORM HEIGHT/DEPTH ADJUSTMENT Figure 10. Q6 Edge Assembly View Quantum Q6 Edge www.pridemobility.com...
- Page 22 5. Plug the controller connector into the rear of the power base. See figure 7. 6. Secure the controller harness to the armrest receiver with wire ties. See figure 13. Figure 12. Controller Harness Routing on a Synergy Seat www.pridemobility.com Quantum Q6 Edge...
- Page 23 3. Place the seating system onto the seat plate and secure. 4. Plug in the power seat toggle switch harness, if equipped. TO POWER BASE Figure 13. Controller Harness Routing on a Contour Seat SEAT PLATE INTERFACE BRACKET ACTUATOR Figure 14. Power Elevating Seat Actuator Quantum Q6 Edge www.pridemobility.com...
- Page 24 Your Quantum Rehab Provider has evaluated your power chair and made any necessary adjustments to suit your specific requirements. Do not change your seating configuration without first contacting Pride Mobility Products or your Quantum Rehab Provider.
- Page 25 The lever is located on the right side of the seat base. To adjust the recline angle: 1. Pull up on the seatback release lever. 2. Lean forward or rearwards to the desired position. 3. Release the lever. Quantum Q6 Edge www.pridemobility.com...
-
Page 26: Armrest Width Adjustment
To change the armrest height: 1. Loosen the two setscrews located on the armrest receiver. See figure 17. 2. Raise or lower the armrest to the desired height. 3. Tighten the setscrews to secure the armrest. www.pridemobility.com Quantum Q6 Edge... -
Page 27: Controller Position
See figure 13. NOTE: If your power chair is equipped with a Spe- cialty Seat, Synergy Seat, or TRU-Balance Power Positioning System, refer to the information provided in supplemental manuals provided with your seating system. Quantum Q6 Edge www.pridemobility.com... - Page 28 1. Flip up the foot platform and locate the screw. See figure 19. 2. Turn the screw to raise or lower the front of the foot platform. FOOT PLATFORM BRACKET HARDWARE SCREW Figure 19. Foot Platform Adjustment www.pridemobility.com Quantum Q6 Edge...
- Page 29 NOTE: The power elevating seat option is equipped with a system that reduces the speed of the power chair to one-quarter when the seat is elevated. Always check to be sure this system is operating properly before using your power chair. Quantum Q6 Edge www.pridemobility.com...
- Page 30 MANDATORY! Inspect the positioning belt for loose or damaged parts before each use of the power chair. If you discover a problem, contact your Quantum Rehab Provider for maintenance and repair. www.pridemobility.com Quantum Q6 Edge...
- Page 31 PROHIBITED! Do not allow unsupervised children to play near the power chair while the batteries are charging. Pride recommends that you do not charge the batteries while the power chair is occupied.
- Page 32 Many factors come into play when deciding how often to charge the batteries. You may use your power chair all day on a daily basis or you may not use it for weeks at a time. www.pridemobility.com Quantum Q6 Edge...
- Page 33 We work closely with our battery manufacturer to provide a battery that best suits your power chair’s specific demands. Fresh batteries arrive regularly at Pride and are promptly shipped with a full charge. During shipping, the batteries encounter temperature extremes that may influence initial performance. Heat robs the charge from the battery, and cold slows the power available and extends the time needed to recharge the battery (just as with a car battery).
- Page 34 What about shipping? If you wish to use a freight company to ship your power chair to your final destination, repack your power chair in the original shipping container and ship the batteries in separate boxes. www.pridemobility.com Quantum Q6 Edge...
-
Page 35: Care And Maintenance
Use a rubber conditioner on the tyre sidewalls to help preserve them. WARNING! Never use a rubber conditioner on the tread area of the tyres; doing so may make the tyres slippery and cause your power chair to skid. Quantum Q6 Edge www.pridemobility.com... - Page 36 Keep your power chair clean and free of foreign material, such as mud, dirt, hair, food, drink, etc. Spring shocks and gas dampers should be visually checked for any abnormality, structure damage, or bent rods. See your Quantum Rehab Provider for repair. www.pridemobility.com Quantum Q6 Edge...
-
Page 37: Cleaning And Disinfection
WARNING! Be sure that the controller’s power is turned off and the power chair is not in freewheel mode before performing this procedure. WARNING! When changing a tyre, remove only the five lug nuts, then remove the wheel. If any further disassembly is required, deflate the tyre completely or it may explode. Quantum Q6 Edge www.pridemobility.com... -
Page 38: Battery Replacement
WARNING! Do not mix old and new batteries. Always replace both batteries at the same time. PROHIBITED! Keep tools and other metal objects away from the battery terminals. Contact with tools can cause electrical shock. www.pridemobility.com Quantum Q6 Edge... - Page 39 10. Reinstall the front cover and foot platform. 11. Charge the batteries. See VI. “Batteries and Charging.” BATTERY WIRING DIAGRAM LABEL QUICK RELEASE BATTERY CONNECTORS FRONT COVER RELEASE HANDLES FRONT BATTERY REAR BATTERY Figure 25. Battery Installation Quantum Q6 Edge www.pridemobility.com...
- Page 40 Disconnect both batteries before load testing and follow the directions that come with the load tester. If either one of the batteries fails the load test, replace both of them. If your power chair still does not power up, contact your Quantum Rehab Provider. www.pridemobility.com Quantum Q6 Edge...
- Page 41 ONE-YEAR LIMITED WARRANTY Your Pride Power Chair is fully guaranteed for twelve (12) months from the date of purchase against faults arising due to defects in manufacture or materials. This warranty does not detract from, but is in addition to your legal rights.
- Page 42 N O T E S www.pridemobility.com Quantum Q6 Edge...
- Page 44 Inclusion of all Parts Joystick Serial Number Controller Serial Number Left Motor Serial Number Right Motor Serial Number Fit and Finish Performance Pride keeps a more detailed report on file at the factory. Date Inspected Inspector *INFMANU4123* Product Serial #...
Need help?
Do you have a question about the Quantum Q6 Edge and is the answer not in the manual?
Questions and answers