Table of Contents
Advertisement
Quick Links
AVFL Vent Free Fireplace System
Installation & Operating Instructions
Models: AVFL42NTSC & AVFL42PTSC
WARNING: If the information in this
manual is not followed exactly, a fi re or
explosion may result causing property
damage, personal injury or loss of life.
•
Do not store or use gasoline or other
fl ammable vapors and liquids in the
vicinity of this or any other appliance.
•
WHAT TO DO IF YOU SMELL GAS
– Do not try to light any appliance.
– Do not touch any electrical switch; do
not use any phone in your building.
– Leave the buildling immediately.
– Immediately call your gas supplier from
a neighbor's phone. Follow the gas
supplier's instructions.
– If you cannot reach your gas supplier,
call the fi re department.
•
Installation and service must be performed
by a qualifi ed installer, service agency or
the gas supplier.
This is an unvented gas-fi red heater. It uses air
(oxygen) from the room in which it is installed.
Provisions for adequate combustion and ventil-
ation air must be provided. Refer to Page 7.
INSTALLER: Leave this manual with the appliance.
CONSUMER: Retain this manual for future
reference.
20305467 5/14 Rev. 1
Advertisement
Table of Contents
Troubleshooting

Related Manuals for Vermont Castings AVFL42NTSC


Summary of Contents for Vermont Castings AVFL42NTSC
- Page 1 AVFL Vent Free Fireplace System Installation & Operating Instructions Models: AVFL42NTSC & AVFL42PTSC WARNING: If the information in this manual is not followed exactly, a fi re or explosion may result causing property damage, personal injury or loss of life.
-
Page 2: Table Of Contents
AVFL Vent Free Fireplace CONTENTS Thank you and congratulations on your purchase of an Vermont Castings Group Fireplace. PLEASE READ THE INSTALLATION AND OPERATION INSTRUCTIONS BEFORE USING THE APPLIANCE! IMPORTANT: Read all instructions and warnings carefully before starting installation. Failure to follow these instructions may result in a possible fi re hazard and will void the warranty. -
Page 3: Important Safety Information
AVFL Vent Free Fireplace IMPORTANT SAFETY INFORMATION INSTALLER OWNER Please leave these instructions with the appliance. Please retain these instructions for future reference. • Any change to this heater or its controls can be dangerous. • Improper installation or use of the heater can cause serious injury or death from fi re, burns, explosion or carbon monoxide poisoning. -
Page 4: Building Code Information
AVFL Vent Free Fireplace IMPORTANT SAFETY INFORMATION harmful but may produce annoying smoke and smells This appliance may be installed in an after- as they are burned off during the initial operation of the appliance; possibly causing headaches or eye or lung market, permanently located, manufactured irritation. -
Page 5: Product Features
GAS SPECIFICATIONS & ORIFICE SIZE MAX. INPUT MIN. INPUT ORIFICE MODEL FUEL (BTU/h) (BTU/h) SIZE AVFL42NTSC NAT. 37,000 24,500 2.20 mm AVFL42PTSC 36,000 28,500 NOTE: For LP models an external regulator is required to reduce supply pressure to a maximum of 13" w.c. -
Page 6: Fireplace And Framing Dimensions
AVFL Vent Free Fireplace FIREPLACE AND FRAMING DIMENSIONS 48C\v" (1238 mm) Minimum Rough Depth " (13 mm) 13" " or 5/8 (16 mm) (330 mm) 13 1/2" (343 mm) 44" (1118 mm) Rough Opening Width Minimum Rough Height 32" 28" (711 mm) (813 mm) 32"... -
Page 7: Pre-Installation Information
AVFL Vent Free Fireplace PRE-INSTALLATION INFORMATION GETTING STARTED PLANNING THE INSTALLATION Check your packing list to verify that all listed parts have In planning the installation for the fi replace it is necessary been received. You should have the following: to determine where the unit is to be installed and whether •... -
Page 8: Fireplace Location
AVFL Vent Free Fireplace PRE-INSTALLATION INFORMATION c. caulking or sealants are applied to areas such as joints FIREPLACE LOCATION around window and door frames, between sole plates This unvented gas heater requires no outside venting and and fl oors, between wall-ceiling joints, between wall burns cleanly and effi... -
Page 9: Clearances And Height Requirements
AVFL Vent Free Fireplace PRE-INSTALLATION INFORMATION CLEARANCES AND HEIGHT REQUIREMENTS The dimensions shown in Figures 4 and Ensure that minimum clearances shown in Figures 4 and 5 are minimum clearances to maintain 5 are maintained. Left and right clearances are determined when installing this heater. -
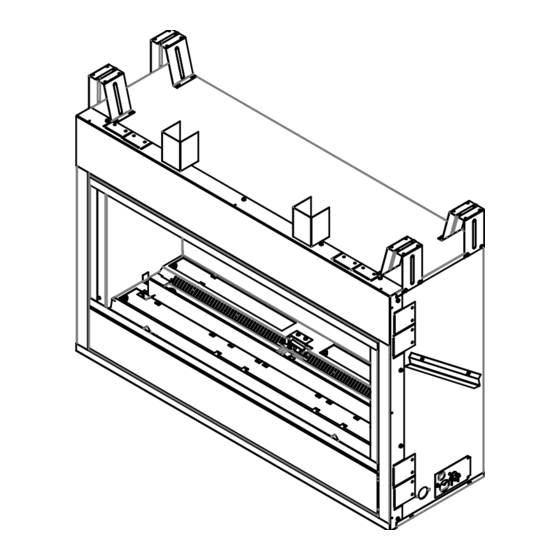
Page 10: Fireplace Installation
AVFL Vent Free Fireplace FIREPLACE INSTALLATION SECURE FIREPLACE TO FRAMING The fi replace must be secured to the framing studs as Framing shown in Figure 6. Use four (4) screws to attach fi replace Members to framing. The side nailing fl anges are ⁄... -
Page 11: Connect The Gas
AVFL Vent Free Fireplace FIREPLACE INSTALLATION CONNECT THE GAS NOTICE: A qualifi ed gas appliance installer must connect CHECK GAS TYPE: The gas supply must the heater to the gas supply. Consult all local codes. be the same as stated on the heater’s rating plate. -
Page 12: Check Gas Pressure
AVFL Vent Free Fireplace FIREPLACE INSTALLATION CHECK GAS PRESSURE Test Port 'A' Figure 8 Check the gas pressure with the appliance burning and the control set to HIGH. Open control access door at bottom front of unit to fi nd valve and regulator referred to below. -
Page 13: Electrical Installation
AVFL Vent Free Fireplace ELECTRICAL INSTALLATION WIRING JUNCTION BOX 1. Before installing, wire the receptacle into an electrical Electrical connections should only be performed circuit. This should be done before framing the fi re- by a qualifi ed licensed electrician. Main power place. -
Page 14: Signature Command Wiring Diagram
AVFL Vent Free Fireplace ELECTRICAL INSTALLATION SIGNATURE COMMAND WIRING DIAGRAM Front Row 20w x 6 Lamps Back Row 20W x 6 Lamps A/C MODULE TO JUNCTION BOX IN FIREPLACE WHITE BLACK WHITE Opt. Blower BLACK WHITE BLACK GREEN Thermocouple Thermocouple Module Pilot Top Lamp... -
Page 15: Final Installation
AVFL Vent Free Fireplace FINAL INSTALLATION 1. Spread glass evenly in one layer over the entire fl oor INSTALLATION OF AIR DEFLECTION and burner. It is important to not have the glass too thick GLASS on ported area (single layer only). NOTE: The 32"... -
Page 16: Placement Of Optional Logs
AVFL Vent Free Fireplace FINAL INSTALLATION The positioning of the logs is critical to the safe and clean operation of this heater. Sooting and other problems may result if the logs are not properly and fi rmly positioned in the appliance. Never add additional logs or embellishments such as pine cones, vermiculite or rock wool to the heater. -
Page 17: Operating Instructions
AVFL Vent Free Fireplace OPERATING INSTRUCTIONS 3. Place the front log (#2) by aligning the holes in the sitions on the burner depending on which two pin set bottom of the log with the two pins at the front of the locations are used. -
Page 18: Turning On Unit
AVFL Vent Free Fireplace OPERATING INSTRUCTIONS TURNING ON UNIT 1. STOP! Read the safety information on Page 17. 2. This appliance is equipped with an ignition device which automatically lights the burner. Do not try to light the burner by hand. 3. -
Page 19: Signature Command System Operation
AVFL Vent Free Fireplace SIGNATURE COMMAND SYSTEM OPERATION To Thermopile FEATURES RF Receiver ON/OFF To Sensor Command Center To Sparker • Easy Access Function Operation and System Con- fi guration NG/LP • Operation Confi rmation/Fault Diagnostic Indications Conversion (LED/Buzzer) • ON/OFF/HI/Med/Low Operation To Command Center •... - Page 20 AVFL Vent Free Fireplace SIGNATURE COMMAND SYSTEM OPERATION NOTE: The Signature Command System comes standard ® Remote Transmitter Learn Function (Default OFF) in the Intermittent Pilot mode, so you must follow the in- 1. The RF receiver button located on the Control Board structions below to switch to Standing Pilot Mode if needed.
-
Page 21: Functions/Operation
AVFL Vent Free Fireplace SIGNATURE COMMAND SYSTEM OPERATION 2. Press the OFF button to decrease fl ame height. The fi rst FUNCTIONS/OPERATION two presses will decrease the fl ame height to medium (from the Command Center) and low. Turning on the fi replace 3. -
Page 22: Touch Screen Remote Control Operation
AVFL Vent Free Fireplace TOUCH SCREEN REMOTE CONTROL OPERATION Due to the sensitive temperature monitoring components in the transmitter, it is necessary to allow the transmitter to stabilize to room tem- perature before accurate room temperatures are displayed. If the transmitter is activated from a severe cold condition, allow 15 minutes for accurate temperature readings to appear on the LCD display. - Page 23 AVFL Vent Free Fireplace TOUCH SCREEN REMOTE CONTROL OPERATION Master Switch Setting Privacy Code on Transmitter: Figure 17 The remote transmitter privacy code is preset in factory. In the event of activation or interference from other nearby transmissions, change the code using the following procedures (learn function must be performed af- ter changing the code):...
- Page 24 AVFL Vent Free Fireplace TOUCH SCREEN REMOTE CONTROL OPERATION a. Push and hold the TIMER button for 3 seconds or 2. Press the OFF/down button b. Use the OFF/down buttons to decrease the Set to decrease the fl ame height Time to zero or and turn off the fi...
- Page 25 AVFL Vent Free Fireplace TOUCH SCREEN REMOTE CONTROL OPERATION NOTE: there will a 10 3. Press the light button again to confi rm the setting. The second delay for the new setting will be transmitted to the receiver. fl ame adjustment when 4.
-
Page 26: Safety Features
AVFL Vent Free Fireplace TOUCH SCREEN REMOTE CONTROL OPERATION Using the Mounting Base 2. When the current setting is B), pressing TIMER button and THERMO button at the same time for 3 seconds The transmitter comes with a mounting base which allows will switch to A) Mode. -
Page 27: Troubleshooting
AVFL Vent Free Fireplace TOUCH SCREEN REMOTE CONTROL OPERATION TROUBLESHOOTING Symptom Causes Action 1. Battery icon on LCD on transmitter 1. Low Battery 1. Replace batteries. Change batteries every 6 months. 2. LCD display is blank 2. Check battery installation or replace batteries. -
Page 28: Maintenance And Cleaning
AVFL Vent Free Fireplace MAINTENANCE AND CLEANING FLAME APPEARANCE Flames from the pilot, front and rear burner should be visually checked as soon as the heater is installed. In addition, periodically check the fl ames visually during operation. Thermocouple for Natural Gas CHECK THE PILOT FLAME The pilot fl... -
Page 29: Cleaning And Servicing
AVFL Vent Free Fireplace MAINTENANCE AND CLEANING CLEANING AND SERVICING ANNUAL CLEANING/INSPECTION – Refer to parts diagram for location of items discussed below. Annual inspection and cleaning by your dealer or quali- • Inspect and clean burner air intake holes. Remove fi... -
Page 30: Troubleshooting
AVFL Vent Free Fireplace TROUBLESHOOTING NOTE: All troubleshooting items are listed in order of op- • Turn appliance OFF and allow to cool eration. before servicing. • Only a qualifi ed service person should service and repair the heater. PROBLEM POSSIBLE CAUSE SOLUTION Appliance produces unwanted odors. -
Page 31: Signature Command System
AVFL Vent Free Fireplace TROUBLESHOOTING SIGNATURE COMMAND SYSTEM ACTION OPERATION FAULT DIAGNOSIS Using Battery polarity wrong? Re-install batteries battery? Make sure Command Install batteries and/or Battery voltage low? Change batteries Center and plug in the AC board No beep in about the control 8 seconds board are... -
Page 32: Replacement Parts
AVFL Vent Free Fireplace REPLACEMENT PARTS 1a,b FIREBOX ITEM DESCRIPTION QTY. PART NO. Bulb (20w) 20301100 Bulb – Top Light (100w) 73D0020 Bulb Socket 73D4521 Screen Frame Assembly 20305693K Panel, Access, Door 20305434K Porcelain Panel Rear 20305461 Porcelain Panel Left 20305462 Porcelain Panel Right 20305464... -
Page 33: Logs
AVFL Vent Free Fireplace REPLACEMENT PARTS LOGS ITEM DESCRIPTION QTY. PART NO. Log #1 20305703K Log #2 20305704K STONES DESCRIPTION QTY. PART NO. Large Sand Stone #1 20303038K Large White Stone #2 20303039K Large Dark Gray Stone #3 20303040K Large Brown Stone #4 74D0720K Medium Sand Stone #5 20303042K... -
Page 34: Signature Command System
AVFL Vent Free Fireplace REPLACEMENT PARTS 2a,b,c,d SIGNATURE COMMAND SYSTEM ITEM DESCRIPTION QTY. AVFL42NTSC AVFL42PTSC Burner Assembly 20305656K 20305468K Tube, Tee to Valve 20305454K 20305454K Tube, Tee to Injector 78D0090K 78D0090K Regulator Tube 20304913K — Pilot Tube 20306010K 20306011K Gas Valve Assembly... -
Page 35: Optional Accessories
AVFL Vent Free Fireplace OPTIONAL ACCESSORIES OPTIONAL ACCESSORIES There are a wide range of optional accessories available for the AVFL Vent Free Fireplace. A variety of face and trim kits can change the appearance of the fi replace while the rope lighting kit can add ambience and light, whether the unit is on or off. - Page 36 AVFL Vent Free Fireplace 20305467...
- Page 37 AVFL Vent Free Fireplace 20305467...
- Page 38 AVFL Vent Free Fireplace 20305467...
-
Page 39: Limited Lifetime Warranty Policy
After installation, if any of the components manufactured by Vermont Castings Group in the appliance are found to be defective in materials or workmanship, Vermont Castings Group will, at its option, replace or repair the defective components at no charge to the original owner. - Page 40 149 Cleveland Drive • Paris, Kentucky 40361 www.vermontcastingsgroup.com...
Need help?
Do you have a question about the AVFL42NTSC and is the answer not in the manual?
Questions and answers