Table of Contents
Advertisement
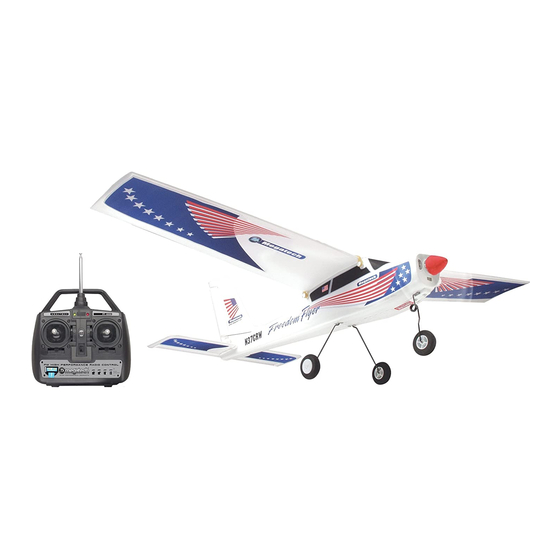
Quick Links
Advertisement
Table of Contents

Related Manuals for MegaTech Freedom Flyer


Summary of Contents for MegaTech Freedom Flyer
- Page 1 Entire contents © Megatech...
-
Page 2: Helpful Hints
Please read this entire manual carefully before you attempt to build or fl y your Freedom Flyer. If you experience any problems, DO NOT take your Freedom Flyer back to the store! Call one of our MegaTechnicians at 1-888-MEGA-911 or send an e-mail to: info@megatech.com... -
Page 3: Table Of Contents
TABLE OF CONTENTS Getting Acquainted with Your Freedom Flyer ......4 Safety Warnings ...............5 Assembling the Main Wing ...........5 Assembling the Landing Gear ..........5 Assembling the Tail Surfaces ..........5 Attaching the Wing to the Fuselage ..........6 Attaching the Propeller ............6 The Freedom Flyer Radio System..........7 The Battery Pack ..............8... -
Page 4: Kit Contents
Getting Acquainted with Your Freedom Flyer Review the components of the Freedom Flyer to ensure that your kit is complete before you begin fi nal assembly. (See Figure 1) Figure 1 – Exploded view of all parts Kit Contents: A. Main Wing B. -
Page 5: Safety Warnings
10 mph or less). Attempting to fl y your aircraft in winds above 10 mph will result in a crash! Assembling Your New Freedom Flyer Items Required to Complete Your Freedom Flyer: • 8 AA alkaline batteries • Transparent tape •... -
Page 6: Attaching The Wing To The Fuselage
Apply 90° Insert 90° tape screws here. here. Antenna should exit here. Figure 3 - Push horizontal stabilizer (tail) in from the rear. Figure 3 - Push horizontal stabilizer (tail) in from the rear. Phillip’s head screwdriver and insert the screws into the pre-drilled holes in the tail as shown in Figure 3. -
Page 7: The Freedom Flyer Radio System
Always remove the wing from the fuselage when not flying. This will help reduce the chance of accidental damage. The Freedom Flyer Radio System This aircraft includes a 4-channel R/C (radio control) system although only 3 channels are actually used . See Figure 6. -
Page 8: The Battery Pack
Figure 7 - Servo Reversers The Battery Pack The battery pack included with the Freedom Flyer (see Figure 8) is made up of NiMH (nickel-metal-hydride) rechargeable cells. These are very different from regular dry cell batteries! With proper care and charging methods, these packs can be charged and used hundreds of times before they need to be replaced. -
Page 9: Charging The Battery
● Do not insert any metal objects into the battery plug, as a direct short (and quite possibly a fi re) will result. ● Always remove the battery pack from your Freedom Flyer after each fl ight. Do not store the battery pack inside the aircraft. -
Page 10: Installing The Batteries
Cycling the Batteries AFTER READING THIS ENTIRE MANUAL, BUT BEFORE YOU FLY YOUR FREEDOM FLYER FOR THE FIRST TIME: You must “cycle” the battery pack at least twice prior to fl ying your aircraft. This will provide the aircraft with more power and longer fl ight times! Here’s how: Switch on the transmitter fi... -
Page 11: Safety Start Switch
B. At this time, move the rudder and elevator control stick (the right con- trol stick), to see how the controls operate your Freedom Flyer. Notice that you can operate the rudder and elevator at the same time. This helps... -
Page 12: Rudder And Elevator Controls
Left Turn Neutral Right Turn Trim Controls Move the stick left Center the trim Move the stick controls and and the rudder right and the sticks. Then moves left. This rudder moves adjust the causes plane to right. This causes pushrods so the turn left. -
Page 13: Testing The Motor
“off” posi- tion (all the way down) and the transmitter switch is on. Then fi rmly grasp the center of the Freedom Flyer fuselage, keeping hands and all obstructions clear of the propeller. Now press the red safety start switch and slowly move the throttle up to full to make certain the propeller and gearbox are operating properly. -
Page 14: Pre-Flight Preparations
Pre-Flight Preparations Now it’s time to describe how you can become a successful R/C pilot with the Freedom Flyer. A little patience and care exhibited here will result in a well-fl ying, long-lasting aircraft. Did you “cycle” the battery pack as previously described on page 10? This is extremely important! Perform these pre-fl... -
Page 15: Your First Powered Flight
After breaking ground, you simply do not have enough time to react to sudden changes in pitch or altitude. With a hand launch, the Freedom Flyer will basically “fl y out of your hand,” providing several feet of altitude for the airplane to stabilize prior to needing any control inputs. -
Page 16: Control Stick Adjustments
Figure 17- Adjusting the Trim In Flight Turning Your Freedom Flyer Turning the Freedom Flyer is done with the coordinated use of both Turning the Freedom Flyer is done with the coordinated use of both rudder and elevator controls. The rudder makes the aircraft yaw (bank) in the direction you wish to turn. - Page 17 aircraft at a constant altitude while turning. As the aircraft turns to the new heading that you desire, a small application of opposite rudder will level the wings and return the aircraft to straight and level fl ight. For your fi rst fl ights, you’ll fi nd it easier to turn by making two 90- degree turns instead of one 180-degree turn.
-
Page 18: Having Trouble
10 18 when the aircraft is fl ying toward you. Turning with the plane and always facing the same direction will greatly help you learn how to fl y in a shorter period of time. During the fi rst fl ight, execute gentle climbing circles in front of you. Keeping the aircraft in front of you (not overhead) is very important and crucial to successful fi... -
Page 19: Landing Your Freedom Flyer
Taking Off From The Ground The Freedom Flyer is capable of taking off from the ground. Keep in mind The Freedom Flyer is capable of taking off from the ground. Keep in mind that ROG (rise off the ground) take-offs use up some battery power and will shorten your fl... -
Page 20: Making Repairs
Allow it to pick up speed for about 35 feet, then gently add a small amount of up elevator and the Freedom Flyer will break ground. Continue to gain altitude in a shallow climb and you’re on your way. -
Page 21: Obtaining Spare Parts
Spare, repair and replacement parts are readily available for your aircraft. Spare, repair and replacement parts are readily available for your aircraft. Should you need parts, visit your local hobby dealer fi rst. If unavailable, you may order directly from Megatech. Use this sheet as a guide. Part Number Description... -
Page 22: Freedom Flyer Trouble Shooting Guide
Trouble Shooting Guide PROBLEM POSSIBLE CAUSE SOLUTION Motor/propeller does not move Battery not fully charged. Charge the battery. after red button is pressed & Battery not connected Connect the battery throttle moved. Properly. Correctly. Motor moves when the start Battery is not fully charged. Charge the battery. -
Page 23: Crash Warranty
Under no circumstances will Megatech International or any of its representatives be held liable for injury to persons or property damage resulting from assembly or use of the product. Megatech is not liable if any outside radio frequencies interfere with the product’s frequency causing loss of control. Megatech International will not be held liable for any injury to persons or property damage resulting from an out-of-control model caused by use or misuse of the product. - Page 24 LOOK FOR THESE OTHER FINE MEGATECH PRODUCTS MTC9932 COSMIC FLYER R/C EASY FLYER MTC7703 MTC7703 MTC6901 WRIGHT FLYER R/C AIRPLANE NIRVANA R/C RACING CLASS SAILBOAT MTC6905 USA R/C CRUISER YACHT Megatech International - 8300 Tonnelle Avenue North Bergen NJ 07047 - (201) 662-2800...
Need help?
Do you have a question about the Freedom Flyer and is the answer not in the manual?
Questions and answers