Table of Contents
Advertisement
Quick Links
Advertisement
Table of Contents

Related Manuals for MegaTech Air Strike


Summary of Contents for MegaTech Air Strike
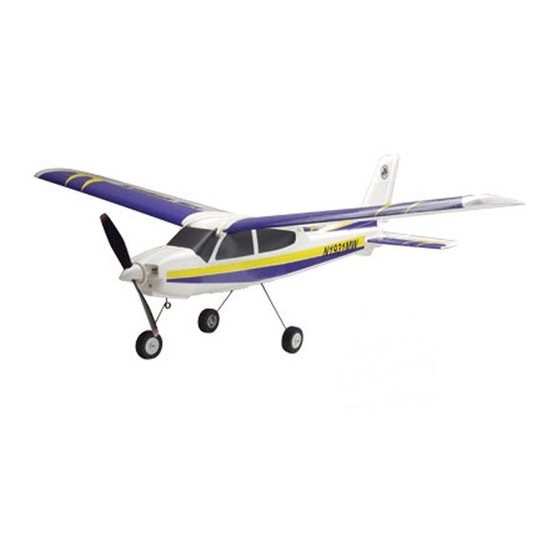
- Page 1 ® www.megatech.com Entire contents © Megatech 2003...
-
Page 2: Helpful Hints
• Check the direction and wind speed before each fl ight. Although the AirStrike is capable of fl ying in winds of 10 mph, Megatech recommends waiting for a day with little or no wind until you become familiar with the fl... -
Page 3: Table Of Contents
TABLE OF CONTENTS Getting Acquainted with Your Air Strike ........4 ® Safety Warnings ................5 Assembling the Main Wing ............5 Assembling the Landing Gear ............6 Assembling the Tail Surfaces ............7 Attaching the Wing to the Fuselage ..........7 The Air Strike Radio System ............8 ®... -
Page 4: Getting Acquainted With Your Air Strike
I. Extra Propeller J. Main Wing Bands and Spares K. Spare Prop Nuts L. Spare Fuse M. Prop Wrench N. PVC Tape Strip Make sure that you have received all parts shown. If something is missing, call Megatech toll-free at 1-888-MEGA-911... -
Page 5: Safety Warnings
10 mph or less). Attempting to fl y your aircraft in winds above 10 mph can result in a crash! Assembling Your New Air Strike Items Required to Build Your Air Strike ® • 8 “AA” alkaline batteries •... -
Page 6: Assembling The Landing Gear
Next, fi nd the strip of white PVC reinforcing tape included with your kit. This will be applied to the bottom of the wing. Remove the backing from the PVC tape and stick the tape to the center section of the wing as shown in Figure 3. Do not conform the tape to the shape of the ridge in the center of the wing. -
Page 7: Assembling The Tail Surfaces
Step 3: Assemble the Tail Surfaces Locate the horizontal stabilizer from your kit. Carefully slide the horizontal stabilizer into the slot located at the rear of the fuselage as shown in Figure 5. The elevator control horn should be pointing upward. Route the antenna under the horizontal stabilizer, so it exits from the indentation in the rear of the fuselage. -
Page 8: The Air Strike Radio System
This will help reduce the chance of accidental damage. This will help reduce the chance of accidental damage. The Air Strike Radio System This aircraft uses a 3-channel R/C (radio control) system. See Figure 7. The stick on the left side of the transmitter operates the motor. When this stick is all the way in the “down”... -
Page 9: The Battery Pack
Important: The Air Strike uses a special battery with polarized connec- tors. Do not use any battery pack for this aircraft other than original Megatech™... -
Page 10: The Battery Charger
Figure 8) specifi cally for the battery specifi cally for the battery specifi cally for the battery packs in your Air Strike packs in your Air Strike packs in your Air Strike and will not charge any other and will not charge any other and will not charge any other type of battery pack. -
Page 11: Charging The Battery
Do not insert any metal objects into the battery plug, as a direct short (and quite possibly a fi re) will result. • Always remove the battery pack from your Air Strike after each fl ight. ® Do not store the battery pack inside the aircraft. -
Page 12: Cycling The Batteries
Cycling the Batteries AFTER READING THIS ENTIRE MANUAL, BUT BEFORE AFTER READING THIS ENTIRE MANUAL, BUT BEFORE YOU FLY YOUR AIR STRIKE FOR THE FIRST TIME: ® You must “cycle” the fl ight pack at least twice prior to fl ying your aircraft. -
Page 13: Safety Start Switch
Safety Start Switch You’ll notice a red button located on the underside of the fuselage next to the on/off switch. This button must be pressed before power can be supplied to the motor. This safety switch exists so that radio interference or problems can be discovered without the motor starting unexpectedly. -
Page 14: Rudder And Elvator Controls
B. At this time, move the rudder and elevator control stick (the right control stick), to see how the controls operate your Air Strike . Notice that you can operate the rudder and ® elevator at the same time. This helps provide smooth, controlled fl... -
Page 15: Testing The Motor
Move the throttle up and down a few times to get a feel for how it works (See Figure 15). Once you are satisfi ed and familiar with the operation of your Air Strike, turn off the receiver (fi rst) and then the transmitter. -
Page 16: Safety Precautions
IMPORTANT SAFETY PRECAUTIONS Please read these before operating your Air Strike. • YOU ALONE ARE RESPONSIBLE FOR OPERATING YOUR AIRCRAFT IN A SAFE AND RESPONSIBLE MANNER. FOLLOW THESE BASIC SAFETY GUIDELINES AT ALL TIMES. • Always fl y your airplane in a wide-open area. You’ll need at least two football fi... -
Page 17: Pre-Flight Preparations
Pre-Flight Preparations Now it’s time to describe how you can become a successful R/C Now it’s time to describe how you can become a successful R/C pilot with the Air Strike . A little patience and care exhibited here ®... -
Page 18: Your First Powered Flight
® Although capable of taking off from the ground, there are several disadvantages to attempting this. First, the Air Strike’s nose gear is fi xed (not steerable), making the aircraft diffi cult to control on the ground. Second, ground take offs provide no margin for error. -
Page 19: Control Stick Adjustments
Control Stick Adjustments Keep your stick movements smooth, not abrupt or “jerky”. The aircraft will actually fl y all by itself if left alone, and SMALL movements of the stick are all that is needed to control the Air Strike. In fact, moving the rudder/elevator stick all the way in any direction will cause the aircraft to become unstable, so remember……smooth! After launch, allow the aircraft to fl... -
Page 20: Turning Your Air Strike
Turning Your Air Strike Turning the Air Strike is done with the coordinated use of both ® rudder and elevator controls. The rudder makes the aircraft yaw (bank) in the direction you wish to turn. When the aircraft banks, the nose will naturally drop, so small amounts of up elevator will be needed to keep the aircraft at a constant altitude while turning. -
Page 21: Having Trouble
If you see that you’re going to crash, immediately cut the power. Doing so will minimize the damage to the aircraft. Landing Your Air Strike When the motor stops, the nose will drop slightly. This is normal under reduced or zero power. Do not immediately give up elevator! Use the... -
Page 22: Taking Off From The Ground
Simply land the plane smoothly into the wind. You will not damage the aircraft as long as you take care to land gently! Taking Off From The Ground The Air Strike is capable of taking off from the ground. Keep in mind that ®... -
Page 23: Making Repairs
Allow it to pick up speed for about 60 feet, then gently add a small amount of up elevator and the Air Strike ® will break ground. Continue to gain altitude in a shallow climb and you’re on your way. -
Page 24: Installing A New Propeller
fl ight. 3. Using sturdy tweezers or needle nose pliers, remove the fuse (located in the front of the battery compartment). 4. Gently, but fi rmly, press the replacement fuse (included with your Air Strike ) into place. ®... -
Page 25: Obtaining Spare Parts
Spare, repair and replacement parts are readily available for your Spare, repair and replacement parts are readily available for your aircraft. Should you need parts, visit your local hobby dealer fi rst. If unavailable, you may order directly from Megatech. Use this sheet as a guide. Part #... -
Page 26: Air Strike ® Trouble Shooting Guide
Trouble Shooting Guide... -
Page 27: Warranty Information
® Limited Warranty Megatech International guarantees this item to be free from defects for a period of 90 days from date Megatech International guarantees this item to be free from defects for a period of 90 days from date of purchase. If any component of this product fails to function properly due to defects in materials or manufacturing process during this 90 day period, the Manufacturers obligations are limited and manu- facturer can choose to either repair or replace the item. - Page 28 LOOK FOR THESE OTHER FINE MEGATECH PRODUCTS MTC7700 X-EC DIVERSION™ MICRO R/C FLYER MTC9310 MTC9310 MEGACHOPPER™ MEGACHOPPER™ R/C HELICOPTER W/ R/C HELICOPTER W/ COMPUTERIZED LIGHTS COMPUTERIZED LIGHTS MTC9932 COSMIC FLYER™ R/C EASY FLYER MTC9901 MEGASTEALTH™ II ELECTRIC RTF AIRCRAFT Megatech International...
Need help?
Do you have a question about the Air Strike and is the answer not in the manual?
Questions and answers