ELICA EPR628SS Installation Instruction Manual
Hide thumbs
Also See for EPR628SS:
- Installation instruction manual (13 pages) ,
- Installation sheet (2 pages)
Table of Contents
Advertisement
Advertisement
Table of Contents

Related Manuals for ELICA EPR628SS


Summary of Contents for ELICA EPR628SS
-
Page 1: Read And Save These Instructions
Installation Instructions Guide Instructions d’installation Guide Guía de Instrucciones para Instalación Model: EPR628SS Model: EAS428SS READ AND SAVE THESE INSTRUCTIONS INSTRUCTIONS D’INSTALLATION GUIDE LEA Y GUARDE ESTAS INSTRUCCIONES English p. 3 Français p. 14 Español p. 25 LI31MA... -
Page 3: Table Of Contents
Table of Contents APPROVED FOR RESIDENTIAL APPLIANCES FOR RESIDENTIAL USE ONLY Important Safety Notice ............3 READ AND SAVE THESE INSTRUCTIONS Tools and parts ................ 4 Location Requirements ............4 PLEASE READ ENTIRE INSTRUCTIONS BEFORE PROCEEDING. Product Dimensions ............4 INSTALLATION MUST COMPLY WITH ALL LOCAL CODES. -
Page 4: Tools And Parts
Installation Instructions and Use and Care Guide T10 TORX®† adapter Parts needed Spacers has to be installed and used when cabinet depth is greater than 12”. EAS428SS / EPR628SS range hood models Dimension DIM A DIM B DIM C DIM D... -
Page 5: Venting Requirements
Installation Clearances VENTING REQUIREMENTS Vent system must terminate to the outdoors, except for no Do not terminate the vent system in an attic or other enclosed area. Use metal vent only. A rigid metal vent is recommended. Plastic or metal foil vent is not recommended. The length of the vent system and number of elbows should Use no more than three 90°... -
Page 6: Venting Methods
Venting Methods Vent Piece 6” (15.2 cm) 45° elbow 2.5 ft This range hood is factory set for venting through the roof or through the wall. You can apply the recirculating venting method by purchasing the Recirculation Kit. The vent system needed for installation is not included. 90°... -
Page 7: Installation Instructions
The grounded 3 prong outlet is to be located inside the GROUNDING INSTRUCTIONS cabinet above the range hood at a maximum distance of This range hood must be grounded. In the event of an The grounded 3 prong outlet must be accessible after electrical short circuit, grounding reduces the risk of electric installation of the range hood. - Page 8 Venting Outside Through the Roof 1. Measure and mark the lines as shown. Use a saber saw or keyhole saw to cut an opening through the top of the cabinet and the roof for the vent. A. Measurement A B. Centerline cutout Non-Vented (recirculating) Installation Through the A.
-
Page 9: Install Range Hood
Install Range Hood WARNING A. Cutout B. See chart below C. 7¾ line to cabinet front Excessive Weight Hazard D. Centerline Use two or more people to move and install range hood. Failure to do so can result in back or other injury. 1. -
Page 10: Connect The Vent System
Complete Installation WARNING Electrical Shock Hazard Plug into a grounded 3 prong outlet. Do not remove ground prong. Do not use an adapter. Do not use an extension cord. Failure to follow these instructions can result in For cabinet size - 30” x 12” (76.2 cm x 30.5 cm) Attach the ”... -
Page 11: Range Hood Use
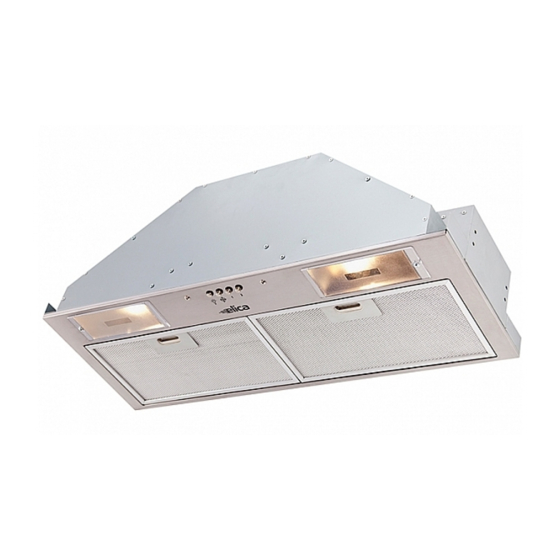
A. Blower and light controls B. Grease filter C. Grease filter handle Range Hood Controls A. EPR628SS model spring release handle B. Blower off and speed minimum button C. Blower speed medium button D. Blower speed maximum button Operating the Light again for Off. -
Page 12: Available Accessories
30” wide x 17” or 20” deep liner is available for both EAS428SS and EPR628SS which provides complete protection of cabinets 36” wide x 17” or 20” deep liner is available for both EAS428SS and EPR628SS which provides complete protection of the See Liner installation instructions for more detail. Reconnect power. -
Page 13: Warranty
WHO TO CONTACT To obtain Service under Warranty or for any Service Related Question Please Call: Or by Writing To: Elica North America, Attention Customer Service, 6658 156th Avenue SE, Bellevue, WA 98006 USA infoamericas@elica.com...
Need help?
Do you have a question about the EPR628SS and is the answer not in the manual?
Questions and answers