
Related Manuals for Dascom Tally T2365


Summary of Contents for Dascom Tally T2365
- Page 1 U1-en.fm Seite 1 Dienstag, 15. September 2009 2:10 14 T2365 T2380 Matrix Printer Quick Start Guide...
- Page 2 Important Information This device fulfils the European standards requirements by complying with the Directive of This equipment generates and uses radio frequency energy the Commission dated May 3, 1989 (89/336/EEC) relating to electromagnetic compatibility and if not installed and used properly, that is, in accordance and the Directive dated February 19, 1973 (73/23/EEC) relating to low-voltage electrical with the manufacturer's instructions, may cause interference in equipment.
-
Page 3: Table Of Contents
Quick Start-en.book Seite 1 Dienstag, 15. September 2009 11:02 11 Quick start guide Table of contents QUICK START GUIDE Table of contents QUICK START GUIDE Introduction Symbols used Important safety instructions Using the Online CD-ROM Contents of the Online CD-ROM Troubleshooting Printer at a glance View from the front... - Page 4 Quick Start-en.book Seite 2 Dienstag, 15. September 2009 11:02 11 Table of contents Quick start guide Printing out status page Technical data Printer specifications Paper specifications Accessories...
-
Page 5: Symbols Used
Quick Start-en.book Seite 3 Dienstag, 15. September 2009 11:02 11 Quick start guide Introduction Introduction This Quick Start Guide is intended as a quick introduction into working with the printer and also to enable inexperienced users to operate the device properly. It de- scribes the most important functions of the printer and contains the essential infor- mation for your everyday work with the printer. -
Page 6: Using The Online Cd-Rom
Quick Start-en.book Seite 4 Dienstag, 15. September 2009 11:02 11 Introduction Quick start guide Using the Online CD-ROM First install the Adobe Acrobat Reader on your hard disk, unless the program has already been installed. To install it, follow the steps described in the README file in the READER directory. -
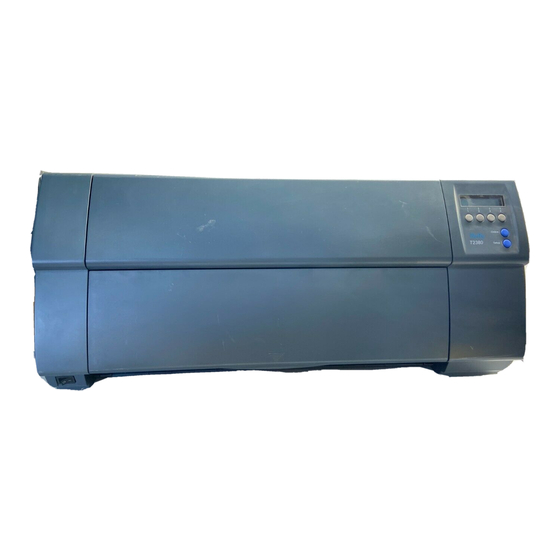
Page 7: Printer At A Glance
Quick Start-en.book Seite 5 Dienstag, 15. September 2009 11:02 11 Quick start guide Printer at a glance Printer at a glance View from the front Printer in tractor mode Control panel Rear cover Top cover Front cover Tractors Bottom cover Power switch View from the rear Interface connectors... -
Page 8: Installation
Quick Start-en.book Seite 6 Dienstag, 15. September 2009 11:02 11 Installation Quick start guide Installation Unpacking the printer Place your packaged printer on a solid base. Make sure that the “Up” symbols point in the correct direc- tion. Open the packaging, take out the accessory cassette and un- pack it. -
Page 9: Placing Your Printer
Quick Start-en.book Seite 7 Dienstag, 15. September 2009 11:02 11 Quick start guide Installation Placing your printer Place the printer on a solid, flat, surface, ensuring that the printer is positioned in such a way that it can not topple, and that there is easy access to the control panel and paper input devices. -
Page 10: Connecting The Printer
Quick Start-en.book Seite 8 Dienstag, 15. September 2009 11:02 11 Installation Quick start guide Connecting the printer Make sure that the printer is set to the correct voltage (e.g. 230 V in Europe, 120 V in the U.S.A.). To do this, check the plate above the power inlet at the rear of the printer. -
Page 11: Switching On The Printer
Quick Start-en.book Seite 9 Dienstag, 15. September 2009 11:02 11 Quick start guide Installation Switching on the printer The power switch for switching on the printer is located at the bottom left at the front of the printer when viewed from the front. -
Page 12: Control Panel
Quick Start-en.book Seite 10 Dienstag, 15. September 2009 11:02 11 Control panel Quick start guide Control panel The control panel and the keys are used for controlling the printer operation. The upper line of the display shows whether the printer is in Online or Offline mode and the paper path selected (Tractor1). -
Page 13: Quick Start-En.book Seite 1 Dienstag, 15. September 2009 11:02
Quick Start-en.book Seite 11 Dienstag, 15. September 2009 11:02 11 Quick start guide Control panel Setup mode In this mode, the following settings are available: Setup key: Sets the printer to setup mode, in which the following settings can be selected: Menu key (1): Other menu settings. -
Page 14: Changing The Ribbon Cassette
Quick Start-en.book Seite 12 Dienstag, 15. September 2009 11:02 11 Changing the ribbon cassette Quick start guide Changing the ribbon Before opening the cover, make sure that the printer is switched on so that it can cassette execute automatic preparations for ribbon changing (widening the print head gap). During the process of initialization after powering on, the printer checks if a rib- bon cassette is installed. - Page 15 Quick Start-en.book Seite 13 Dienstag, 15. September 2009 11:02 11 Quick start guide Changing the ribbon cassette Move the coloured friction tabs on the right and on the left into the direction of the respective arrows shown in the figure and raise the friction mechanism.
- Page 16 Quick Start-en.book Seite 14 Dienstag, 15. September 2009 11:02 11 Changing the ribbon cassette Quick start guide Raise the coloured insertion tongue Remove the coloured protections Insert the coloured ribbon tension knob into the right-hand front location of the new ribbon cassette. Turn the knob in the direction of the arrow in order to take up slack of the ribbon.
- Page 17 Quick Start-en.book Seite 15 Dienstag, 15. September 2009 11:02 11 Quick start guide Changing the ribbon cassette Slightly tilt the ribbon cassette forwards and thread in the rib- bon between the coloured insertion tongue and the ribbon support (transparent plastic plate). Align and insert the cassette into the guides on the left and right, then press down until it clicks into place.
- Page 18 Quick Start-en.book Seite 16 Dienstag, 15. September 2009 11:02 11 Changing the ribbon cassette Quick start guide Press down the coloured insertion tongue Move the print head carriage back and forth several times. If the ribbon is correctly seated, there must be no perceptible resistance.
- Page 19 Quick Start-en.book Seite 17 Dienstag, 15. September 2009 11:02 11 Quick start guide Changing the ribbon cassette Press the friction mechanism down until it clicks into place. Close the top cover.
-
Page 20: Paper Handling
Quick Start-en.book Seite 18 Dienstag, 15. September 2009 11:02 11 Paper handling Quick start guide Paper handling This section describes how to load fanfold paper, transport paper and move the pa- per to the tear position. Loading paper Your printer can process fanfold paper. For information on the supported paper sizes, please refer to page 31 (“Paper specifications”). - Page 21 Quick Start-en.book Seite 19 Dienstag, 15. September 2009 11:02 11 Quick start guide Paper handling Open the coloured latch lever and align the tractor so that the first printing position on the paper matches the mark on the printer housing. Lock the coloured lever again.
- Page 22 Quick Start-en.book Seite 20 Dienstag, 15. September 2009 11:02 11 Paper handling Quick start guide Make sure to align the paper stack in parallel with the printer and that the paper flow is unobstructed. Lower the front cover. Switch the printer on. The active paper source (Tractor1) appears in the display.
-
Page 23: Paper Transport
Quick Start-en.book Seite 21 Dienstag, 15. September 2009 11:02 11 Quick start guide Paper handling Paper transport Loaded paper can be transported in the printer in several ways. Make sure that the printer is in offline mode (Pause); press the Online key, if necessary. -
Page 24: Moving The Paper To The Tear Position
Quick Start-en.book Seite 22 Dienstag, 15. September 2009 11:02 11 Paper handling Quick start guide Moving the paper to the tear You can use the Tear key to move the paper to the tear position. The tear edge is position located at the front side of the paper output opening. -
Page 25: Removing Paper
Quick Start-en.book Seite 23 Dienstag, 15. September 2009 11:02 11 Quick start guide Paper handling Removing paper Never use force to remove the paper from the printer. Otherwise the mechanical STOP components may be damaged. Make sure that the printer is in offline mode; press the Online key, if necessary. Press the Park (1) key. -
Page 26: Settings
Quick Start-en.book Seite 24 Dienstag, 15. September 2009 11:02 11 Settings Quick start guide Settings This section describes how to set the tear position, the first printing line, the print head gap as well as the font selection and the character density. Setting the tear position If the tear position of the paper is not aligned with the tear edge of the top cover of the printer, you can adjust it. -
Page 27: Setting The First Printing Line (Tof)
Quick Start-en.book Seite 25 Dienstag, 15. September 2009 11:02 11 Quick start guide Settings Setting the first printing line You can use the TOF function for setting the position of the first printing line for (TOF) each paper source and each menu individually. Before using the TOF function, you first have to set the tear position (see above). - Page 28 Quick Start-en.book Seite 26 Dienstag, 15. September 2009 11:02 11 Settings Quick start guide Confirm the input by pressing the Set (1) key. FormAdj= 17/72" Online Press the Setup key. The printer returns to the initial status. < > Exit Setup The setting made will be retained after switching off the printer.
-
Page 29: Setting The Print Head Gap
Quick Start-en.book Seite 27 Dienstag, 15. September 2009 11:02 11 Quick start guide Settings Setting the print head gap The printer features automatic print head gap adjustment to the thickness of the pa- per used. In setup mode, you can enter a correction value to modify the head gap that is normally determined automatically. -
Page 30: Selecting Character Density And Font
Quick Start-en.book Seite 28 Dienstag, 15. September 2009 11:02 11 Settings Quick start guide Selecting character density You can use the CPI (Character Per Inch) key in setup mode to select the number and font of characters per inch to be printed. You can use the Font key to select fonts. Press the Setup key. -
Page 31: Printing Out Status Page
Quick Start-en.book Seite 29 Dienstag, 15. September 2009 11:02 11 Quick start guide Printing out status page Printing out status page The status page contains all selected menu settings and the installed control soft- ware and the character generators. Make sure that blank paper is inserted in the valid paper source (default is Tractor 1). -
Page 32: Technical Data
Quick Start-en.book Seite 30 Dienstag, 15. September 2009 11:02 11 Technical data Quick start guide Technical data Printer specifications Type T2365 T2380 T2365MC Printing method Serial with 24-needle print head Printing width 136 characters at 10 cpi Print speed (bidirectional mode, 12 cpi) (bidirectional mode, 12 cpi) (bidirectional mode, 12 cpi) HSQ (Matrix 12 x 8) -
Page 33: Paper Specifications
Quick Start-en.book Seite 31 Dienstag, 15. September 2009 11:02 11 Quick start guide Technical data Paper specifications Fanfold paper Tractor1 Continuous single forms Paper weight 60–120 g/m Single set of forms No. of copies 1 + 6 (T2365) (requires individual testing) 1 + 5 (T2380) 1 + 8 (T2365MC) Form thickness (max.) -
Page 34: Accessories
Quick Start-en.book Seite 32 Dienstag, 15. September 2009 11:02 11 Accessories Quick start guide Accessories Ribbon cassettes Order no. Black ribbon cassette 062471 For additional accessories and options, please refer to the User guide on the On- line-CD-ROM. - Page 35 Quick Start-en.book Seite 1 Dienstag, 15. September 2009 11:02 11 “All rights reserved. Translations, reprinting or copying by any means of this manual complete or in part or in any different form re- quires our explicit approval. We reserve the right to make changes to this manual without notice. All care has been taken to ensure accuracy of information contained in this manual.
- Page 36 Fax: +49 (0) 731 2075 100 Fax: +44 (0) 1256 481400 www.dascom.com www.dascom.com www.dascom.com SINGAPORE DASCOM AP Pte Ltd 63 Hillview Avenue #08-22, Lam Soon Industrial Building Singapore 669569 Phone: +65 6760 8833 Fax: +65 6760 1066 www.dascom.com © September 2009 DASCOM Europe GmbH 063206b...
Need help?
Do you have a question about the Tally T2365 and is the answer not in the manual?
Questions and answers