Table of Contents
Advertisement
Available languages
Available languages
Item: 50024(SP-045)
Version Submitted by KAB: R1-1
Page size: 11"(W)x8.5"(H)
Submission date: 2014/05/19
Dieline:
______
Layout area:
______
3.3833"
3.3833"
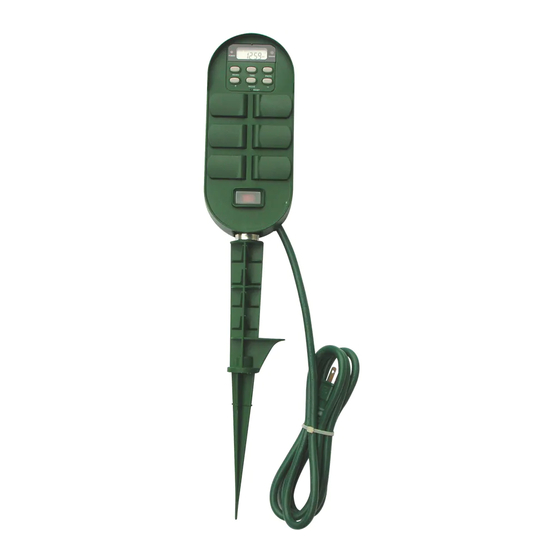
ITEM #0050024
2. Attach the assembled
8. <-> - To reduce time and day setting.
1-2
MODE
TIME
PROG
stake to the outlet (A) by
+
SET/
-
9. RESET - Reset all the functions.
MODEL #SP-045
screwing the top of
10. ON/OFF Switch - Press the switch "I" to start
DIGITAL TIMER
upper stake (B) into the
A
your desired settings.
base of the outlet.
YARD STAKE
Be sure to firmly tighten
3. Reset
the stake to the body
before installing into the
B
There is a reset hole under
Call customer service at 1-866-994-4148,
ground.
8 a.m. - 6 p.m., EST, Monday - Thursday,
the dashboard. Insert a pin
8 a.m. - 5 p.m., EST, Friday.
or paperclip end into the
3. Insert the stake 6 inches into the ground.
hole to reset the timer. This
PACKAGE CONTENTS
will clear all programmed
Plug the yard stake into a GFCI-protected
settings.
grounded outlet. (CAUTION: Combined amp load
on all the outlets at any one time must not exceed
A
B
C
1,875 watts).
4. Set Current Time
4. Press the switch to "I"
1. Press and hold "TIME" button for 2 seconds to
1-4
MODE
TIME
PROG
+
SET/
-
position
enter the current time settings. Press "+" or "-"
button to set the correct day.
2. Press the "SET" button to enter the hour setting.
Press "+"or "-" buttons to set the current hour. Be
8.5"
sure that AM or PM appears correctly.
3. Press the "SET" button to enter the minute
MODE
TIME
PROG
setting. Press the "+" or "-" buttons to set the
current minute.
+
SET/
-
4. Press the "SET" button to finish setting the
2. Panel Layout
PART
DESCRIPTION
QUANTITY
2-1
current time and return to normal display.
A
Outlet
1
5. While setting those processes above, press and
1. POWER - Power
hold "SET" button to clear the setting and revert
1
2
B
Upper Stake
1
indicator light indicates if
4
to the original timer settings. While setting those
the yard stake is turned
1
C
Lower Stake
MODE
TIME
PROG
processes above, press "TIME" button or wait for
on or off.
3
5
15 seconds to go back to the standby display.
2. SENSOR - Sensor will
+
SET/
-
Before initial use, please plug in the outlet (A) for at
7
turn yard stake on at dusk
6
8
least 30 minutes to charge the internal battery. The unit
9
5. MODE Setting
and off at dawn.
will be ready for programming after the LCD display
3. MODE - Manual override
appears.
2-2
Press "MODE" button to choose the desired mode.
scroll between timer
ON → OFF → RDM
status options.
OPERATING INSTRUCTIONS
AUTO
4. TIME - Press and hold for
2 seconds to set current
1. Installation
1-1
10
1. ON - Always on.
time.
5. PROG - Press and hold
1. Connect the two pieces of
The outputs remain
B
for 2 seconds to begin
the yard stake together by
setting function. (Only
always on.
screwing the lower stake
works under "AUTO
" or "AUTO
" mode).
(C) into the upper stake
6. <+> - To increase time and day setting.
(B).
C
7. SET/
- Setting confirms and clear setting (Press
and hold for 2 seconds).
AB14429
Page 1
11"
ITEM #0050024
2. Attach the assembled \
6. <+> - To increase time and day setting.
stake to the Body (A) by
2-2
7. MODE - Press and hold the "MODE" button to
MODEL #SP-045
screwing the top of
scroll between the different mode settings.
OUTDOOR DIGITAL
Upper Stake (B) into the
A
a. Automatic Timer Program
TIMER YARD STAKE
base of the Body.
b. Photocell
Be sure to firmly tighten
c. Timer+Photocell
the stake to the body
B
8. <-> - To reduce time and day setting.
Call customer service at 1-866-994-4148,
before installing into the
9. RESET - Reset all the functions.
8 a.m. - 6 p.m., EST, Monday - Thursday,
ground.
10. ON/OFF Switch - Press the switch ON to start
8 a.m. - 5 p.m., EST, Friday.
3. Insert the stake 6 inches into the ground.
your desired settings.
PACKAGE CONTENTS
3. Reset
4. Press the switch to I
2-4
Press the "RESET" button to reset your timer. This
A
B
C
position
will clear all programmed settings.
4. Set Current Time
1. Press and hold "TIME" button to enter the current
time. First, set the day of the week; press "+" or
"-" button to set the correct day.
2. Press the "TIME" button to enter the hour setting.
Operating:
Press "+"or "-" buttons to set the current hour. Be
1. Plug the yard stake into a GFCI-protected
sure that AM or PM appears correctly.
grounded outlet. (CAUTION: Combined amp load
3. Press the "TIME" button to enter the minute
8.5"
on all the outlets at any one time must not exceed
setting, Press the "+" or "-" buttons to set the
1875 watts).
current minute.
4. Press the "TIME" button to finish setting the
2. Button Layout
current time and return to normal display.
PART
DESCRIPTION
QUANTITY
2
1
4
2
A
Outlet
1
1. POWER - Power
3
6
8
5
5. MODE Setting
indicator light indicate if
9
7
Press MODE button to choose between function.
B
Upper Stake
1
the yard stake is turned
Timer→Photocell→Timer + Photocell→Timer
C
Lower Stake
1
on or off.
(repeat)
2. SENSOR - Sensor will
turn yard stake on at dusk
Display
MODE
Explanation
and off at dawn.
10
ON/OFF at your exact
OPERATING INSTRUCTIONS
3. MANU - Manual Override scroll between timer
Timer
programmed timer.
status options.
1. Installation
a. ON - Always ON
Photocell
ON at dusk or ON immediately;
1-1
b. OFF - Always OFF
OFF after 1~12 hours.
1. Connect the two pieces
c. AUTO - Timer Will turn ON/OFF according to
Timer
+
ON at dusk, OFF at your exact
of the yard stake
B
the program settings.
Photocell
programmed timer.
together by screwing
d. RDM - Run all events (programs) in a Random
Lower Stake (C) into
mode.
6. Program Setting
Upper Stake (B)
C
4. TIME - Press and hold for three seconds to set
Before setting, make sure timer is set to AUTO and
current time.
RDM mode.
5. PROG - Press and hold for three seconds to
Press and hold "PROG" button for three seconds to
begin setting function.
begin program setting, using the "+" and "-" buttons
XXXXXX
11"
3.3833"
3.3833"
3.3833"
2. OFF - Always off.
6. Program Settings
5-2
The outputs remain
Make sure the current mode
always off.
is at AUTO
mode, then
press and hold "PROG"
button for two seconds to
3
begin program setting,
using the "+" and "-" buttons
to adjust the setting.
3. RDM
- Security feature.
MODE
TIME
PROG
5-3
On at a random time and
+
-
1. Press "SET" button to
SET/
will remain ON for 15
enter the timer time.
minutes.
Press "+" or "-" button to
set the correct day.
Up to 5 on/off events
MO →TU →WE→ TH →
every day. The on/off
FR→SA→SU→MO TU
events are built-into this
WE TH FR → SA SU→
product, turn ON at a
random time and the ON time is different each
MO TU WE TH FR SA
SU (cycle).
day, creating a more "lived-in" look.
2. Press the "SET" button to
4. AUTO
- ON/OFF
5-4
enter the hour setting.
program at AUTO mode.
Press "+" or "-" buttons to
set the desired hours for
ON/OFF at your exact
your timer to turn on. Be
programmed timer.
sure that AM or PM
appears correctly.
Remark: Please refer to
"6" for setting in details.
3. Press the "SET" button to
5. AUTO
- Photocell
5-5
enter the minute setting.
Press the "+" or "-"
Turn on the power at
buttons to set the desired
dusk and turn off the
minutes for your timer to
power at dawn
turn on.
automatically.
→ AUTO
→ AUTO
→
as follows.
4. Press "SET" button to enter the program OFF
6. AUTO
- Program +
setting, the "1 OFF" will appear on the display.
5-6
Photocell
Repeat steps 1 to 3 to set your desired OFF time,
5-1
up to 8 on/off program settings.
On at dusk, OFF at your
5. While setting the programs, press and hold the
exact programmed time.
"SET" button 2 seconds to clear the set program
time.
6. Once finished, press "TIME" button or wait for 15
Remark: Please refer to
"7" for setting in details.
seconds to restore your programs to back the
standby display.
Page 2
MODE
TIME
PROG
-
+
SET/
3.3833"
3.3833"
7. Digital Timer + Photocell Setting
HELPFUL TIPS
• OPERATION: Once assembled, plug the yard stake
1. Press "MODE" to select
6
7-1
into a grounded outlet (total wattage should
"AUTO Program +
not exceed 15 amp or 1,875 watts)
photocell setting", then
press and hold "PROG"
button for two seconds to
set the off time.
SAFETY INFORMATION
Disregarding cautions could cause damage, fire, or
fatal shock. When using outdoor electrical products,
2. Press "+" or "-" button to
6-1
basic safety precautions should always be followed to
7-2
set the desired OFF day
reduce the risk of fire, electric shock, and personal
of the week program.
injury.
You can select each day
individually, Monday to
Friday, Saturday/Sunday,
SPECIFICATIONS:
or an entire week to have
6FT AWG 14/3 SJTW vinyl cord
your timer turn on at dusk
RATINGS:
and off at the set time.
125V, 60Hz, 15A, 1,875W general purpose
6-2
3. Press the "SET" button
7-3
to enter the OFF time
hour setting. Press the
"+" or "-" buttons to set
WARNING
time. Be sure to cycle
This equipment has been tested and found to comply
through until AM or PM
with the limits for Class B digital device, pursuant to
appears correctly.
part 15 of the FCC Rules. These limits are designed to
provide reasonable protection against harmful
interference in a residential installation. This equipment
6-3
4. Press the "SET" button
generates, uses and can radiate radio frequency
7-4
to enter the OFF time
energy and, if not installed and used in accordance
minutes setting. Press
with the instructions, may cause harmful interference to
the "+" or "-" buttons to
radio or television reception, which can be determined
set time.
by turning the equipment off and on, the user is
encouraged to try to correct the interference by one or
more of the following measures:
• Reorient or relocate the receiving antenna.
• Increase the separation between the equipment and
5. You can press "SET" button to enter additional
the receiver.
programs, up to 8 off program setting. While
• Connect the equipment into an outlet on a circuit
setting the programs, press and hold the "SET"
different from that to which the receiver is connected.
button to clear the set program time. Press
• Consult the dealer or an experienced radio/TV
technician for help.
"TIME" button or wait for 15 seconds to store the
program, and go back to the standby display.
This device complies with Part 15 of the FCC Rules.
Operation is subject to the following two conditions: (1)
This device may not cause harmful interference, and
3.3833"
3.3833"
(2) this device must accept any interference received,
WARRANTY
CARE AND MAINTENANCE
including interference that may cause undesired
• Store indoors in dry location.
operation of the device.
• For information on product warranty please call
• Always unplug when not in use.
customer service at 1-866-994-4148, 8 a.m. - 6 p.m.,
Any changes or modifications not
• Do not unplug by pulling on cord.
EST, Monday - Thursday, 8 a.m. - 5 p.m., EST,
Friday.
expressly approved by the party responsible for
• This product is guaranteed to be free of defects for
compliance could void the user's authority to operate
a limited period of one year form the date of
this equipment.
TROUBLESHOOTING
purchase.
• If the product suddenly malfunctions and is not
damaged by external factors or personal reasons
PROBLEM
POSSIBLE
CORRECTIVE
within the one year warranty limit from the day of
CAUTION
CAUSE
ACTION
purchase, the product maybe considered for repair.
There is a risk of fire when too much power is drawn
If lights do
It could be timer
To correct the
If the product is damaged due to natural disaster like
not turn on
is not in a good
problem, move the
from this item. Use only with a total of 15 ampere
at dusk.
area for light
timer to another
fire, lightning, flood, hurricane, etc., the product will
maximum Christmas tree or other seasonal lighting
meter to function
location where
not be considered for repair.
products.
as there is too
there is no ambient
• Risk of fire. Not for permanent installation. Use only
much ambient
light.
with outdoor equipment, Christmas tree, or other
light to detect
seasonal decorative-lighting products having a total
darkness.
of 15 Ampere maximum. Do not install or use this
If lights do
It could be lights
To correct the
product for more than a 90-day period.
not turn on
are not in "ON"
problem be sure
• If using Christmas tree or decorative-lighting
even when
position, lights
that lights are
products that are not marked with an ampere rating,
timer is "ON"
are not
functional by
position.
functioning, or
plugging them
connect no more than 140 screw-base lamps (C7 or
timer is not
directly into the
C9) or 12 strings with push-in lamps to this cord set.
receiving power.
outlet. Be sure that
• Cord sets shall be plugged into a GFCI - protected
lights are in "ON"
position if they have
receptacle.
their own switch. Be
• If using an outdoor-use cord set for an extended
sure that timer is
period of time (greater than 90 days), please consider
receiving power -
hard wiring a permanent outdoor-use receptacle
the LED should light
rated for year-round use in the area that power is
up when plugged
needed. Please contact a licensed electrician for
into an outlet and
put in the "ON"
proper installation of permanent wiring.
position.
• After completion of installation, the connector shall be
maintained a minimum of 6 inches above ground.
If lights are
It could be the
To correct the
• SUITABLE FOR INDOOR/OUTDOOR USE – STORE
flashing
timer is in Dusk to
problem, move the
(turning on
Dawn mode, and
lights away from the
INDOORS WHILE NOT IN USE.
and off).
the light from the
timer, or reposition
• PLUG INTO GROUND FAULT PROTECTED
plugged-in lights
the timer so that it
RECEPTACLE ONLY.
is affecting the
does not face the
light sensor.
lights.
NOTE: Position yard stake away from other light
sources. If it is too close to other light sources, or if the
photocell is facing a light source other than the sun
(such as a porch light or street lamp), the yard stake
may shut off outside of the timer setting you chose. If
this happens, relocate yard stake or eliminate other
light sources. Keep yard stake and power cord out of
common walkways to prevent tripping.
Page 3
3.3833"
3.3833"
3.3833"
Printed in China
Page 4
Advertisement
Table of Contents

Related Manuals for Utilitech SP-045


Summary of Contents for Utilitech SP-045
- Page 1 Item: 50024(SP-045) Version Submitted by KAB: R1-1 ITEM #0050024 2. Attach the assembled \ 6. <+> - To increase time and day setting. stake to the Body (A) by 7. MODE - Press and hold the “MODE” button to MODEL #SP-045 screwing the top of scroll between the different mode settings.
-
Page 2: Instrucciones De Funcionamiento
Este equipo • El juego de cables debe estar enchufado en un MODELO #SP-045 tomacorriente con interruptor de circuito por falla a • Si desea más información sobre la garantía del superior (B) para conectar jardín al anochecer y la...
Need help?
Do you have a question about the SP-045 and is the answer not in the manual?
Questions and answers