Advertisement
Available languages
Available languages
Quick Links
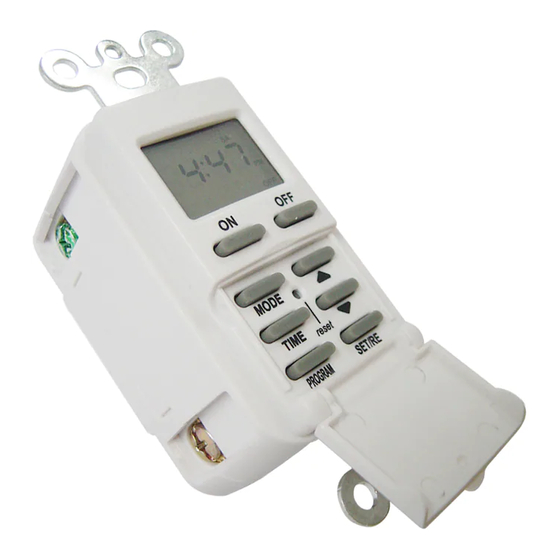
ITEM #0141224
Before initial use, if LCD screen is blank, connect with
power for at least 30 minutes to charge the internal
MODEL #TM-097
battery. After the screen displays, the unit is ready for
IN-WALL TIMER
programming.
1. This device is to be installed in a wall box measuring
at least 3 in. x 2 in. x 2-1/2 in. (standard single gang
Call customer service at 1-866-994-4148,
electrical wall box) and wired in
8 a.m. - 6 p.m., EST, Monday - Thursday,
Strip Length:
accordance with National Electrical
8 a.m. - 5 p.m., EST, Friday.
Code.
PACKAGE CONTENTS
2. Straighten each conductor and strip 3/4 in.
of insulation from each wires.
A
B
3. Installing In-Wall Timer:
Begin by loosening all screws.
3
Ground
Neutral
Ground wire (Green)
Neutral
Neutral wire (White)
Hot wire
Load wire (Black)
C
D
Hot wire (Black)
Load
wire
1. Insert the ground or bare wire(s) into the hole(s)
PART
DESCRIPTION
QUANTITY
labeled "G" (near green screw) (see figure 3).
2. The timer requires a
A
Timer
1
neutral wire connection
3-2-1
B
Wall plate
1
or the timer will not work.
(1) If the neutral (white)
C
0.748 in. - 2
Mounting screws (Wall box)
wire has an appropriate
0.33 in. - 2
D
Mounting screws (Wall plate)
length, strip and twist
together the ends of the
* Tools Required for Assembly (not included):
neutral (white) wires and
flathead screwdriver.
insert into the holes
labeled N (near silver
screw). (see figure
3-2-2
INSTALLATION INSTRUCTIONS
3-2-1).
Warning: To avoid fire and/or shock, turn off power.
(2) If the neutral wire from
the wall box is short
Make sure the power is off before wiring. If you are
unsure or uncomfortable with installation, contact a
and does not reach the
licensed electrician.
timer, use the enclosed
jumper kit to extend the
The spare
(white) wire.
wire connection. Begin
by connecting one end
AB16775
of the supplied wire (white) to the neutral wires
6. Press the
" " or " "
button until the display shows
the current DAY then press SET/RE button.
from the wall and secure it with a wire nut.
Then, insert the two neutral (white) wires into
7. Press the
" " or " "
button until the display shows
the holes labeled N (near silver screw) (see
the current HOUR then press SET/RE button.
8. Press the
" " or " "
button until the display shows
figure 3-2-2).
3. Insert the hot wire into the hole labeled "L-I" (near
the current MINUTE then press SET/RE button to
brass screw) (see figure 3).
complete time setting.
4. Insert the load wire into the hole labeled "L-O"
2. Operating the Time Switch
(near brass screw). The screw terminal accepts
14AWG-12AWG copper wire (12AWG maximum).
3/4"
(see figure 3).
Press the MODE button repeatedly to set the timer
(1.9cm)
to Automatic, Random or Manual (ON or OFF) mode.
5. Tighten all screws firmly
(see figure 3-5).
NOTE: For the time switch to run programmed
6. Carefully fold wire into
events, it must be set to "AUTO" mode.
wall box and mount timer
(A) into wall box using
• AUTO — runs all events automatically, according
Wall
mounting screws (CC),
to the schedule you have set. The word "AUTO"
then attach the wall plate
appears in the display.
using the mounting
• RDM (Random) - Timer will randomly turn devices
screws (DD). (see figure 3-6).
ON/OFF within15 minutes 5 times per day. This is
3-6
a security feature in which ON and OFF times
randomly, creating a more "lived-in" look.
• MANUAL (ON or OFF) — turns always ON or OFF
only when user presses the ON or OFF button.
The display is blank, showing neither RDM nor
AUTO.
3. Overriding Timer Settings
The ON or OFF buttons
override the current
7. Restore power by flipping the breaker to the "on"
programmed events. To
position or re-installing the fuse to the circuit.
override the current
program (either ON or OFF),
press the ON or OFF button.
OPERATING INSTRUCTIONS
NOTE: If the timer is not in
1. Setting the Clock
"Manual (ON or OFF)" mode,
it will obey the next programmed event. This allows
1. Open the door.
the user to manually turn a light on and allow the
2. Press TIME button.
program to shut the light back off at a preset time.
3. Display will flash for a 15 seconds. If no other
action taken, clock may engage with the incorrect
time.
4. Setting Programs
4. Press the
" " or " "
button until the display shows
the current YEAR then press SET/RE button.
Timer has up to 7 customizable ON/OFF Event
5. Press the
" " or " "
button until the display shows
Settings to turn devices on and off at different times
the current MONTH then press SET/RE button.
and on different days as programmed.
1. Press MODE repeatedly until the display
6. Clearing (Deleting) an Event
shows AUTO.
1. Press the PROGRAM button as many times as
2. Press the PROGRAM
4-2
necessary to locate the setting you want to clear.
button once. The display
2. Press and hold the SET/RE for 3 seconds button.
will look as shown at the
3. When finished, press the TIME button to return
right. The
"
ON
" in
the
the display to the time of day.
lower right hand corner
indicates that you are now
ON
programming EVENT 1
HELPFUL TIPS
which you want your
device turned ON.
• In case of an operational failure of the timer, use a
paper clip and insert into the RESET hole to clear all
3. Press the SET/RE button to set up the time.
the settings and restart.
4. Press the
" " or " "
button repeatedly until the
display shows the DAY(s) when you want then
SAFETY INFORMATION
press SET/RE button.
The options are:
Please read and understand this entire manual before
• All days of the week (MO TU WE TH FR SA SU)
attempting to assemble, operate or install the product.
• Individual days of the week (MO, etc.)
• Weekdays only (MO TU WE TH FR)
• Weekends only (SA SU)
THIS TIMER IS FOR USE WITH A 125 V AC POWER
5. Press the
" " or " "
button repeatedly until the
SOURCE. 125 V AC / 60 Hz
display shows the HOUR when you want then
press SET/RE button.
DO NOT ATTACH A DEVICE THAT EXCEEDS THE
6. Press the
" " or " "
button repeatedly until the
UNIT RATINGS:
display shows the MINUTE when you want then
15 A / 1,875 Resistive (General Purpose)
press SET/RE button.
8 A / 1,000 W Tungsten (Incandescent)
7. Repeat Steps 3, 4, 5, 6 to set the OFF time for
8.3 A / 996 W Standard Ballast (Fluorescent)
Event 1
500 VA Ballast (Electronic)
3
SU
1/2 HP (Horsepower Motor)
Two kinds of settings can cause the timer to work in
AM
an unexpected way:
- Set up events in progressive order of time (for
ON
WARNING
AUTO
example, 8:00 pm ON, 9:00 pm ON, 10:00 pm
TO AVOID FIRE, SHOCK, OR DEATH, TURN OFF
ON — NOT 8:00 pm ON, 10:00 pm ON, 9:00 pm
ON
OFF
POWER AT CIRCUIT BREAKER AND TEST THAT
ON).
POWER IS OFF BEFORE WIRING.
- Do not overlap event times (for example, 8:00 pm
ON /12:00 pm OFF, and 9:00 pm ON / 11:00 pm
This equipment has been tested and found to comply
OFF).
MODE
with the limits for Class B digital device, pursuant to
part 15 of the FCC Rules. These limits are designed to
5. Reviewing Events Programmed
provide reasonable protection against harmful
TIME
reset
interference in a residential installation. This equipment
1. In the current time display, press the PROGRAM
generates, uses and can radiate radio frequency
PROGRAM
SET/RE
button repeatedly to check your settings.
energy and, if not installed and used in accordance
2. When finished, press the TIME button to return
with the instructions, may cause harmful interference to
the display to the time of day.
radio or television reception, which can be determined
by turning the equipment off and on, the user is
encouraged to try to correct the interference by one or
• This product is guaranteed to be free of defects for
more of the following measures:
a limited period of one year from the date of
• Reorient or relocate the receiving antenna.
purchase.
• Increase the separation between the equipment and
• If the product suddenly malfunctions and is not
the receiver.
damaged by external factors or personal reasons
• Connect the equipment into an outlet on a circuit
within the one year warranty limit from the day of
different from that to which the receiver is connected.
purchase, the product maybe considered for repair.
• Consult the dealer or an experienced radio/TV
If the product is damaged due to natural disaster like
technician for help.
fire, lightning, flood, hurricane, etc., the product will
not be considered for repair.
This device complies with Part 15 of the FCC Rules.
Operation is subject to the following two conditions: (1)
TROUBLESHOOTING
This device may not cause harmful interference, and
(2) this device must accept any interference received,
PROBLEM
POSSIBLE
CORRECTIVE
including interference that may cause undesired
CAUSE
ACTION
operation of the device.
Timer turns
1. Programmed
1. Press
PROGRAM
ON/OFF at
event(s) are
button to review the
FCC Caution: Any changes or modifications not
incorrect
incorrect.
settings and revise
expressly approved by the party responsible for
times or
2. Timer is in
them as necessary.
compliance could void the user's authority to operate
skips some
RANDOM mode,
See OPERATING
this equipment.
of the
which varies
INSTRUCTIONS.
programmed
switching times
2. If you don't want to
times.
up to 15 minutes
keep the timer in
CAUTION
(to give your home
RANDOM mode,
a "lived-in" look).
press MODE to
• Do not attach a device that exceeds the unit ratings
change to AUTO
as described in the Safety Information section of this
mode.
manual.
The attached
The timer is wired
Disconnect wires,
• Wattage of lamps or appliances controlled must NOT
device turns
incorrectly.
remove timer,
exceed rated capacity.
off
re-install per the
• FOR INDOOR USE ONLY.
immediately
instruction manual. If
• Installation by a licensed electrician to local, state
after being
problem persists,
and national codes is recommended.
turned on.
contact certified
electrician.
• Remove wall plate and make sure both hot and
neutral wires are present in the junction box. If both
LCD screen
The included
Battery will
wires are not present, additional wiring will be
is blank.
rechargeable
automatically
battery has lost its
recharge after
necessary before installation can be completed.
charge.
installation.
• Check that all wire connections are secure.
• Place all wires inside junction box. Fit timer into
LCD screen
The light or
Make sure the light
is on but
attached device
or attached device is
junction box.
attached
itself may be
switched ON.
• Reconnect electrical power.
device is off.
switched OFF.
WARRANTY
• For information on product warranty please call
customer service at 1-866-994-4148, 8 a.m. - 6 p.m.,
EST, Monday - Thursday, 8 a.m. - 5 p.m., EST,
Friday.
Printed in China
Advertisement

Related Manuals for Utilitech TM-097


Summary of Contents for Utilitech TM-097
- Page 1 MODEL #TM-097 battery. After the screen displays, the unit is ready for Then, insert the two neutral (white) wires into 7.
- Page 2 MINUTO que desee, CLASIFICACIÓN DE LA UNIDAD: estén expresamente aprobados por la parte MODELO #TM-097 1. Configuración del reloj 30 minutos para cargar la batería interna. Después de conexión de los conductores. Comience Los botones ON u OFF después, presione el botón SET/RE.
Need help?
Do you have a question about the TM-097 and is the answer not in the manual?
Questions and answers
My installation is a simple replacement of a single off/on switch with only one 3 wire line coming in from the top of the box. How do I attach the wires to enable the timer to operate? The diagram in the instructions shows a 3 wire line coming in from both the top and the bottom of the box, so how do I connect the wires for my installtation with only one 3 wire line coming in from the top.