Table of Contents
Advertisement
Available languages
Available languages
Quick Links
Item: 155671(TM-087)
ITEM #0155671
4. Press the Time button
(5). Press the "+" or "-"
MODEL #TM-087
buttons (2 & 3) to set the
TIMER
daylight savings time
(DST) function to AUTO
mode or OFF mode.
Call customer service at 1-866-994-4148,
8 a.m. - 6 p.m., EST, Monday - Thursday,
NOTE: When DST is set
8 a.m. - 5 p.m., EST, Friday.
to AUTO, the
OPERATING INSTRUCTIONS
programmed time will increase 1 hour on the
second Sunday in March, at 02:00 AM every
Before initial use, plug the timer in for at least 30
year. The programmed time will be reduced by
minutes to charge the internal battery. After the screen
1 hour on the first Sunday in November, at 02:00
displays, the unit is ready for programming.
AM every year.
5. Press the Time button (5). Press the "+" or "-"
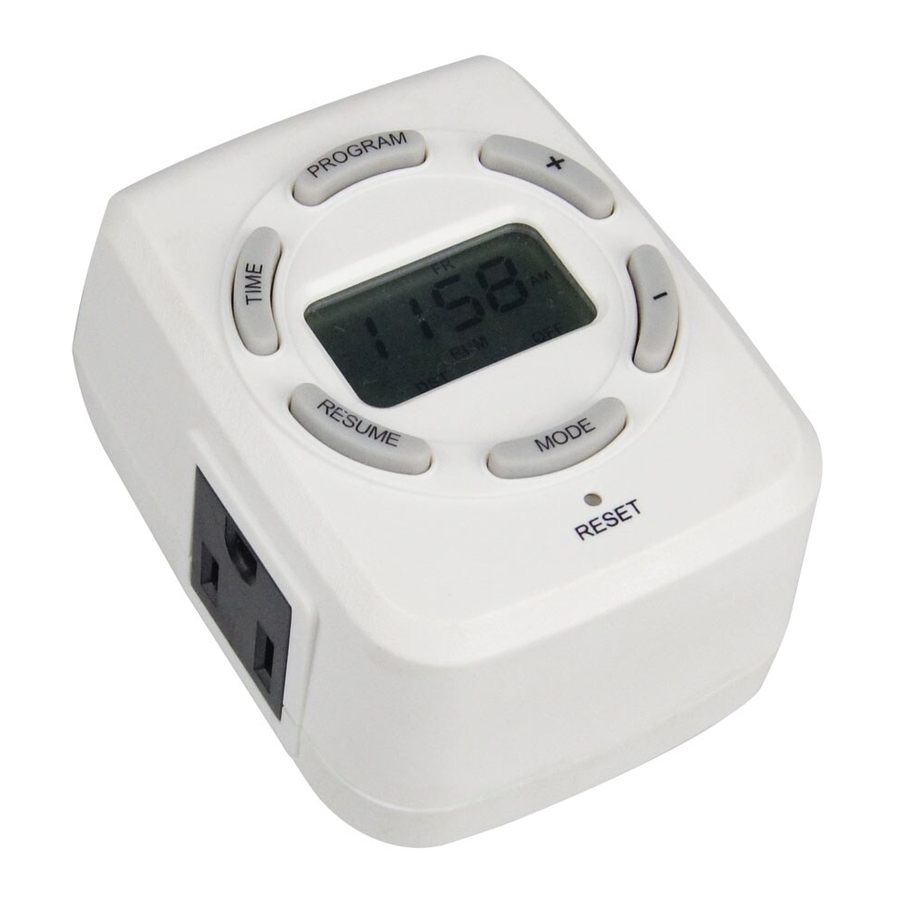
1. Button Layout
buttons (2 & 3) to set the current hour.
1
4
1. Mode: Press to select the
6. Press the Time button (5). Press the "+" or "-"
5
3
desired working
buttons (2 & 3) to set the current minute.
mode.
2. "- " : Press to scroll
2
down or reduce
7. Press the Time button
6
1
the time displayed.
(5) again to set the
7
3. "+" : Press to scroll up
Astronomic function.
or increase the time displayed.
Press the "+" or "-"
4. Program: Press to enter programming mode, or to
buttons (2 & 3) to select
review programs that have been input.
from the three areas
5. Time: Press to set the clock.
where you live based on
6. Resume: Press to erase the current program.
the map 2-7: North,
7. RESET: Press to reset all functions.
Central, or South.
NOTE: Press the RESET button to clear all
functions, then go to the following settings.
8. Press the Time button
(5). Press the "+" or"-"
buttons (2 & 3) to adjust
2. Setting the clock
the sunrise time; the
setting range is ± 2 hrs.
1. Press the Time button (5). Press the "+" or "-"
Press the Resume
buttons (2 & 3) to set the current year.
button (6) if you want to
keep the original sunrise
2. Press the Time button (5). Press the "+" or "-"
setting.
buttons (2 & 3) to set the current month.
3. Press the Time button (5). Press the "+" or "-"
buttons (2 & 3) to set the current date.
AB13550
http://waterheatertimer.org/plug-in-timers.html#59029
9. Press the Time button
2-9
2-4
(5). Press the "+" or "-"
buttons (2 & 3) to adjust
the sunset time; the
setting range is ± 2 hrs.
Press the Resume
button (6) if you want to
keep the original sunset
setting.
10. Press the Time button (5) once more to finish.
The timer will go back to standby mode.
3. Programming the ON and OFF times
1. Press the Program button (4) to enter
programming mode.
2. Press the Time button
3-2
(5) to begin setting the
program ON time (the
time that you want the
2-7
timer to control the
device(s) that are
North
plugged into the unit).
Central
3. Press the "+" or "-"
South
buttons (2 & 3) to set the days for the timer to
control the device(s) plugged into the unit:
- Every day and individual days
- Weekdays
- Weekends
2-8
4. Press the Time button (5). Press the "+" or "-"
buttons (2 & 3) to set the hours you wish the
timer to control the device(s) plugged into the unit:
- 12-Hour Clock AM/PM
- Sunrise/Sunset
NOTE: If you select Sunrise/Sunset as the
programmed ON time, press the Program
button (4) to continue programming OFF setting.
5. Press the Time button (5). Press the "+" or "-"
buttons (2 & 3) to set the minute you wish the
timer to control the device(s) plugged into the unit.
NOTE: Pressing the Resume button (6) will
4. OFF - The timer will turn OFF and stay OFF until
cancel the setting.
another mode is selected.
5. OFF AUTO - The timer
6. Press the Program
3-6
will turn OFF and
button (4) to begin
remain OFF until the
setting the program OFF
next scheduled ON
time (the time that you
time.
want the timer to stop
controlling the device(s)
plugged into the unit).
Follow the same
procedure given for
setting the program ON time.
6. OFF RDM - The timer
will turn OFF and
NOTE: You can program seven different ON and
remain OFF until the
OFF times in this timer. Once finished, press the
next contrary
Program button (4) to return the timer to standby
programmed RDM event.
mode. If no button is pushed for 30 seconds, the
timer will automatically return to standby mode.
NOTE: To review the
programs that have
been input, press the
4. Manual Override
Program button (4).
Press the Mode button (1) to select the desired timer
mode.
HELPFUL TIPS
1. ON - The timer is in continuous ON mode.
• Do not attach a device that exceeds the unit ratings
as described in the Safety Information section of this
2. ON AUTO - The timer
manual.
4-2
will turn ON and remain
ON until the next
programmed OFF time.
SAFETY INFORMATION
Please read and understand this entire manual before
use.
RATINGS:
3. ON RDM - The timer will
4-3
125 V, 60 Hz, 15 A, 1,875W general purpose
turn ON and remain ON
125 V, 60 Hz, 15 A, 1,875W resistive
until the next contrary
8A, 1,000 W tungsten
programmed RDM event.
500 VA electronic ballast
When RDM is set to ON,
120 V, 60 Hz, 8.3 A standard ballast
the timer will turn
1/2 HP
ON/OFF at the
programmed times ± 30
minutes.
CARE AND MAINTENANCE
• Plug directly into an electrical outlet.
• Do not use in wet locations.
• Use indoors only.
4-5
TROUBLESHOOTING
PROBLEM
POSSIBLE
CORRECTIVE
CAUSE
ACTION
The devices
The timer is
Check to make sure
do not turn
programmed
the timer is
OFF and ON
incorrectly.
programmed
4-6
at the
correctly or insert an
desired time.
object, such as
toothpick or pencil,
into the reset hole
and reprogram.
Make sure the light
or device is on.
WARRANTY
• For information on product warranty please call
customer service at 1-866-994-4148, 8 a.m. - 6 p.m.,
EST, Monday - Thursday, 8 a.m. - 5 p.m., EST,
Friday.
• This product is guaranteed to be free of defects for
a limited period of one year form the date of
purchase.
• If the product suddenly malfunctions and is not
damaged by external factors or personal reasons
within the one year warranty limit from the day of
purchase, the product maybe considered for repair.
If the product is damaged due to natural disaster like
fire, lightning, flood, hurricane, etc., the product will
not be considered for repair.
Printed in China
Advertisement
Table of Contents

Related Manuals for Utilitech TM-087


Summary of Contents for Utilitech TM-087
- Page 1 Item: 155671(TM-087) ITEM #0155671 4. Press the Time button 9. Press the Time button NOTE: Pressing the Resume button (6) will 4. OFF - The timer will turn OFF and stay OFF until CARE AND MAINTENANCE (5). Press the “+” or “-”...
- Page 2 “+” o “-“ (2 y 3) para ingresar los minutos en que ENCENDIDO): El 125 V, 60 Hz, 15 A, 1875W uso general (5). Presione los botones MODELO #TM-087 “+” o “-” (2 y 3) para desea que el temporizador controle los temporizador se 125 V, 60 Hz, 15 A, 1875W resistivo “+”...
Need help?
Do you have a question about the TM-087 and is the answer not in the manual?
Questions and answers