Advertisement
Available languages
Available languages
Quick Links
Item: 224879(TM-089)
Page size: 11"(W)x8.5"(H)
Dieline:
______
Layout area:
______
3.3833"
ITEM #0224879
MODEL #TM-089
TIMER
Call customer service at 1-866-994-4148,
8 a.m. - 6 p.m., EST, Monday - Thursday,
8 a.m. - 5 p.m., EST, Friday.
OPERATING INSTRUCTIONS
1. Set a period of time for the
1
unit to be "ON".
Locate the gray pins and
push them down at the
marked times when the
attached device should be
"ON". Each pin represents a
30-minute time interval.
2. Set the "TIME".
2
8.5"
Rotate the entire gray push-
pin dial clockwise until the
arrow marked "TIME" aligns
with the current time of day
on the dial. "
" hours are
highlighted in white. " "
hours are highlighted in
black.
3. Set "BYPASS SWITCH".
3
When the switch is in the
"
" position, the unit will
automatically turn your
attached device on and off
according to the
programmed time. When the
ON
switch is in the "
" position,
the unit will bypass the
programming and your
attached device will remain
on.
AB14390
Version Submitted by KAB: R1-2
Submission date: 2014/05/12
ITEM #0224879
NOTE: The unit you are plugging into the timer
has to be ON.
MODEL #TM-089
TIMER
4. The switch on the side of the timer must be in the
up "
" position for the timer function to work.
Call customer service at 1-866-994-4148,
5. You may override operation of the timer by setting
8 a.m. - 6 p.m., EST, Monday - Thursday,
the switch to the down "ON" position. Then the
8 a.m. - 5 p.m., EST, Friday.
power supply will always be "ON". Be sure to set
OPERATING INSTRUCTIONS
the switch back to the up "
" position for the
timer to function.
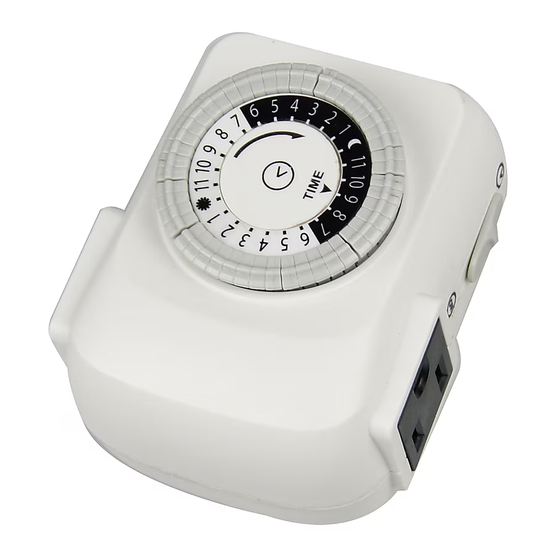
1. Button Layout
1
NOTE: Make sure day
or night
area is correct
1
1. Side switch:
on the dial when setting the timer.
The side switch is used to
2
set the timer function:
Always ON or Timer
3
3
HELPFUL TIPS
Control.
2. Timer dial:
• Do not attach a device that exceeds the unit ratings
• Day time
:
as described in the Safety Information section of this
7:00 AM~6:00 PM
manual.
Night time :
7:00 PM~6:00 AM
8.5"
• Each segment pin represents 30 minutes:
2 segment pins = 1 hour.
SAFETY INFORMATION
• 24 hour cycle with 24 on/off settings.
• Pin in down position means ON.
Please read and understand this entire manual before
• Pin in up position means OFF.
use.
3. Outlets:
Plug the lights or devices to be controlled by the
RATINGS:
timer into one of the outlets.
125Vac 60Hz 15 A Resistive.
15 A General Use.
1875 W Tungsten.
2. Setting the clock
500 VA Electronic Ballast.
1/2 HP.
Be sure segments are pulled up before
programming.
1. To set the current time, turn the dial clockwise
CARE AND MAINTENANCE
and set the arrow to thecurrent time.
• Plug directly into an electrical outlet.
2. Determine the desired start time and push down
• Do not use in wet locations.
all the pins until reaching the desired OFF time.
• Use indoors only.
3. Plug your electrical devices directly into the
outlets on the timer. Electrical devices must be
"ON" for the timer control to work properly.
AB13550
11"
3.3833"
Do not attach a device that exceeds the unit ratings.
4. Plug the unit into an
4
125 V AC / 60 Hz
electrical outlet.
15 A / 1,875 W Resistive (General Purpose)
15 A / 1,875 W Tungsten (Incandescent)
The unit will rest against the
1/2 HP (Horsepower Motor)
outlet at a slight upward
angle, making it easier to
see and operate the push-
pin dial.
• Do not plug this timer into an extension cord or other
electrical adapter. Plug directly into an electrical
outlet.
5. Attach up to two devices to
5
• Do not connect this timer to appliances that contain
the unit.
heating elements (cooking appliances, heaters, irons,
etc. Failure of the timer to shut off such devices may
Plug the devices into outlets
lead to overheating and potential fire.)
on either side of the unit.
• Do not plug in this timer if it is wet.
• Do not clean this timer when it is plugged in.
• Do not exceed the maximum ratings of the timer.
• Potential shock hazard: Keep out of reach of children.
HELPFUL TIPS
• This timer repeats the same settings daily.
• To push down or pull up the gray pins, use your finger
or the tip of a small instrument such as a pen or pencil.
• You can set up to 48 different "ON" and "OFF" times
in a 24-hour period. Pins pressed down represent the
"ON" time. Pins in the up position represent "OFF"
time.
• Switching the unit to "
" will bypass programming;
however, the timer dial will continue to rotate and
maintain the current time.
• Once the timer is plugged into an outlet, it will sit at a
slight upward angle making it easier to read and
program the unit.
IN CASE OF POWER FAILURE
Unit will stop operating if the power goes out. Once
power is resumed, reset the time of day as explained in
Step 2 of the instructions.
SAFETY INFORMATION
This unit is a "grounded" device. The male
plug contains a ground pin and is only
intended for use with a three-pronged
grounded outlet.
Page 1
11"
TROUBLESHOOTING
PROBLEM
POSSIBLE
CORRECTIVE
CAUSE
ACTION
The devices
The timer is
Check to make sure
do not turn
programmed
the timer is
OFF and ON
incorrectly.
programmed
at the
correctly or insert an
desired time.
object.
Make sure the light
or device is on.
WARRANTY
• For information on product warranty please call
customer service at 1-866-994-4148, 8 a.m. - 6 p.m.,
EST, Monday - Thursday, 8 a.m. - 5 p.m., EST,
Friday.
• Do not plug this timer into an extension cord or other
electrical adapter. Plug directly into an electrical
outlet.
• Do not connect this timer to appliances that contain
heating elements (cooking appliances, heaters, irons,
etc. Failure of the timer to shut off such devices may
lead to overheating and potential fire.
• Do not plug in this timer if it is wet.
• Do not clean this timer when it is plugged in.
• Do not exceed the maximum ratings of the timer.
• Potential shock hazard: Keep out of reach of children.
• This product is guaranteed to be free of defects for
a limited period of one year form the date of
purchase.
• If the product suddenly malfunctions and is not
damaged by external factors or personal reasons
within the one year warranty limit from the day of
purchase, the product maybe considered for repair.
If the product is damaged due to natural disaster like
fire, lightning, flood, hurricane, etc., the product will
not be considered for repair.
Printed in China
3.3833"
3.3833"
TROUBLESHOOTING
PROBLEM
POSSIBLE
CAUSE
Lights do
Connected lights
not turn on
are not in "ON"
as
position; they are
programmed.
not functioning;
timer is not
receiving power,
or "BYPASS
SWITCH" is in the
"
" position.
Lights come
Pins were pushed
on in "
"
down in the "
but are
section
supposed to
(highlighted in
come on in
white on the timer
"
"
dial).
Lights come
Pins were pushed
on in "
"
down in the "
but are
section
supposed to
(highlighted in
come on in
white on the timer
"
"
dial).
Lights come
"TIME" was not
on before
set properly.
the actual
time.
3.3833"
WARNING
Risk of Electric Shock
CORRECTIVE
Keep children away. Unplug timer before cleaning.
ACTION
Fully insert plug. Do not use in wet locations.
Ensure the
Risk of Fire
connected lights are
Do not use to control appliances that contain heating
functional by
plugging them
elements (cooking appliances, heaters, irons, etc.).
directly onto the
Do not exceed electrical ratings. For indoor use only.
outlet. Be sure the
connected lights are
in the "ON" position
WARRANTY
if they have their
own switch. Make
• For information on product warranty please call
sure the outlet the
timer is plugged into
customer service at 1-866-994-4148, 8 a.m. - 6 p.m.,
is active. Check
EST, Monday - Thursday, 8 a.m. - 5 p.m., EST,
that the "BYPASS
Friday.
SWITCH" is in the
• This product is guaranteed to be free of defects for
"
" position.
a limited period of one year from the date of
Be sure the pins are
purchase.
"
pushed down in the
• If the product suddenly malfunctions and is not
"
" section
damaged by external factors or personal reasons
(highlighted in black
on the timer dial).
within the one year warranty limit from the day of
purchase, the product maybe considered for repair.
If the product is damaged due to natural disaster like
Be sure the pins are
fire, lightning, flood, hurricane, etc., the product will
"
pushed down in the
"
" section
not be considered for repair.
(highlighted in black
on the timer dial).
Refer to step 2 of
this manual. Be sure
"TIME" is set in the
white section on the
timer dial if the
"TIME" is in the "
."
The "TIME" should
be set in the black
section on the timer
dial if the "TIME" is
in the " ."
3.3833"
Printed in China
Advertisement

Related Manuals for Utilitech TM-089


Summary of Contents for Utilitech TM-089
- Page 1 Item: 224879(TM-089) Version Submitted by KAB: R1-2 Page size: 11”(W)x8.5”(H) Submission date: 2014/05/12 Dieline: ______ ITEM #0224879 NOTE: The unit you are plugging into the timer TROUBLESHOOTING has to be ON. MODEL #TM-089 PROBLEM POSSIBLE CORRECTIVE TIMER 4. The switch on the side of the timer must be in the...
- Page 2 3.3833” ARTÍCULO #0224879 INFORMACIÓN DE SEGURIDAD SOLUCIÓN DE PROBLEMAS 4. Enchufe la unidad a un AVERTISSEMENT tomacorriente. MODELO #TM-089 Esta unidad es un dispositivo "con Riesgo de descarga eléctrica PROBLEMA CAUSA ACCIÓN TEMPORIZADOR puesta a tierra". El enchufe macho Mantenga alejado de los niños. Desenchufe el...
Need help?
Do you have a question about the TM-089 and is the answer not in the manual?
Questions and answers