Table of Contents
Advertisement
Advertisement
Table of Contents

Subscribe to Our Youtube Channel
Related Manuals for Riccar Vibrance VIB


Summary of Contents for Riccar Vibrance VIB
- Page 1 V I B R A N C E O w n e r ’ s M a n u a l for all Vibrance models...
-
Page 3: Table Of Contents
Replacing the headlight bulb ................Edge cleaning ....................Annual checkup reminder ................. Problem Solving Guide Unclogging nozzle and hose ................Thermal motor protection ................. Trouble shooting ....................How to contact your Authorized Retailer ............Visit Riccar on-line .................... Warranty ......................... -
Page 4: Important Safety Instructions
IMPORTANT SAFETY INSTRUCTIONS When using an electrical appliance, basic precautions should always be followed, including the following: READ ALL INSTRUCTIONS BEFORE USING THIS APPLIANCE WARNING: The manufacturer cannot accept responsibility for damage caused when the appliance is not used according to the instructions, or for uses other than those for which it was intended. -
Page 5: Polarization Instructions
Polarization Instructions POWER CORD, 2-WIRE POLARIZED CORD Household Models: VIB, VIBUSA, VIBCLNT, VIBCL, VIBS, VIBD, VIBPNT & VIBP To reduce the risk of electric shock, this product is equipped with a polarized alternating current line plug (a plug having one blade wider than the other). This plug will fit into the power outlet only one way. -
Page 6: Description Of The Vacuum
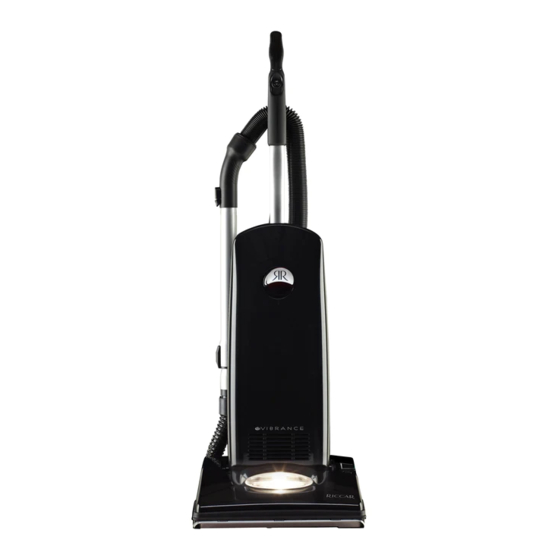
Description of the vacuum... - Page 7 Description of the vacuum Ergonomic handle Main on / off power switch (for models VIB, VIBS, VIBD, VIBPNT, VIBP, VIBCNT & VIBC) Power Cord Carrying handle Bag compartment cover (to replace vacuum bag) Xenon headlight Vacuum nozzle Furniture guard Carpet / floor selector (for models VIB, VIBUSA, VIBPNT & VIBP) Quick release cord hook Fast Task tools (for models VIB, VIBUSA, VIBCL, VIBS, VIBD, VIBP &...
-
Page 8: Before Using Your Vibrance The First Time
Before using your Vibrance for the first time Attaching the handle to the vacuum The vacuum cleaner and the handle are packed separately. • After first removing the handle screw, position the handle behind the vacuum cleaner and level with the top of the unit. Hold the power cord down and away from the vacuum while the handle is being attached. -
Page 9: Operation
Operation Unwinding the power cord • The upper cord hook rotates to allow for quick access to the power cord. -
Page 10: Turning Vacuum On / Off
Operation On / Off switch Models: VIB, VIBS, VIBD, VIBPNT, VIBP, VIBCNT & VIBC • To start the vacuum cleaner, flip the “on / off” switch located on the handle to the “on” position. • To stop the vacuum cleaner, flip the “on / off”... -
Page 11: Vacuuming Carpet
/ floor selector toward the front of the nozzle so that it reads “floor & tools”. Carpet height adjustment Your Riccar upright vacuum cleaner is designed with an automatic self-adjusting rug nozzle. No manual adjustments are required. The height of the rug nozzle is instantly and automatically adjusted to carpet pile height. -
Page 12: Vacuuming Under Furniture
Operation Vacuuming under furniture Your Riccar Vibrance will lay flat on the floor for effective cleaning under beds and tables. • Press the foot pedal release once for normal vacuum cleaning. • Press the foot pedal release a second time to enable the vacuum to lay flat... -
Page 13: Carrying The Vacuum
Operation Carrying the vacuum To safely transport your vacuum, especially when carrying the vacuum up and down stairs, use the carry handle. -
Page 14: Attachment Cleaning
Wand cleaning Models: VIB, VIBUSA, VIBCL, VIBS, VIBD, VIBP & VIBC With the on-board cleaning tools and vacuum wand, your Riccar Vibrance becomes a comprehensive cleaning system. The models equipped with on-board tools include an upholstery tool, dusting brush, crevice tool, extension wand and stretch hose. -
Page 15: Cleaning Tools
VIBD, VIBP & VIBC Your vacuum is equipped with a dusting brush, upholstery brush and crevice tool. Other tools are available at your Authorized Riccar Retailer. • Remove the cleaning wand from the vacuum and turn the carpet / floor selector to the “floor &... -
Page 16: Adjusting The Suction Power
Attachment Cleaning Adjusting the suction power for tool cleaning On the back of the vacuum, locate the suction control dial and turn it to the desired position. This reduces the suction power coming through the hose. Close the suction control dial when finished to restore full suction power. -
Page 17: Optional Cleaning Tools
These kits are effective overall cleaning tools to address some of the hard to reach areas of your home or car. Talk to your Riccar Retailer to see which tools might be beneficial for your home. Deluxe Attachment Set (RDAK1) 1. -
Page 18: Connecting Attachment Hose
There is no way to turn the brushroll off. Therefore, when using the cleaning tools it is important to keep your Riccar vacuum from running in the same spot for a period of time, as carpet or flooring damage could result. If you... -
Page 19: When To Change The Vacuum Bag And Clog Indicator
Attachment Cleaning When to change the vacuum bag and full bag indicator light Models: VIB, VIBD, VIBPNT, VIBP, VIBCNT & VIBC The full bag indicator light is designed to show when the bag is full or when there is a clog in the vacuum. The system measures airflow and alerts the user when airflow is significantly reduced –... -
Page 20: Maintenance And Care
Maintenance and Care Replacing the vacuum bag • Open the bag compartment lid. • Remove vacuum bag by pulling bag collar off the bag holder. • Attach the new vacuum bag onto the bag holder. • Tuck the bag corners into the vacuum before replacing the bag compartment lid. -
Page 21: When To Change The Filters
Maintenance and Care When to change filters At minimum, it’s recommended to replace the filters once a year or after using twelve vacuum bags, whichever comes first. If someone in your household is highly sensitive to airborne allergens, it is recommended to change the filter set after every six vacuum bags. - Page 22 Maintenance and Care Replacing the secondary filter The secondary filter protects the motor from dust and dirt. Before installing a new vacuum bag, check the filter. Accumulated dirt in the bag compartment will be collected on this filter and may restrict motor performance when the filter becomes dirty.
-
Page 23: Removing And Reinstalling Bottom Plate
Maintenance and Care Removing and reinstalling bottom plate CAUTION: Disconnect the vacuum cleaner from the electrical outlet before removing the bottom plate. • Depress handle release pedal twice and place the vacuum cleaner in the low position. • Turn vacuum cleaner over, exposing the underside. -
Page 24: Replacing The Agitator Belt
Maintenance and Care Replacing the agitator belt Models: VIBCLNT, VIBCL, VIBS, VIBD, VIBCNT, VIBC, VIB & VIBUSA NOTE: To ensure maximum cleaning efficiency, the condition of the belt should be checked regularly. If belt is stretched, cracked or if excessive slipping is occurring, replace the belt. •... - Page 25 Maintenance and Care Replacing the agitator belt Models: VIB, VIBUSA, VIBPNT & VIBP NOTE: To ensure maximum cleaning efficiency, the condition of the belt should be checked regularly. If belt is stretched, cracked or if excessive slipping is occurring, replace the belt. •...
-
Page 26: Replacing The Headlight Bulb
Annual checkup reminder To keep your vacuum in peak operating condition, it is recommended you bring your vacuum to your Authorized Riccar Retailer for an annual checkup. Your Retailer will conduct a comprehensive examination to ensure your vacuum is in top... -
Page 27: Problem Solving Guide
Problem Solving Guide Unclogging nozzle and hose CAUTION: Disconnect the vacuum cleaner from the electrical outlet before cleaning nozzle housing. The nozzle hose, located on the back of the vacuum, carries the dirt from the nozzle to the vacuum bag. The hose also functions as the attachment cleaning hose. -
Page 28: Thermal Motor Protection
• Inspect your vacuum for a full bag condition or a hose clog and correct the problem. Locate the Thermal Motor Reset button on the back of the vacuum. Press button and resume vacuuming. If problem continues, contact your Authorized Riccar Retailer. -
Page 29: Trouble Shooting
• Review filter installation correctly (page 20) • Vacuum bag not installed • Review bag installation (page 19) correctly Any other service should be done by an Authorized Service Representative. Service 1-888-6-RICCAR To locate your nearest retailer, visit our website at www.riccar.com... -
Page 30: Warranty
Warranty What is Covered: This warranty covers any defects in material and workmanship in your new Riccar Vibrance vacuum. How Long Coverage Lasts: Warranty coverage for Riccar Vibrance models VIBUSA, VIBCLNT and VIBCL lasts three years. Warranty coverage for Riccar Vibrance models VIB, VIBS, VIBD, VIBPNT and VIBP lasts four years. - Page 31 Owner’s Warranty Information keep this for your records… Date of purchase Serial number Model number Purchased from: Store name Address City, State, Zip Telephone...
- Page 32 ©2009 Tacony Corporation B503-3500C...
Need help?
Do you have a question about the Vibrance VIB and is the answer not in the manual?
Questions and answers