
Related Manuals for Roadstar CD240MPR


Summary of Contents for Roadstar CD240MPR
- Page 1 CD240MPR/512 Car Audio with CD/MP3/WMA playback FM/MW RDS tuner and 512 USB memory drive...
-
Page 2: Introduction
CD240MPR/512 Introduction Thank you for buying the CD240MPR/512. This unit is designed to give you many years of trouble-free service. You may already be familiar with using a similar product but do please take time to read these instructions. They are designed to familiarise you with the many features of this unit and to ensure you get the very best from your purchase. -
Page 3: Table Of Contents
CD240MPR/512 Introduction ................2 Safety is Important ..............2 Safety Instructions ..............5 Power Source ................... 5 Safety Considerations ................5 Servicing ....................5 Getting Started ................ 6 In the box ....................6 Installation ................7 Recommendations ................... 7 ISO connector ..................7 ISO connector plug wiring details ............. - Page 4 CD240MPR/512 Recording ................25 Recording from Audio CDs ..............25 Recording from MP3 Discs ..............25 Recording from Radio ................26 Voice Recording ..................26 Deleting Files ..................26 The Flash MP3 Player ............27 Removing the Flash MP3 Player ............27 Basic functions ..................
-
Page 5: Safety Instructions
Servicing • The CD240MPR/512 unit contains fuses that may be changed by suitably qualified service personnel when necessary. The instructions for carrying out fuse replacement are contained in Help & Advise chapter of this guide. -
Page 6: Getting Started
CD240MPR/512 Getting Started Remove your Roadstar CD240MPR/512 car audio carefully from the box. You may wish to store the packaging for future use. In the box Included in this package are the following items: • Roadstar car audio with CD/MP3 player •... -
Page 7: Installation
CD240MPR/512 Installation Recommendations • Choose the mounting location where the unit will not interfere with the normal driving function of the driver. • Before finally installing the unit, connect the wiring temporarily and make sure it is all connected up properly and the unit and the system work properly. -
Page 8: Iso Connector Plug Wiring Details
CD240MPR/512 ISO connector plug wiring details Rear panel ISO connector plug FUNCTION ISO PLUG PIN NUMBER Memory +12v Power antenna Ignition switch +12v Ground Rear right speaker + Rear right speaker - Front right speaker + Front right speaker -... -
Page 9: Fitting The Din Mounting Sleeve
CD240MPR/512 Fitting the DIN mounting sleeve DIN front-mounting This unit can be properly installed using the DIN front-mounting method. Do not connect the unit to any wiring at this stage. The fixing hardware supplied is for the front mounting method. This... -
Page 10: Removing The Unit
CD240MPR/512 Inserting and connecting the unit 1. Where possible use the strap to support the back of the unit. 2. Bend the strap (by hand) to the desired angle to reach the surrounding structure. Fit to the car structure using the fixings provided. -
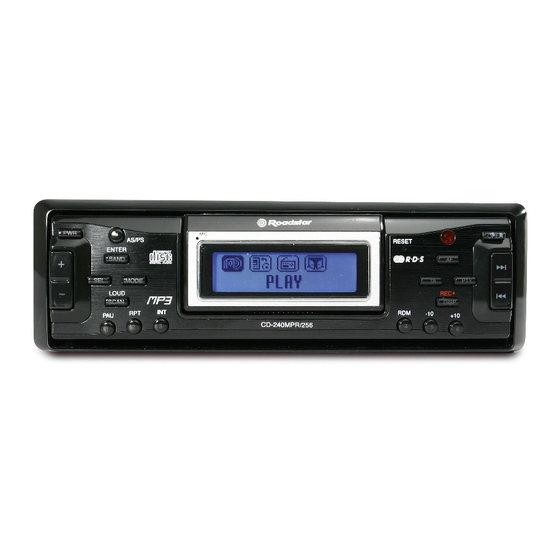
Page 11: Location Of Controls
CD240MPR/512 Location of controls Front Panel... - Page 12 CD240MPR/512 Label Function Power ON/OFF 2 & FUNCTION Select button for: Initial Volume / Bass / Treble / SELECT BUTTON Balance / Fader / DSP/ CT/ TA Vol/ Eon. VOL Up/Down Controls for: Initial Volume / Bass / Treble / Bal- ance / Fader / DSP/ CT/ TA Vol/ Eon.
-
Page 13: Flash Drive
CD240MPR/512 Flash drive Label Function Display Microphone MENU Enters the menu screen PLAY/PAUSE STOP LINE IN HEADPHONES VOL + VOL - USB SOCKET F.F. RESET... -
Page 14: Radio Data Systems (Rds)
CD240MPR/512 Radio Data Systems (RDS) Radio Data System. RDS is a service provided by radio stations. In addition to conventional music and speech programmes, the stations also transmit additional information in the form of encoded digital signals that can be analysed by the car radio. -
Page 15: Basic Functions
CD240MPR/512 Basic Functions Power on/off Press PWR button on the front panel to turn the unit ON. Press the PWR button to turn the unit OFF. NOTE: Switching the unit on after a RESET, or when the power to the unit was disconnected, the unit will revert to the factory default... -
Page 16: Using The Radio
CD240MPR/512 Using the Radio Band selection In the radio mode: Press the BAND button to select the desired band. As you press the button the bands will be stepped through and displayed on the screen in the following cyclic order: ->FM1 -> FM2 ->... -
Page 17: Program Scanning
CD240MPR/512 The radio will scan continuously, then cycle through the stations found and play each for a brief period During the scan press AS/PS to stop and play the currently displayed station. Program scanning Press AS/PS button briefly to scan the preset stations. - Page 18 CD240MPR/512 Reset (reset functions to factory defaults) The RESET button can be activated with either a ball point pen or a thin metal object. It will need to be activated: • After completing the installation of the unit. • If any function buttons do not operate.
-
Page 19: Rds Operation
CD240MPR/512 RDS operation Using PTY (Program type) This function allows the radio to select stations by their programme type (PTY). When PTY is selected, the radio starts to search for the selected PTY information and stops when the this information is detected. If the... - Page 20 CD240MPR/512 Regional Program Operation (REG) Some broadcasting stations change their programme from normal broadcasting to regional broadcasting. When REG ON is selected the current listening program remains unchanged. When REG OFF is selected it allows the reception to moves to a regional station.
-
Page 21: Using The Cd Player
CD240MPR/512 Using the CD Player CD operation Press the MODE button and select CD CD play Carefully insert a compact disc into the disc slot with the label side up. The disc is then automatically loaded into the unit and starts playing from the first track on the disc. - Page 22 CD240MPR/512 Repeatedly play a track During CD play, press 2 RPT button, the display shows RPT. This will continuously replay the same track. Press 2 RPT again to exit repeat play. The repeat indicator will be removed from the display.
-
Page 23: Mp3 Operation
CD240MPR/512 MP3 operation When an MP3 format disc is inserted, the unit initially searches the disc for the number of MP3 files and folders on the disc, song length, song title, artist name and album name, it then starts playing the first song. - Page 24 CD240MPR/512 Directory search: If the MP3 files have been place in directories on the disc. you can search for a particular directory by: 1. Press AS/PS button three times. 2. The unit displays DIR: (name of first directory). 3. Use the TRACK TUNE buttons to scroll through the directory list.
-
Page 25: Recording
CD240MPR/512 Recording This unit allows you to record from the CD or Radio and store the recording on to the removable flash MP3 player. Recording from Audio CDs 1. Press MODE button repeatedly to select CD. 2. Press and hold the REC button until NAND ONE TRACK is shown on the display 3. -
Page 26: Recording From Radio
CD240MPR/512 Recording from Radio 1. Press MODE button repeatedly to select TUNER. 2. Select the station you want to record. 3. Press and hold the REC button to start recording. REC starts flashing on the display 4. To stop recording, press the ENTER button Voice Recording 1. -
Page 27: The Flash Mp3 Player
CD240MPR/512 The Flash MP3 Player Removing the Flash MP3 Player 1. Press the OPEN button, to lower the front panel. 2. Press the clip on the rear of the panel until a click is heard 3. Slide the Flash MP3 Player from the front panel. -
Page 28: Basic Functions
CD240MPR/512 Basic functions Switching on To turn the Flash MP3 Player on, press and hold the Play/Pause button for around 2 seconds. Adjusting the volume Press the VOL +/- buttons on the Flash MP3 Player unit to increase or decrease the volume. - Page 29 CD240MPR/512 2. A window will open on your PCs task bar stating that new hardware has been found and that it is a mass storage device. This will then change to a message stating that the new hardware is ready to use.
-
Page 30: Play Mode
CD240MPR/512 Play Mode Playing tracks on the Flash MP3 Player. 1. Connect your headphones and press the PLAY/PAUSE button to start playback. The display will show the track title, elapsed time for the track, the track number and the total number of tracks. -
Page 31: Settings
CD240MPR/512 Settings 1. During playback, press and hold the MENU button to enter the settings menu and to make selections. 2. Use the REW or FF buttons to scroll through the options, select from the following modes Play mode Music files can be set to playback in a variety of repeat and random modes. -
Page 32: Recording Mode
CD240MPR/512 Settings You can adjust the play mode setting in this menu the options available to change are: • Contrast: Adjusts the screen contrast from 10 to 100 • Backlight: Sets the length of time the backlight stays on after a button press from 0 - 20 seconds •... - Page 33 CD240MPR/512 Recording Input Select from Voice (Microphone) and Line input. This option allows you to adjust the sensitivity of the microphone input, we recommend you keep this setting set to OFF. Select between: • Off - Starts recording immediately •...
-
Page 34: Fm Radio
CD240MPR/512 FM Radio NOTE: The headphones act as an aerial and must be connected in order to receive a good signal. Tuning 1. Use the REW or FF buttons to search for a station, the frequency will increase or decrease by 0.1 Mhz with each press. - Page 35 CD240MPR/512 Normal /Preset tuning Normal mode simply means that with each press of the FF or REW button the frequency will increase by 0.1 Mhz Preset mode means that with each press of th.e FF or REW button the Radio will skip to the next preset station. 1-20 Using the preset mode This section explains how to turn on the PRESET MODE.
-
Page 36: Help And Advice
CD240MPR/512 Help and Advice Troubleshooting Before going through the check list, check wiring connection. If any of the problems persist after the check list has been made, consult your nearest service dealer. Symptom Cause Solution No Power 1. The car ignition 1. -
Page 37: Replacing The Fuse
CD240MPR/512 Symptom Cause Solution The operation keys 1. The built-in 1. Press the RESET do not work. microcomputer is not button with a ball point operating properly pen or similar object. due to noise. 1. The antenna cable is 1. Insert the antenna The radio does not work. -
Page 38: Care And Maintenance
CD240MPR/512 Care and Maintenance Cleaning the unit Wipe with a soft cloth. If the unit is very dirty, dampen the cloth with a weak solution of neutral detergent and water, and then wipe clean. Dry thoroughly with a clean dry cloth. -
Page 39: Technical Specification
CD240MPR/512 Technical Specification CD/MP3 PLAYER SECTION Signal to Noise Ration >60dB Channel Separation >50dB (1kHz) Frequency Response 20Hz-20kHz TUNER (FM) Frequency Range 87.5 - 108 MHz Intermediate Frequency 10.7 MHz Stereo Separation 30dB Signal to Noise Ratio 50dB Channel Step... -
Page 40: Guarantee
CD240MPR/512 Guarantee This product is guaranteed for 12 months from the date of original purchase. If any defect arises due to faulty materials or workmanship, the unit will either be replaced, a refund given or repaired free of charge (where possible) during this period by the dealer from whom you purchased the unit. - Page 41 LPS-REV1-APR06...
Need help?
Do you have a question about the CD240MPR and is the answer not in the manual?
Questions and answers