Table of Contents
Advertisement
Quick Links
Advertisement
Table of Contents

Related Manuals for Geemarc CL8450


Summary of Contents for Geemarc CL8450
- Page 1 CL8450 GSM Telephone with Voice Amplification English...
-
Page 2: Table Of Contents
CONTENTS CONTENTS INTRODUCTION Unpacking the Telephone DESCRIPTION General Description Menu Navigation SETTING UP Network Services Passwords Install SIM Card and Battery Charging the battery Battery Use Switching On/Off USING THE TELEPHONE Standby Mode Energy Saving Mode Making a Call Making a Call from the Call List Making a Call from the Phone Book Making a Call using Quick Dial Receiving a Call... - Page 3 CONTENTS Hold Single Call End Single Call Start a New Call Phoneboook Write an SMS Mute Function DTMF Tones Receiving Volume and Tone Call Timer MESSAGE Send a Text Message Receiving a Text Message (Inbox) Reviewing Stored Text Messages (Inbox) Outbox Sent Messages Templates...
- Page 4 CONTENTS Assigning a Ring Tone to a Phonebook Group 42 Phonebook Settings Speed Dial CALL CENTER View Call Logs Delete Call Logs Call Settings SOS SETTINGS SETTINGS ORGANISER Calendar Calculator Alarm Bluetooth Tasks Stopwatch nWay stopwatch TROUBLESHOOTING SAFETY INFORMATION HEARING AID INFORMATION NETWORK SERVICES GUARANTEE...
-
Page 5: Introduction
Its is important that you read the instructions below in order to use your Geemarc telephone to its full potential. Keep this user guide in a safe place for future reference. -
Page 6: Unpacking The Telephone
INTRODUCTION Unpacking the Telephone When unpacking the telephone, you should find the following in the box: • 1 CL8450 mobile telephone handset • 1 Desktop charging unit • 1 Mains power adaptor • 1 x Li-ion rechargeable batterie • 1 User Guide For product support and help visit our website at www.geemarc.com... -
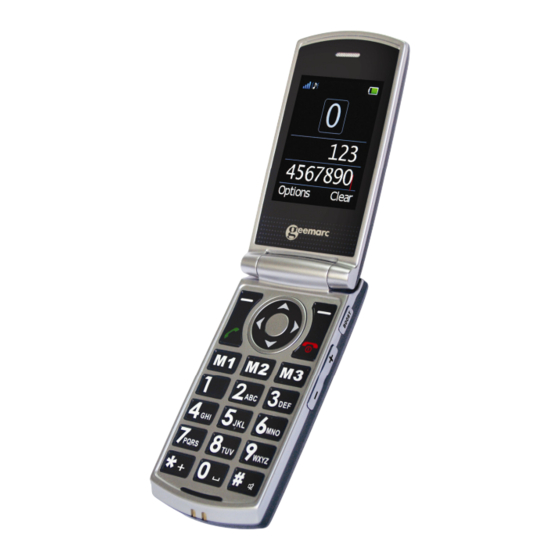
Page 7: Description
DESCRIPTION General Description Handset Description (front) Earpiece Display End call key Call key Navigation key M1, M2, M3 Keypad Microphone Hash key Star key... - Page 8 DESCRIPTION LED Charging/Low battery Headset socket (Headset Boost not included) Volume Mini-USB control charging socket Contact plate for charge cradle SOS key Battery door Loudspeaker...
-
Page 9: Navigation Button
DESCRIPTION One touch dialing keys/Soft keys A telephone number can be assigned to each of these buttons. To dial the number all you have to do is to press the button once and the number will be dialled automatically M1 and M3 are also soft keys i.e. they take on different functions depending on the menu displayed. - Page 10 DESCRIPTION ▲ - Shortcuts: Quick access to important settings. ▼ - Alarm: Setting an alarm time. ◄ - User profiles: Activation/Customisation of a user profile. ► - Tone settings: Settings for ringtone, alarm tone etc. - OK button in the centre of navigation key In standby: open the menu In menus: function “OK”.
-
Page 11: Digit Key
DESCRIPTION Asterisk key Press this key to insert one or more symbols while composing a message or editing a phonebook entry name. Then use ▲ , ▼ , + and - as navigation keys to select the symbols you want to insert Press this key to enter the international prefix “+”... - Page 12 DESCRIPTION Volume Key/Navigation Button +/- keys: - In standby: adjusts the volume level of the key tone - Whilst on a call -> adjusts the earpiece or Hands-free volume. This key is also used to scroll through lists of options. LCD Screen Description The LCD screen is split into three distinct areas: The icon area.
- Page 13 DESCRIPTION The soft key area. This is found at the bottom of the screen. Signal Strength icon This is always displayed when your telephone is switched on. It shows the current signal strength. More bars indicate more signal strength. Alarm icon Alarm is activated New Call icon This indicates that you have missed one...
- Page 14 DESCRIPTION Boost is activated Ring tone icon The telephone is in ring tone mode. The call alert will be a ring tone Vibrate icon The telephone is in vibrate mode. The call alert will be the telephone vibrating Vibrate followed by ring icon The telephone is in vibrate followed by ring mode.
-
Page 15: Menu Navigation
DESCRIPTION Menu Navigation are soft keys i.e. they take on different functions depending on the menu displayed on the LCD. The current function is always displayed by the text above the key. MENU soft key is used to activate the menu. The BACK soft key is used to go back a level in the menu system. -
Page 16: Setting Up
SETTING UP Network Services To use this mobile telephone you must subscribe to a service from a wireless service provider. Different service providers offer different features (at a variety of charges). This may effect the features made available to you through the mobile telephone. Passwords This mobile telephone allows you to set up passwords to help protect your telephone from unauthorized use. - Page 17 SETTING UP Always switch the telephone off and disconnect the charger before removing/inserting the battery or SIM card. Take care when handling the SIM card. The SIM card and its contacts can be easily damaged by scratches or bending. To remove the battery compartment cover, press down and slide the cover off completely.
-
Page 18: Charging The Battery
SETTING UP Observe the battery contacts (the gold coloured contacts must face towards the top left).and insert the battery. Slide the back cover back into place. Charging the battery Charging via the mini USB charging socket Plug the power adapter in the mini USB charging socket. Connect the power adapter plug. - Page 19 SETTING UP Charging via the Charging Unit Plug the charger into a wall socket. Connect the lead from the charger into the the socket on the back of the charging unit. Place the mobile phone onto the charging unit. The battery indicator on the LCD will fill and empty whilst charging.
-
Page 20: Battery Use
SETTING UP available networks. Once connected, the name of network supplier will show in the middle of the LCD. ‘ ’ Emergency Note: If is displayed on the LCD, you are out of range for a network service. However, you can still make emergency calls according to the signal strength. -
Page 21: Switching On/Off
SETTING UP Switching On/Off Press for 3 seconds or longer to switch the telephone on. Geemarc logo will be displayed on the LCD (depend on settings). Insert SIM If no SIM card has been inserted, will be displayed. Only emergency calls can be made until the SIM has been inserted. -
Page 22: Using The Telephone
USING THE TELEPHONE Standby Mode When the telephone is ready for use and you have not entered any characters, the telephone is in standby mode. You can set the telephone to standby mode by pressing Energy Saving Mode Your telephone has a standby mode in order to save battery power in the standby mode when no keys are pressed. -
Page 23: Making A Call From The Call List
USING THE TELEPHONE To place an international call you need to press a „+“ before the country code, which you get by pressing the „ “ key twice. Some foreign telephone networks have extension lines that cannot be dialled as dial-through, but need to be entered by the keypad. -
Page 24: Making A Call From The Phone Book
USING THE TELEPHONE Making a Call from the Phone Book If you have stored numbers in the phone book, you can dial numbers using the phone book. Press Names soft key to enter Phonebook ▲ ▼ to scroll through the phonebook or type in the first letter of the name required and your search will be filtered to all contacts starting with that letter. -
Page 25: Receiving A Call
USING THE TELEPHONE Receiving a Call When an incoming call is received the telephone rings and/or vibrates. The caller’s telephone number will be displayed. If this caller’s number is stored on the Phonebook, the associated name will be displayed Press to answer To end the call simply press When an incoming call is received, pressing the left... -
Page 26: Hands Free
USING THE TELEPHONE Hands Free You can turn on the speakerphone built into the telephone during a call. In this mode there is no need to hold the handset. You will hear the third party through the speaker and the microphone will pick up your voice. -
Page 27: End Single Call
USING THE TELEPHONE End Single Call You can end the call if required During a call, press OPTIONS soft key ▲ ▼ to scroll through the menu to select END SINGLE CALL Press Select to confirm Start a New Call You can make a second call while your initial call is placed on hold (if your service provider allows) During a call, press OPTIONS soft key... -
Page 28: Phoneboook
USING THE TELEPHONE Phoneboook You can browse the phonebook during a call During a call, press OPTIONS soft key ▲ ▼ to scroll through the menu to select PHONEBOOK Use the phonebook as described in the phonebook chapter Write an SMS You can write/edit an SMS during a call During a call, press OPTIONS soft key ▲... -
Page 29: Mute Function
USING THE TELEPHONE Mute Function If you wish, you can speak privately to someone else in the room with you without your caller overhearing. You will still be able to hear the caller but they cannot hear you during the mute operation. During a call, press OPTIONS soft key ▲... -
Page 30: Receiving Volume And Tone
USING THE TELEPHONE Receiving Volume and Tone During a conversation, the keys on the right or the up and down navigation keys will adjust the ear piece volume level. Alternatively, press the BOOST key to switch amplify on/off. There are three tone settings: Low frequency/Normal frequency/High frequency. -
Page 31: Message
MESSAGES Send a Text Message A text message using this telephone can contain up to 160 characters, this includes spaces. Press MENU soft key to activate the menu Press OK soft key to enter messages ▲ ▼ to select WRITE MESSAGE Press OK soft key, enter the text message using the numeric keypad (see Phone book Chapter about entering text using the numeric keypad) -
Page 32: Receiving A Text Message (Inbox)
MESSAGES Receiving a Text Message (Inbox) On receiving a text, a ringing tone will be audible (see User Profiles Chapter on how to set ring tone). MESSAGE will be displayed on the LCD. Press OK soft key to display the message Reviewing Stored Text... -
Page 33: Outbox
MESSAGES These options include Reply, Call sender, Forward, Delete, Delete all, Advanced( Use number,Copy to phone,Move to phone, Copy all, Move all) Outbox You can check the messages you have saved in the outbox. These messages still not to be sent. Options available are View, Resend, Edit, Delete, Delete all, Advanced(Copy to SIM, Move to SIM, Copy to SIM,Copy all, Move all). -
Page 34: Phonebook
PHONEBOOK Telephone numbers and names can be stored in the phonebook. This is held both on the SIM and in the phone memory. If you are storing the contact details on the phone you can also store other details such as Phone number, home number, Office number, Caller ringtone. -
Page 35: Create A Phonebook Entry
PHONEBOOK Create a Phonebook Entry Press Names soft key to Enter Phonebook ▲ ▼ Press OPTIONS and use to scroll through the menu to select ADD NEW CONTACT Press OK soft key to select To SIM or To Phone Enter the name using the numeric keypad ▲... - Page 36 PHONEBOOK If saving the contact to phone, continue through the menu until all relevant information has been entered e.g. Phone number, home number, office number etc The numeric keypad also has characters printed on the keys. These characters are used for entering text for the purposes of phonebook entry and modification, SMS text writing and when searching for contacts in the phone book.
-
Page 37: Create A Phonebook Entry From Standby
PHONEBOOK Character Map Characters Characters .,-?!’@:#$/_1 MNO6 ABC2 PQRS7 DEF3 TUV8 GHI4 WXYZ9 JKL5 Space 0 Create a Phonebook Entry from Standby Enter the number using the numeric keypad (always include the local area code) Press OPTIONS soft key ▲ ▼... -
Page 38: View Phonebook Entries
PHONEBOOK If storing to the phone memory, continue through the menu until all relevant information has been Phone number, home entered e.g. number, office number etc Press OPTION and select DONE. Press OK soft key and select Yes or No to confirm. - Page 39 PHONEBOOK with that letter. If you type the second letter of the contact, your search will be further filtered to all contacts starting with those two letters etc Press OPTIONS soft key Options available to be performed on that contact record are as follows: View Send text message...
-
Page 40: Copying And Deleting All Phonebook Entries
PHONEBOOK Copying and Deleting All Phonebook Entries Press Names soft key to Enter Phonebook Press OPTIONS soft key to select ▲ ▼ to select Phonebook settings: ▲ ▼ to select Delete all contacts – delete all entries (From SIM or From phone) Copy contacts –... - Page 41 PHONEBOOK Press Edit and name a group you wish to add the contact to e.g.FAMILY. Press Options and select Done and Press Save to cofirm ▲ ▼ to scroll through the menu to select View Members Press Add soft key to select ▲...
-
Page 42: Editing Phonebook Groups Name
PHONEBOOK Editing Phonebook Groups Name Press Names soft key to Enter Phonebook Press Options to scroll through the menu to select Caller groups ▲ ▼ to scroll through the menu to select the type of group you wish to modify e.g.FAMILY Press Options soft key to select ▲... -
Page 43: Assigning A Ring Tone To A Phonebook Group
PHONEBOOK Assigning a Ring Tone to a Phonebook Group Press Names soft key to Enter Phonebook ▲ ▼ Press Options and use to scroll through Caller groups the menu to select Press OK soft key to select ▲ ▼ to scroll through the menu to select the type of group you wish to give a specific ring tone to e.g.FAMILY Press Options soft key to select... -
Page 44: Phonebook Settings
PHONEBOOK Phonebook Settings Press Names soft key to Enter Phonebook ▲ ▼ Press Options soft key then Use scroll through the menu to select Phonebook settings Press OK soft key to select The following settings are available Preferred storage Memory status Copy contacts Move contacts Delete all contacts... -
Page 45: Speed Dial
PHONEBOOK Speed dial There are 8 other speed dial numbers (keys 2-9 on the numeric keypad). Press Names soft key to Enter Phonebook ▲ ▼ Press Options soft key then use scroll through the menu to select Speed dial ▲ ▼... -
Page 46: Call Center
CALL CENTRE View Call Logs Information about all calls is stored on this telephone. These calls include: Calls missed Calls dialed Calls received Up to 20 numbers can be held in each log. Press MENU soft key to activate the menu ▲... -
Page 47: Delete Call Logs
CALL CENTRE Press OK soft key to select Information about the call will be displayed e.g. name, number, date and time Delete Call Logs Press MENU soft key to activate the menu ▲ ▼ to scroll through the menu to select CALL CENTER Press OK soft key to select CALL HISTORY ▲... -
Page 48: Call Settings
CALL CENTRE Call Settings There are a number of call settings. You can access the call settings as shown below followed by a description of each call setting available. Press MENU soft key to activate the menu ▲ ▼ to scroll through the menu to select CALL CENTER Press OK soft key to select... - Page 49 CALL CENTRE Caller ID: Settings for the transmission of your phone number. Set by network: Using the default setting of your provider. Hide ID: No transmission of your phone number. Send ID: Transmission of your phone number. Call Waiting Call waiting can be activated or deactivated. Please check that this service is available from your service QUERY STATUS provider.
- Page 50 CALL CENTRE Call Barring Incoming and outgoing calls to and from your phone can be limited. There are 4 options available with this function: Outgoing calls: If you select All calls, no more calls can be dialled. If you select International calls, no more calls to networks abroad can be dialled.
- Page 51 CALL CENTRE line is engaged, your telephone will automatically redial this number after a certain amount of time. This will take place provided you have not canceled the call Call time display: whether to display the call duration. Call time reminder: You can estimate the call duration accurately by activating the prompt.
-
Page 52: Sos Settings
SOS SETTINGS Press MENU soft key to activate the menu ▲ ▼ to scroll through the menu to select Press OK soft key to select ▲ ▼ to scroll through the menu to select either SOS setting and Record SOS MSG SOS mode setting ▲... - Page 53 SOS SETTINGS Can set the 5 numbers here. You can select the number from Phone book or Edit number. Call center number Select call center number -> OK enter the desired phone number. It is forbidden to enter a public emergency number such as police, fire and rescue control centre , it is purely a “private”...
- Page 54 The phone will start to dial the predefined emergency contacts as saved in the SOS contact list one by one, automatically. As soon as the CL8450 connected to one of these contacts, the alarm will stop and the conversation can begin.
- Page 55 SOS SETTINGS after the helper’s phone was ringing, then the CL8450 will end the call and the next number on the SOS contact list will be dialled. If you have only set one phone number in the SOS contact list, the CL8450 will only call that number cyclically.
-
Page 56: Settings
SETTINGS Boost You have the possibility to activate or deactivate the boost function automatically when you are on a call Tone Control Set the tone for the earpiece/loudspeaker. • Press Menu, select Settings -> Tone control and press • Select Normal frequency, Low frequency (increases the lower frequencies) or High frequency (increases the higher frequencies) and press OK. - Page 57 SETTINGS Press OK soft key to select ▲ ▼ to scroll through the menu to select M1/M2/M3 SETTING Press OK soft key to select Enter the name and Select Phone Number, press EDIT. Select From phonebook or Edit number and Press ▲...
-
Page 58: User Profiles
SETTINGS User profiles The mobile is supplied with four profiles. Each profile has a number of settings which are configurable. Therefore you can set up a profile for different contexts e.g. outdoor profile would have a louder ring than general, meeting profile will have no ring but will vibrate on receiving a call etc. - Page 59 SETTINGS Tone setting Incoming call Set the ring tone of Incoming calls (up to 10 ring tones available) Alarm tone set the melody for the alarm.10 melodies available for the function Alarm Power on Set the tone of Power on (up to 5 tones and Silent available) Power off Set the tone of Power off (up to 5 tones and Silent available)
- Page 60 SETTINGS Alert type: Select whether an incoming call should be signalled by Ring only, Vib. only, Vib. and ring or Vib. then ring (Vib. = vibration). Ring type: You can select Single, Repeat or Ascending. Extra tone: You can switch different tones for special circumstances on and off (Warning / Error /Network connect / Call connect).
- Page 61 SETTINGS Phone Setting Press MENU soft key to activate the menu Use ▲ and ▼to scroll through the menu to select SETTINGS Press OK soft key to select Press OK soft key to select Phone settings Time and Date Set home city: Select your city Set Time/ Date: Set the current date and time using the numeric keypad.
- Page 62 SETTINGS Display - Wallpaper: Select a wallpaper for the standby mode. - Screen saver: Select on Settings/Status, whether the screen saver should be on or off and set a time to start (if status is “On“). Select offers different pictures. - Power on display/Power off display: Select an animation which should be played when powering the phone on/off.
- Page 63 SETTINGS - Charge LED: Select whether the indicator LED for charging should be always active (On), between 8 pm and 8 am off (Night mode) or always deactivated (Off). Network settings Press MENU soft key to activate the menu Use ▲ and ▼to scroll through the menu to select SETTINGS Press OK soft key to select Use ▲...
-
Page 64: Security Settings
SETTINGS Security settings Press MENU soft key to activate the menu ▲ ▼ to scroll through the menu to select SETTINGS Press OK soft key to select ▲ ▼ to scroll through the menu to select SECURITY SETTINGS Press OK soft key to select This mobile telephone allows you to set up passwords to help protect your telephone from unauthorized use. - Page 65 SETTINGS SIM Security SIM lock The SIM lock (PIN) can be switched on or off. To switch on, the Code PIN is required. Change password: You can change the following passwords: - PIN (of the SIM card) - PIN2 (of the SIM card) For further information regarding SIM PIN 1 and 2 contact your network provider Restore factory settings...
-
Page 66: Organiser
ORGANISER Note: The default password is 1122; please change it to your own personal password as soon as possible. Calendar You can review the calendar and move to a certain date quickly. Press MENU soft key to activate the menu Use ▲... -
Page 67: Calculator
ORGANISER • Delete event: delete all/ delete certain events • Jump to date: skip to the appointed date to check or edit the event Calculator There is a calculator on the telephone. This is operated via the numeric keypad. Press MENU soft key to activate the menu Use ▲... -
Page 68: Alarm
ORGANISER Enter the second number using the numeric keypad Press OK soft key Note: Press CLEAR soft key to clear the last digit. Press and hold CLEAR soft key to clear the display completely. Alarm You can set up to 5 alarms. Each with the following settings: Press Edit soft key: •... -
Page 69: Bluetooth
ORGANISER Bluetooth This phone can be connected with a Bluetooth device which is in the range of 10m. • Bluetooth activation: on/off • Visibility: on/off • My device: The name of audio device will be displayed after pairing. • Search audio device: activate Bluetooth and the headset before entering this menu, and then begin to search for audio device. -
Page 70: Stopwatch
ORGANISER monthly, yearly), priority (Low, high, medium), Details, Status (undone, done) Check all the tasks saved and edit them as follows: • View: view the selected task details • Add: add a new task • Edit: edit the task • Search: search by time and subject •... -
Page 71: Nway Stopwatch
ORGANISER the stopwatch. Lap timing: Stopwatch with lap timing without total time. Press Start to start the function, Lap to take the lap time (each elapsed time since the last round timing is displayed), Pause or the red button in the centre of the navigation key stops the stopwatch. -
Page 72: Troubleshooting
TROUBLESHOOTING Mobile hone cannot be switched on • Check battery is inserted and check that it is inserted correctly Nothing appears on the display • Check the handset is switched on • Check the battery and SIM are inserted correctly Display is locked when the telephone is switched on •... - Page 73 TROUBLESHOOTING Failure to link to the network • The signal is too weak, or there may be some radio interference • Is the SIM card installed incorrectly or damaged? If the SIM card is damaged, please ask your service provider for a replacement. Cannot make a Call •...
-
Page 74: Safety Information
SAFETY INFORMATION General Only use the power supply included with the product. Only use the approved rechargeable battery supplied. Do not open the handset (except to replace the handset batteries) or base. Contact the helpline for all repairs. Never dispose of batteries in a fire. There is a serious risk of explosion and/ or the release of toxic chemicals. - Page 75 SAFETY INFORMATION Do not expose your product to fire or other hazardous conditions. The telephone is designed for working within a temperature range of -20°C to 60°C. Usage In summary, read these simple guidelines. Not following them may be dangerous or illegal. SWITCH ON SAFELY Do not switch the device on when wireless phone use is prohibited or when it may cause interference or danger.
- Page 76 SAFETY INFORMATION blasting is in progress. USE SENSIBLY Use only in the normal position as explained in the product documentation. BACK-UP COPIES Remember to make back-up copies or keep a written record of all-important information. CHARGING Do not use the telephone during charging...
-
Page 77: Hearing Aid Information
HEARING AID INFORMATION Some phones are measured for compatibility with hearing aids. If the box for your particular model has “Rated for Hearing Aids” printed on it, the following explanation applies. When some mobile phones are used near some hearing devices (hearing aids and cochlear implants), users may detect a buzzing, humming, or whining noise. -
Page 78: Network Services
NETWORK SERVICES To use the phone you must have service from a wireless service provider. Many of the features in this device depend on features in the wireless network to function. These network services may not be available on all networks have make... -
Page 79: Guarantee
GUARANTEE From the moment your Geemarc product is purchased, Geemarc guarantee it for the period of one year. During this time, all repairs or replacements (at our discretion) are free of charge. Should you experience a problem then contact our help line or visit our website at www.geemarc.com. - Page 80 - Or, hand the old product to the retailer. If you purchase a new one, they should accept it. Thus if you respect these instructions you ensure human health and environmental protection. For product support and help visit our website at www.geemarc.com Telephone 01707 384438 Or fax 01707 832529...
- Page 81 UGCL8450_En_v1.3...
Need help?
Do you have a question about the CL8450 and is the answer not in the manual?
Questions and answers