Table of Contents
Advertisement
Quick Links
Advertisement
Table of Contents

Related Manuals for Geemarc CL8700


Summary of Contents for Geemarc CL8700
- Page 1 CL8700 Mobile Phone with SOS emergency key English...
-
Page 2: Table Of Contents
CONTENTS !!! Please refer to our website: www.geemarc.com for an up to date user guide, as there may be important updates and changes you need to be aware of !!! CONTENTS ..............1 INTRODUCTION ............4 Unpacking the Telephone ..........5 DESCRIPTION ............ - Page 3 CONTENTS SMS ................23 Send a Text Message ..........23 Receiving a Text Message ......... 23 Reviewing Stored Text Messages (Inbox) ....23 Sent Messages ............24 Draftbox ..............24 Delete SMS ..............24 Text Message Settings ..........25 Broadcast Messages ..........26 VOICEMAIL ...............
- Page 4 CONTENTS HANDSET SETTINGS ..........36 Phone Settings, Led setting, M1/M2 numbers ... 36 I.C.E ................36 Torch, Flight mode ............. 37 Profiles, Call Settings ..........37 Speed dial ..............37 Display ............... 38 Security Settings ............38 Connections ............... 39 SOS ................
-
Page 5: Introduction
Its is important that you read the instructions below in order to use your Geemarc telephone to its full potential. Keep this user guide in a safe place for future reference. This guide explains how to use the following telephone:... -
Page 6: Unpacking The Telephone
INTRODUCTION Unpacking the Telephone When unpacking the telephone, you should find the following in the box: • 1 CL8700 mobile telephone handset 4G • 1 Desktop charging unit • 1 cable USB/ type C • 1 Mains power adaptor • 1 x Li-Polymer rechargeable battery •... -
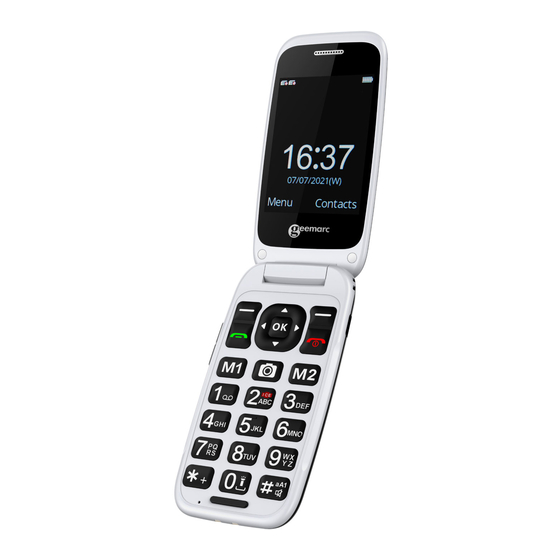
Page 7: Description
DESCRIPTION General Description Handset Description (front) Earpiece Display Right Soft key End/Power key Navigation keys Confirm key Left Soft key Dial key M1, camera , M2 Keypad Torch... - Page 8 DESCRIPTION Handset Description (Rear) SOS key Loudspeaker Battery door Type-C USB Port / Type-C Headset Jack Volume Up / Amplify button Down Button Charging Contacts...
- Page 9 DESCRIPTION Charging Contacts Type-C USB port...
- Page 10 DESCRIPTION One touch dialing keys A telephone number can be assigned to each of these buttons. To dial the number all you have to do is press the button once and the number will be dialed automatically This is a dedicated key in Standby. It provides access to the Camera function in stand by mode.
- Page 11 DESCRIPTION Left/Right key These are softkeys i.e. they take on different functions depending on the menu displayed. The current function is always displayed by the text above the key. Asterisk key Press this key to insert one or more symbols while composing a message or editing a phonebook entry name.
-
Page 12: Lcd Screen Description
DESCRIPTION Front Cover When there are unread text messages, the white light is on. Front Cover When there is a missed call, the green light is on. Front Cover When the voltage is low, the red light flashes at an interval of 2.5 seconds, when charging, the red light flashes at an interval of 1 second, and when it is fully charged, it displays blue. - Page 13 DESCRIPTION Signal Strength icon This is always displayed when your telephone is switched on. It shows the current signal strength. More bars indicate more signal strength. There is one of these icons per SIM. Alarm icon The alarm has been set to ring at a specified time. Battery Status icon This is always displayed when your telephone is switched on.
-
Page 14: Menu Navigation
DESCRIPTION Menu Navigation The MENU soft key or central square key is used to activate the menu. The BACK soft key is used to go back a level in the menu system. Press to deactivate the menu and return to standby mode from any menu. The ▼and▲... - Page 15 DESCRIPTION Call timers Data service cournter Mode SOS number Set call center SOS SMS Set outgoing voice Settings Phone Settings LED Setting M1/M2 memories I.C.E Torch Flight mode Profiles Call settings Speed dial Display Security Connections Tools Bluetooth Clock Calendar Calculator Services Internet...
-
Page 16: Network Services & Password
DESCRIPTION Video FM radio Audio Recorder My files Phone Memory card Network Services To use this mobile telephone you must subscribe to a service from a service provider. Different service providers offer different features (at a variety of charges). This may effect the features made available to you through this mobile telephone. -
Page 17: Setting Up, Install Sim Card
SETTING UP Install SIM Card and Battery Always switch the telephone off and disconnect the charger before removing the battery. Take care when handling the SIM card. The SIM card and its contacts can be easily damaged by scratches or bending. To remove the battery compartment cover, slide the cover in the direction shown and pull it off. -
Page 18: Charging The Battery
SETTING UP Charging the Battery Charging via the Type-C Port Plug the charger into a wall socket. Connect the lead from the charger into the Type-C port on the side of the telephone. During charging, the battery icon starts to fill. Charging via the Charging Unit Plug the charger into a wall socket. -
Page 19: Switching On/Off & Battery Use
SETTING UP Switching On/Off Press for 3 seconds or longer to switch the telephone If no SIM card has been inserted, No SIM card will be displayed. Only emergency calls can be made until the SIM has been inserted. Press again for 3 seconds to switch the telephone off. -
Page 20: Call
USING THE TELEPHONE Standby Mode When the telephone is ready for use and you have not entered any characters, the telephone is in standby mode. You can set the telephone to standby mode by pressing Making a Call Flip open the cover and dial the number on the keypad. Press Delete soft key to delete an incorrect digit Press , the number is automatically dialled... -
Page 21: Making A Call From The Call Record & Phone Book
USING THE TELEPHONE Making a Call from the Call Record You can find numbers dialled, received or missed in the call record. 1. Menu Call logs Dialed calls Select the telephone number required 2. On finding the desired number, press , the number is automatically dialled 3. -
Page 22: Receiving A Call, Rejecting A Call, Switch Off Alerts
USING THE TELEPHONE Receiving a Call When an incoming call is received the telephone, the caller’s telephone number will be displayed. If this caller’s number is stored in the Phonebook, the associated name will displayed Press to answer or flip the cover opened To end the call simply press or flip the cover closed Rejecting a Call... -
Page 23: Receiving Volume
USING THE TELEPHONE Receiving Volume During a conversation, the V+ and V- buttons found on the right side, adjust the ear piece volume level, there are 9 volume levels. start the amplifier function after level 7. will give a boost with the maximum volume attainable being 40dB. -
Page 24: Sms
Send a Text Message A text message using this telephone can contain up to 160 characters. This figure includes spaces. 1. Menu Message Write Message or press directly on the left navigator key 2.Enter the first characters of the contact or press OPTION, select Add recipient, select the contact in the list, press OK key then OPTIONS and OK If you just the phone number, press # key and select 123... -
Page 25: Sent Messages
Sent Messages The outbox stores successfully sent and saved messages (if the phone is set up to save outbound text messages in Message Settings). 1. Menu Message Sentbox 2. Scroll to the message you wish to review 3. Press OK key to view 4. -
Page 26: Text Message Settings
Text Message Settings Service Centres distribute SMS messages. Your mobile telephone must have the telephone number for the service centre programmed into memory. Generally, this will have already been set up by your service provider. Menu Message Options Settings There are many settings options: SIM SMS center Set up the location of the SMS center SMS validity period... -
Page 27: Broadcast Messages
Memory Status A useful option is to request to see how much memory is occupied and how much is free on both the SIM card and the telephone e,g, SIM1 17/30, SIM2 2/30, Phone 5/200. Broadcast Messages This telephone supports the broadcast messages i.e. information services from your service provider. -
Page 28: Voicemail
VOICEMAIL Voicemail Number Setting The voicemail function allows you to listen to any voicemail messages people may have left for you. The voice mailbox is a network service to which you may need to subscribe. Contact your service provider if in doubt. If your service provider does give you access to voice mail, the telephone number used to access the voice mail system will normally be set up on your telephone. -
Page 29: Phonebook
PHONE BOOK Telephone numbers and names can be stored in the phone book. This is held both on the SIM and in the phone memory. It allows you to store frequently used numbers so that you can easily make a call without having to remember or enter the telephone number. -
Page 30: Create A Phone Book Entry From Standby
PHONE BOOK key. You can also switch to numbers using key. The input mode will be indicated on the right hand side of the name entry field indicated by a pencil. Press 0 to insert a space. Press the CLEAR soft key to delete the last character typed in while entering a number or a name. -
Page 31: Options Within Phone Book Contact
PHONE BOOK Options within Phonebook Within Phonebook contact you can do the following: Normal Phonebook then OK or press 1. Menu Contacts Contact soft key directly in stand-by mode. 2. Use ▼and▲ to scroll through the list until you find the desired contact and press OK 3. -
Page 32: Dial A Picture Phone Book Entry
PHONE BOOK Select from album or Take photo 2. Take a photograph of the person that you are adding to the phonebook (press Central Square key). Press OK soft key. 3. Select Name and press OK Enter a name for the Phonebook and press Save soft key 4. -
Page 33: Call Record
CALL RECORD Display Missed Calls When you have a missed call, a message n MISSED CALLS will appear on the display e.g. 3 MISSED CALLS. Press Details soft key to review the details or press Exit to exit. You can also review missed calls via the menu as follows: 1. -
Page 34: Display Received Calls
CALL RECORD Display Received Calls 1. Menu Call logs Received Calls 2. Use ▼and▲ to scroll through the list until you find the desired contact 3. Press the soft key OPTIONS, the following will be available to perform on that call record entry: Details Call Write message... -
Page 35: Call Settings
CALL RECORD Call Settings Within Call Settings there is SIM Call Settings and Advance Settings. You can access SIM Call Settings as follows: Menu Settings Call Settings There are many settings available: Dual SIM Set the setting to use one or 2 SIM. Flip to answer : when the function is activated, just open the flap to answer Call Divert: Incoming calls can be diverted to a specified... - Page 36 CALL RECORD • All outgoing Calls : No outgoing calls can be made • All Incoming Calls: No incoming calls can be received • ISD calling • Cancel all barring Hide ID: - You can choose whether this is set by network, hidden or shown Others Call Time Reminder: - customise if you want a reminder of how...
-
Page 37: Handset Settings
HANDSET SETTINGS Phone Settings Within Phone Settings you can adjust the following functions: Time and date: Set the time and date, Time format (12hr or 24hr), Date format (DDMMYYYY or MMDDYYYY or YYYYMMDD) and update time settings. Language: There are 16 languages available to display the menu i.e. -
Page 38: Torch, Flight Mode
HANDSET SETTINGS Menu Settings Contacts You can input all the phone owner's information e.g.name, address, disease, allergy, blood group, doctor Menu Settings Owner Info TORCH You can activate the torch or not. Flight mode Select Activate to activate the flight mode. Select Off to stop the flight mode. -
Page 39: Display
HANDSET SETTINGS Display You can modify your display in this menu with the different functions: Animation effect: you can selet the animation when your phone power on or power off Wallpaper settings: you can select your wallpaper or choose an picture Contrast: With the key <- and ->... -
Page 40: Connections
HANDSET SETTINGS Privacy : You have the possibility to locked the functions that you want in the list of choose Fixed dialing number : You have access at your voicemail number and at the dialing mode Own number: you have the possibility to enter your phone number for the SIM 1 or 2 Blacklist:you have the possibility to activate or desactivate the function in blacklist setting. -
Page 41: Sos
SOS Function In an emergency, you can press the SOS button for help during 3 seconds. If you have preset an SOS text message and set the SMS RECEIVER (generally another mobile phone), once you press the SOS button, the phone will send the SOS text message to the receiver. -
Page 42: Sos Text Message
SOS Text Message You can enter the SOS text message. This will be sent to mobile phones on your list. Menu SOS SMS Content Type an informative text message (you have the possibility to modify this message) SOS Message Record Record an informative message that will assist your helpers in time of emergency e.g. -
Page 44: Advanced Settings
There are many useful functions within organizer. Bluetooth CL8700 supports bluetooth. Other bluetooth devices can be searched for and likewise the CL8700 can be found. Bluetooth password is 0000. You can connect with a bluetooth headset or perhaps with another phone. This would enable file transfer via bluetooth.e.g. -
Page 45: Multimedia
This function allows you to save all contacts on your network operator Multimedia There is superb multimedia options available on the CL8700. There is a Image, Camera, Make a video, Video, Audio Player, Sound Recorder and FM Radio. File Manager All the files used in the many applications on the phone can be found within My files. -
Page 46: Troubleshooting
TROUBLESHOOTING Telephone cannot be switched on • Check battery is inserted and check that it is inserted correctly Nothing appears on the display • Check the handset is switched on • Check the battery and SIM are inserted correctly Display is locked when the telephone is switched on •... - Page 47 TROUBLESHOOTING • Place the phone correctly in the charging unit or connect the charging unit properly. Clean the contact surfaces on the mobile phone and charging unit with a soft, dry cloth. • Try a new battery Unable to Charge the phone •...
- Page 48 TROUBLESHOOTING Cannot answer a call: • Check that mobile fees have been paid • Check that the SIM card is valid • Check if fixed dialling is set • Is the bar incoming calls feature enabled • Is the call diverting function enabled The keys appear to be locked •...
-
Page 49: Safety Information
SAFETY INFORMATION General Only use the power supply included with the product. Only use the approved rechargeable battery supplied. Do not open the handset (except to replace the handset batteries or SIM) or base. Contact the helpline for all repairs. Never dispose of batteries in a fire. - Page 50 SAFETY INFORMATION Usage In summary, read these simple guidelines. Not following them may be dangerous or illegal. SWITCH ON SAFELY Do not switch the device on when wireless phone use is prohibited or when it may cause interference or danger. ROAD SAFETY COMES FIRST Obey all local laws.
- Page 51 SAFETY INFORMATION USE SENSIBLY Use only in the normal position as explained in the product documentation. BACK-UP COPIES Remember to make back-up copies or keep a written record of all-important information. CHARGING Do not use the telephone during charging.
-
Page 52: Hearing Aid Information
HEARING AID INFORMATION Some phones are measured for compatibility with hearing aids. If the box for your particular model has “Rated for Hearing Aids” printed on it, the following explanation applies. When some mobile phones are used near some hearing devices (hearing aids and cochlear implants), users may detect a buzzing, humming, or whining noise. -
Page 53: Network Services
NETWORK SERVICES To use the phone, you must have service from a wireless service provider. Many of the features in this device depend on features in the wireless network to function. These network services may not be available on all networks or you may have to make specific arrangements with your service provider before you can utilize network services. -
Page 54: Guarantee
GUARANTEE From the moment your Geemarc product CL8700 is purchased, Geemarc guarantee it for the period of two years. During this time, all repairs or replacements (at our discretion) are free of charge. Should you experience a problem then contact our help line or visit our website at www.geemarc.com. -
Page 55: Recycling Directives
For product support and help visit our website at www.geemarc.com Parc de l’Etoile, 2 Rue Galilée, 59791 Grande-Synthe, France E-mail : help@geemarc.com Telephone : 01707 387602 lines are open 09h00 to 16h00 Mon to Fri This product is made in China To Geemarc Telecom... - Page 56 UGCL8700_En_v1.1...
Need help?
Do you have a question about the CL8700 and is the answer not in the manual?
Questions and answers