Table of Contents
Advertisement
Advertisement
Table of Contents

Related Manuals for Perkins 1106 Series


Summary of Contents for Perkins 1106 Series
- Page 1 Part No N40469 ® User’s Handbook 1106 Series Marine Propulsion Engines...
- Page 3 © Proprietary information of Wimborne Marine Power Centre, all rights reserved. The information is correct at the time of print. Published in July 2013 by Wimborne Marine Power Centre, Wimborne Marine Power Centre, Wimborne, Dorset, England BH21 7PW Tel:+44(0)1202 796000 Fax: +44(0)1202 796001 E-mail: Marine@Perkins.com www.perkins.com/marine...
- Page 4 N40469 Foreword Thank you for purchasing the Perkins M300C, M250C, M216 & M190 marine diesel engine. This manual contains information for the correct operation and maintenance of your Perkins engine. Information contained in this manual is correct at the time of printing. Wimborne Marine Power Centre reserves the right to make changes at any time.
-
Page 5: General Safety Precautions
N40469 Title General safety precautions can cause corrosion in the closed circuit of the cooling system. These safety precautions are important. You must • Do not allow sparks or fire near the batteries refer also to the local regulations in the country of (especially when the batteries are on charge) use. - Page 6 Title N40469...
-
Page 7: Table Of Contents
N40469 Table of Contents Chapter ............................Page 1 Engine views .................. 1 Introduction ......................1 Location of engine parts ..................2 Front and right side view ................2 Rear and left side view .................4 2 General information ..............5 Introduction ......................5 Safety notices ....................5 How to care for your engine ..................6 Engine guarantee ....................7 Engine identification ....................7... - Page 8 Table of Contents N40469 When required ....................24 Daily ......................24 Every week ....................24 Initial 500 service hours ................24 Every 500 service hours or 1 year .............24 Every 1000 service hours ................25 Every 2000 service hours ................25 Every 3000 service hours or 2 years ............25 Every 3000 service hours or 3 years ............25 Every 4000 service hours ................25 Every 6000 service hours or 3 years ............25...
- Page 9 N40469 Table of Contents On-board repair kit....................49 General data ..................51 Engine .........................51...
-
Page 11: Engine Views
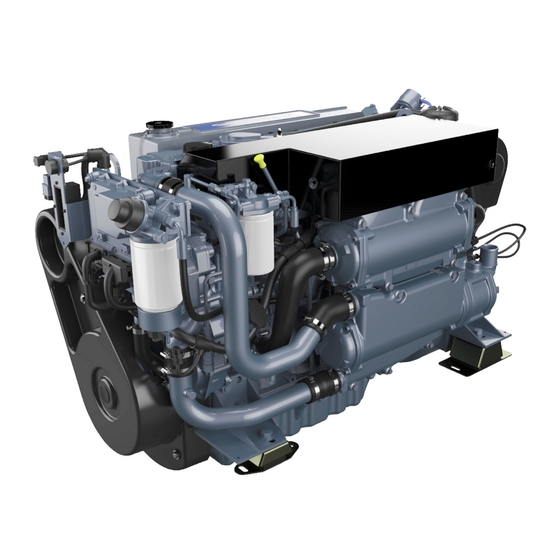
N40469 Chapter 1 Engine views Introduction Perkins engines are built for specific applications and the views which follow may not necessarily match your engine specification. Page 1... -
Page 12: Location Of Engine Parts
Chapter 1 N40469 Location of engine parts Front and right side view 1. Coolant filler cap 8. Sump 9. Auxiliary water pump 2. Secondary fuel filter 10. Fuel return 3. Dipstick 11. Belt guard 4. Top cover 12. Primary fuel filter 5. -
Page 14: Rear And Left Side View
Chapter 1 N40469 Rear and left side view 23. Air cleaner 15. Rear lifting bracket 24. Oil breather 16. Oil filler cap 17. Exhaust manifold / header tank 18. Front lifting bracket 19. Alternator 20. Oil filter 21. Starter 22. Turbocharger Page 4... -
Page 15: General Information
Chapter 2 General information Introduction The Perkins range of marine engines are the latest developments from the Perkins Group of Companies together with Wimborne Marine Power Centre. These engines are designed for use in pleasure craft and for commercial craft. -
Page 16: How To Care For Your Engine
Personnel with this training are available at your Perkins distributor. You can also obtain parts and service from your Perkins distributor. If you do not know the address of your nearest distributor, enquire at Wimborne Marine Power Centre. -
Page 17: Engine Guarantee
Perkins marine distributor or an approved dealer. If it is difficult to find a Perkins distributor or an approved dealer, consult the Sales and Customer Support of Wimborne Marine Power Centre. -
Page 18: Contact Details
Chapter 2 N40469 Contact details Wimborne Marine Power Centre Ferndown Industrial Estate Wimborne Dorset BH21 7PW England Telephone: +44 (0)1202 796000 Fax: +44 (0)1202 796001 www.Perkins.com/marine Page 8... -
Page 19: Operation Instructions
N40469 Chapter 3 Operation instructions Running-in A gradual running-in of a new engine is not necessary. Prolonged operation at light loads during the early life of the engine can cause lubricating oil to enter the exhaust system. Maximum load can be applied to a new engine as soon as the engine is put into service and the coolant temperature has reached a minimum of 60 (140 Cautions:... -
Page 20: Control Panel Overview
Chapter 3 N40469 Control panel overview The main control panel for single and twin engine installations is shown in figure 1. The switches are protected from the entry of water, but if the control panel is in an exposed location, it should be protected by a cover when not in use. -
Page 21: Auxiliary Control Panel Overview
N40469 Chapter 3 Auxiliary control panel overview The auxiliary control panel shown in figure 2 is used on craft which have an extra control point. The switches are protected from the entry of water, but if the control panel is in an exposed location, it should be protected by a cover when not in use. -
Page 22: Digital Control Panel Overview
Chapter 3 N40469 Digital control panel overview The digital control panel shown in figure 3 is used with the keyswitch panel. The switches are protected from the entry of water, but if the control panel is in an exposed location, it should be protected by a cover when not in use. -
Page 23: Keyswitch Panel Overview
N40469 Chapter 3 Keyswitch panel overview The keyswitch panel shown in figure 4 is used in conjunction with the digital panel. The switches are protected from the entry of water, but if the control panel is in an exposed location, it should be protected by a cover when not in use. -
Page 24: Preparations For An Engine Start
Chapter 3 N40469 Preparations for an engine start Ensure that there is more than enough fuel in the tank for the voyage. Ensure that the fuel supply control (if fitted) is in the open position. Check that the seacock strainer is clean. Open the seacock. -
Page 25: How To Start The Engine
N40469 Chapter 3 How to start the engine Switch on the electrical system (1). Adjust the engine speed control to the minimum speed position. Press and hold the start switch (2) to engage the starter motor, there may be a short delay if the cold start aid is required (this is an automatic process when the temperature is below 5 C. -
Page 26: How To Stop The Engine
Chapter 3 N40469 How to stop the engine Adjust the engine speed control to the minimum speed position. Ensure that the control lever for the reverse gearbox is in the neutral position. If the engine has operated at high load for a long period of time, allow the engine to cool for one to two minutes. -
Page 27: Circuit Breakers
• Always find the cause of a breaker failure and correct the fault. If in doubt, consult an electrician at your nearest Perkins distributor. A wiring loom, which includes a breaker panel to protect the wiring from damage by a short circuit, has been fitted to your engine. - Page 28 Chapter 3 N40469 Page 18...
-
Page 29: Engine Fluids
Engine fluids Fuel specification To get the correct power and performance from your engine, use good quality fuel. The recommended fuel specification for Perkins engines is indicated below: Cetane number .........45 minimum Viscosity ......2.0/4.5 centistokes at 40 Density.......... 0,835/0,855 kg/litre Sulphur .........0.2% of mass, maximum... -
Page 30: Lubricating Oil Specification
Chapter 4 N40469 Lubricating oil specification Use only good quality lubricating oil which is equivalent to or above the minimum specification shown in the table below. Target oil specifications are: Engine type Specification 1106D-E66TA API/CH4/CI4 Oil change period is 500 hrs. on CH4 oils and higher specifications Caution: The type of lubricating oil to be used may be affected by the quality of the fuel which is available. -
Page 31: Coolant Specification
N40469 Chapter 4 Coolant specification The quality of the coolant which is used can have a great effect on the efficiency and life of the cooling system. The recommendations indicated below can help to maintain a good cooling system and to protect it against frost and/or corrosion. - Page 32 Chapter 4 N40469 Page 22...
-
Page 33: Regular Maintenance
N40469 Chapter 5 Regular maintenance Maintenance periods These preventive maintenance periods apply to average conditions of operation. Check the periods given by the manufacturer of the boat in which the engine is installed. If necessary, use the shorter periods. When the operation of the engine must conform to the local regulations these periods and procedures may need to be adapted to ensure correct operation of the engine. -
Page 34: Schedules
Chapter 5 N40469 Schedules The schedules which follow must be applied at the interval (hours or months) which occur first. When required • Battery - replace • Battery or battery cable - disconnect • Engine - clean • Fuel system - prime •... -
Page 35: Every 1000 Service Hours
N40469 Chapter 5 • Auxiliary water strainer (if fitted) - check • Heat exchanger seals - check • Heat exchanger tubestack - check Every 1000 service hours • Aftercooler condensate drain valve - inspect/clean • Engine valve lash - inspect/adjust •... -
Page 36: How To Fill The Coolant Circuit
Chapter 5 N40469 How to fill the coolant circuit Warning! If coolant is to be added to the circuit during service, allow the engine to cool before the coolant is added. Remove the filler cap slowly as dangerous coolant could be discharged if the coolant is still hot and the system under pressure. -
Page 37: How To Drain The Coolant Circuit
N40469 Chapter 5 How to drain the coolant circuit Warnings! • Discard the used coolant in a safe place and in accordance with local regulations. • Do not drain the coolant while the engine is still hot and the system is under pressure because dangerous hot coolant can be discharged. -
Page 38: How To Check The Specific Gravity Of The Coolant
Note: If it is necessary to fill or replenish the coolant system in service, mix the coolant to the correct strength before it is added to the coolant system. Perkins antifreeze with a concentration of 50% will give protection against frost to a temperature of -35 (-31 F). -
Page 39: How To Drain The Auxiliary Water System
N40469 Chapter 5 How to drain the auxiliary water system Caution: The auxiliary water system cannot be drained completely. If the system is drained for engine preservation purposes or for protection from frost, the system must be filled again with an approved antifreeze mixture. -
Page 40: How To Check The Impeller Of The Auxiliary Water Pump
Chapter 5 N40469 How to check the impeller of the auxiliary water pump Caution: When the impeller is checked, the strainer in the outlet hose of the auxiliary water pump must also be checked. 1. Ensure that the seacock is closed. 2. -
Page 41: How To Check The Drive Belt Of The Alternator
N40469 Chapter 5 How to check the drive belt of the alternator Warning! The engines have a guard fitted to give protection from the alternator fan and the drive belt. Ensure that this guard is fitted before the engine is started. -
Page 42: How To Adjust The Belt Tension
Chapter 5 N40469 How to adjust the belt tension 1. Loosen the nut and bolt (figure 11 item 1). Then loosen the nut and bolt (figure 11 item 2). 2. Loosen bolt (figure 12 item 1) and adjust the alternator in order to alter the belt tension. Tighten all bolts for the adjustment of the alternator to 22 Nm (16 lb ft). -
Page 43: How To Check The Condition Of The Heat Exchanger
N40469 Chapter 5 How to check the condition of the heat exchanger The interval for the maintenance of the tube type heat exchanger (figure 13 item 1) depends on the operating environment of the vessel and on the operating time. The sea water that is circulated through the heat exchanger and the amount of operating time of the vessel affects the following items:... -
Page 44: If Tubestack Is Greasy
Chapter 5 N40469 If tubestack is greasy 1. Degrease using solvent or by washing with warm alkaline detergent that is compatible with aluminium. 2. Rinse with water and air dry. Tubestack is not greasy. 1. Wash with warm alkaline detergent that is compatible with aluminium. -
Page 45: How To Renew The Element On The Primary Fuel Filter
N40469 Chapter 5 How to renew the element on the primary fuel filter Warning! Fuel leaked or spilled onto hot surfaces or electrical components can cause a fire. To help prevent possible injury, turn the start switch off when changing fuel filters or water separator elements. Clean up fuel spills immediately. - Page 46 Chapter 5 N40469 6. Rotate the bowl counter clockwise in order to remove the bowl. Remove ‘O’ ring seal (3). Clean the bowl. 7. Use a chain wrench in order to remove old canister (2). 8. Lubricate the ‘O’ ring seal (1) with clean engine oil on the new canister.
-
Page 47: How To Renew The Element On The Secondary Fuel Filter
N40469 Chapter 5 How to renew the element on the secondary fuel filter Warning! Fuel leaked or spilled onto hot surfaces or electrical components can cause a fire. To help prevent possible injury, turn the start switch off when changing fuel filters or water separator elements. Clean up fuel spills immediately. -
Page 48: How To Renew The Lubricating Oil Of The Engine
Chapter 5 N40469 How to renew the lubricating oil of the engine Warning! Discard the used lubricating oil in a safe place and in accordance with local regulations. 1. Attach a suitable length of hose on the sump pump (figure 18 item 1) and place a suitable container with a capacity of at least 16 litres (28 UK pints) at the other end. -
Page 49: How To Renew The Canister Of The Lubricating Oil Filter
N40469 Chapter 5 How to renew the canister of the lubricating oil filter Warning! Discard the used canister and lubricating oil in a safe place and in accordance with local regulations. 1. Put a tray or plastic bag under or around the filter to retain spilt lubricating oil. -
Page 50: How To Renew The Engine Breather
Chapter 5 N40469 How to renew the engine breather Caution: Do not use excessive force to remove the hose (figure 23 item 1) from the breather outlet pipe. 1. Remove the hose (figure 23 item 1) from the engine breather body (figure 23 item 2). 2. -
Page 51: How To Clean The Air Filter
N40469 Chapter 5 How to clean the air filter 1. Remove nut (1) and washer (2 ). 2. Loosen setscrew (3) and rotate bracket (4) away from the cowl (7). 3. Relax the two hose clips (5) and remove the cleaner assembly. -
Page 52: How To Check The Condition Of The Vibration Damper
Chapter 5 N40469 How to check the condition of the vibration damper Caution: A vibration damper (figure 27 items 1) should be renewed if there is impact damage to the outer casing or if there is leakage of the viscous fluid from the cover plate. -
Page 53: How To Check The Valve Tip Clearances
N40469 Chapter 5 How to check the valve tip clearances Check the valve lash while the engine is stopped. The temperature of the engine does not change the valve lash setting. Warning! Accidental engine starting can cause injury or death to personnel. To prevent accidental engine starting, turn the ignition switch to the OFF position and place a ‘DO NOT OPERATE’... -
Page 54: Tc Exhaust Stroke
Chapter 5 N40469 TC Exhaust Stroke 1. Measure the valve lash for the valves when the engine is at TC exhaust stroke according to the table below. If necessary, make an adjustment to the valves accordingly. TC Exhaust Inlet Valves Exhaust Stroke Valves... -
Page 55: Corrosion
Supplementary tools A general tool kit and an on-board repair kit are available from your Perkins Distributor. It is recommended that the tools and other parts, listed below, are also retained on-board: Wire, 20 SWG (1mm in diameter) - Page 56 Chapter 5 N40469 Page 46...
-
Page 57: Engine Preservation
N40469 Chapter 6 Engine preservation Introduction The recommendations indicated below are designed to prevent damage to the engine when it is withdrawn from service for a prolonged period. Use these procedures if the engine is to be withdrawn from service. The instructions for the use of POWERPART products are given on the outside of each container. -
Page 58: How To Add Antifreeze To The Auxiliary Water System For Engine Preservation Purposes
Chapter 6 N40469 14. Remove the alternator drive belt and put it into storage. 15. In order to prevent corrosion, spray the engine with POWERPART Lay-Up 3. Do not spray the area inside the alternator cooling fan. 16. If the transmission is not to be used for at least a year, fill the gearbox completely with its normal lubricating oil. -
Page 59: Parts And Service
Parts and service Introduction If problems occur with your engine or with the components fitted onto it, your Perkins distributor can make the necessary repairs and will ensure that only the correct parts are fitted and that the work is done correctly. - Page 60 The instructions for the use of each product are given on the outside of each container. POWERPART Silicone adhesive These products are available from your Perkins An RTV silicone adhesive for application where low distributor or Wimborne Marine Power Centre.
-
Page 61: General Data
N40469 Chapter 8 General data Engine Number of cylinders............................6 Cylinder arrangement ..........................In line Cycle............................... Four stroke Induction system:.....................Turbocharged aftercooling Combustion system ........................Direct injection Nominal bore ......................... 105 mm (4.13 in) Stroke ............................ 127 mm (5.00 in) Compression ratio: ..........................16.2:1 Cubic capacity ........................6.6 litres (365 in Firing order .......................... - Page 62 Chapter 8 N40469 Page 52...
- Page 63 California Proposition 65 Warning Diesel engine exhaust and some of its constituents are known to the State of California to cause cancer, birth defects, and other reproductive harm.
- Page 64 Wimborne Marine Power Centre subsequently. 22 Cobham Road, Part No. N40469 issue 3 Ferndown Industrial Estate, Produced in England ©2013 by Wimborne Wimborne, Dorset, BH21 7PW, England. Marine Power Centre Tel: +44 (0)1202 796000, Fax: +44 (0)1202 796001 E-mail: Marine@Perkins.com Web: www.perkins.com/Marine...
Need help?
Do you have a question about the 1106 Series and is the answer not in the manual?
Questions and answers