
Related Manuals for Precor PRECISIONSERIES


Summary of Contents for Precor PRECISIONSERIES
- Page 1 Quick Start Card PRECISION SERIES ™ AND ENERGY SERIES ™ ELLIPTICALS WELCOME TO A PERSONALIZED FITNESS EXPERIENCE FOR YOUR HOME...
- Page 2 GETTING sTARTED PRECISION SERIES AND ENERGY SERIES ELLIPTICALS As you get to know your new Precor Elliptical Fitness Crosstrainer WarnInG: Read through ALL of the safety information ™ (EFX ) and your own fitness goals, you’ll use the advanced features in the Owner’s Manual, and make sure that the EFX is...
- Page 3 Precor web site When these steps are complete, you are ready to view When these steps are complete, you are ready to view...
- Page 4 O W N E R ’ S M A N U A L Precision ™ & Energy ™ S E R I E S E L L I P T I C A L S E F X ® 4 2 5 • E F X ® 4 2 3 E F X ®...
- Page 6 DANGER Important Safety To reduce the risk of electrical shock always unplug the unit from the electrical outlet immediately Instructions after using and before cleaning. WARNING To reduce the risk of burns, fire, When using the equipment, always take basic electric shock, or injury, take the precautions, including the following: following precautions:...
- Page 7 Precision Series / Energy Series Elliptical Fitness Crosstrainer Owner's Manual: EFX 425 / 423 / 225 / 222 / 221 Never operate the unit if it is damaged, not Never drop or insert objects into any opening. working properly, when it has been dropped, or has Keep hands away from moving parts.
-
Page 8: Safety Approvals For Cardiovascular Equipment
Cardiovascular Equipment result in a risk of electric shock. Check with a qualified electrician or service Precor equipment has been tested and found to person if you are in doubt as to whether comply with the following applicable safety standards. -
Page 9: Radio Frequency Interference (Rfi)
Precor could void the cause harmful interference to radio communications. user’s authority to operate the If the equipment does cause harmful interference to equipment. -
Page 10: Canadian Department Of Communications
Canadian Department of Communications This digital apparatus does not exceed the Class B limits for radio noise emissions from digital apparatus set out in the Radio Interference Regulations of the Canadian Department of Communications. Le présent appareil numérique n’émet pas de bruits radioélectriques dépassant les limites applicables aux appareils numériques de la class B prescrites dans le Règlement sur le brouillage radioélectrique édicté... -
Page 11: Obtaining Service
Equipment serial number: Precor web site at www.precor.com. Console serial number: Should you need more information regarding customer Date purchased: support numbers or a list of Precor authorized service centers, visit the Precor web site at www.precor.com. - Page 12 The equipment serial number is located on the rear The console serial number is located inside the audio stabilizer bar, just below the power switch. connector compartment on the back of the console. You will need to open the cover of this compartment to see the number.
-
Page 13: Table Of Contents
Getting Familiar with the Controls ....15 Long-Term Storage ..........49 Status Display ............16 Workout Selection and Volume Controls ..18 Precor Residential Equipment Lower Readouts and Intensity Controls ..19 Limited Warranty ........50 Connecting Your Audio Player ......20... -
Page 14: Efx Safety Features
EFX Safety Features Turning the Unit On and Off To turn the unit on and off, use the power switch ® located on the back of the unit, near the power cord The Elliptical Fitness Crosstrainer™ (EFX ) is equipped connection. -
Page 15: Using The Locking Pin
Precision Series / Energy Series Elliptical Fitness Crosstrainer Owner's Manual: EFX 425 / 423 / 225 / 222 / 221 Using the Locking Pin The following figure shows how the pin looks when it is properly seated. Your EFX is equipped with a pin and lanyard to lock its pedals (and arms, if it has moving arms) in place. - Page 16 When you want to use the EFX, remove the pin from the hole and store it in the hole under the bottom of the ramp. The following figure shows how the pin should look while the EFX is in use. Figure 5: Locking pin in storage during a workout EFX Safety Features...
-
Page 17: Getting Started
5. Press the Go key. 6. Use the up and down arrows to adjust the amount of resistance. If the equipment includes a As you get to know your new Precor Elliptical Fitness motorized CrossRamp® adjustment, use the ® Crosstrainer and your own fitness goals, you’ll use the... -
Page 18: Using Crossramp
Using CrossRamp CrossRamp is a Precor technology that helps you get more out of your EFX. As you select different CrossRamp settings, the angle of the roller ramp changes while your body remains in a biometrically correct position. In addition to increasing the intensity... - Page 19 Precision Series / Energy Series Elliptical Fitness Crosstrainer Owner's Manual: EFX 425 / 423 / 225 / 222 / 221 Be sure to try different CrossRamp settings during your workout. In addition to exercising different groups of muscles, you may also find that certain settings adjust the performance of the EFX to your height and body geometry.
-
Page 20: Getting Familiar With The Controls
Getting Familiar with the Controls The figure and table on the following page introduce the controls on the console of your fitness equipment. Getting Familiar with the Controls... -
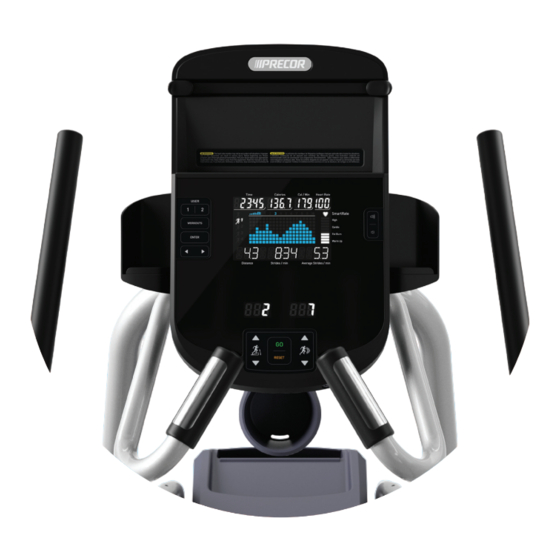
Page 21: Status Display
Precision Series / Energy Series Elliptical Fitness Crosstrainer Owner's Manual: EFX 425 / 423 / 225 / 222 / 221 Status Display Table 1. Control descriptions Number Name Purpose Upper text Displays status messages and your display workout progress graph Lower text Displays text messages about your display... - Page 22 Number Name Purpose Number Name Purpose User Shows which user profile is Calorie Displays the number of calories indicator currently selected. Progress made indicator that you have used in your current during the current workout will be workout applied to this profile. Cal / Min Displays the average number of SmartRate®...
-
Page 23: Workout Selection And Volume Controls
Precision Series / Energy Series Elliptical Fitness Crosstrainer Owner's Manual: EFX 425 / 423 / 225 / 222 / 221 Workout Selection and Volume Table 2. Control descriptions Controls Number Name Purpose User keys Selects a user profile to personalize your exercise experience Workout Displays preset workouts... -
Page 24: Lower Readouts And Intensity Controls
Lower Readouts and Intensity Table 3. Control descriptions Controls Number Name Purpose CrossRamp Displays the current CrossRamp indicator* angle as a grade percentage Resistance Displays the current level of indicator resistance GO key Begins a manual workout Reset key Resets (stops) the workout program and displays the Figure 11: Lower readouts and intensity controls workout summary... -
Page 25: Connecting Your Audio Player
Precision Series / Energy Series Elliptical Fitness Crosstrainer Owner's Manual: EFX 425 / 423 / 225 / 222 / 221 Connecting Your Audio Player To connect your audio player or tablet to the display The reading tray at the top of your display console can console: also hold an audio player or a tablet. - Page 26 2. Feed one end of the connecting cable through the opening in the reading tray. 3. Insert the plug on the lower end of the cable into the jack on the back of the console. 4. Close the access cover. 5.
-
Page 27: Setting Up Your Equipment
Precision Series / Energy Series Elliptical Fitness Crosstrainer Owner's Manual: EFX 425 / 423 / 225 / 222 / 221 Setting Up Your If you want to … Press … Switch between available choices The right and left Equipment arrow keys Make a selection or save a setting After the console is installed, it needs the following PAUSE... - Page 28 3. When the first setting (SAFETY CODE) appears, Table 4. Console settings press a key to continue. Setting Effect Values Default If you want to … Then press … SAFETY CODE Requires users ENABLE or DISABLE Change this setting DISABLE to press a sequence of Leave this setting as it is The right arrow key...
- Page 29 Precision Series / Energy Series Elliptical Fitness Crosstrainer Owner's Manual: EFX 425 / 423 / 225 / 222 / 221 Setting Effect Values Default Setting Effect Values Default SET DEFAULT Controls ON or OFF; ON (30 SET MAX Selects the A setting WORKOUT whether...
- Page 30 Setting Effect Values Default Setting Effect Values Default SET MAX Selects how An amount 30 seconds CONFIGURA- Selects the EFX 200 or EFX 200 PAUSE TIME long the of time TION type of EFX 400 equipment will between 30 equipment wait for seconds and installed with...
-
Page 31: Creating User Profiles
Precision Series / Energy Series Elliptical Fitness Crosstrainer Owner's Manual: EFX 425 / 423 / 225 / 222 / 221 Creating User To create a user profile: Press one of the two USER keys. Profiles 2. Use the left and right arrow keys to adjust the workout length you want, then press ENTER. -
Page 32: Measuring Your Heart Rate
CAUTION: Your heart rate should never exceed 85% of Precor cardio equipment can measure your heart rate your maximum aerobic heart rate. in one of two ways:... - Page 33 Precision Series / Energy Series Elliptical Fitness Crosstrainer Owner's Manual: EFX 425 / 423 / 225 / 222 / 221 The following graph shows how your effective heart On the Workout List, you can find several rate ranges vary with your age. preprogrammed heart rate workouts.
-
Page 34: Using Smartrate
Using SmartRate CAUTION: Before beginning any fitness program, see your physician for a thorough physical examination. ® The Precor SmartRate technology is a precise, Seek advice from your physician to learn the target easy-to-read heart rate monitor that helps users achieve their best personalized workouts. - Page 35 Precision Series / Energy Series Elliptical Fitness Crosstrainer Owner's Manual: EFX 425 / 423 / 225 / 222 / 221 Note: In the Basic Heart Rate Control workout, the GO To test your heart rate: key is deactivated. The equipment needs to know your Select a workout and press GO or Enter.
-
Page 36: Getting Accurate Heart Rate Readings
Getting Accurate Heart Rate Important: Precor cardio equipment works with 5 KHz ® chest straps only. It does not work with Bluetooth -based Readings chest straps, which are designed for use with mobile apps. To work reliably, heart rate sensors need to be Note: To receive an accurate reading, the strap needs securely in contact with your skin. - Page 37 Precision Series / Energy Series Elliptical Fitness Crosstrainer Owner's Manual: EFX 425 / 423 / 225 / 222 / 221 2. Adjust the strap and fasten it around your chest. 4. After you put on the chest strap, face the display The strap should feel snug, not restrictive.
-
Page 38: Troubleshooting Heart Rate Readings
possible causes. If the solutions in this list do not solve covered with any sort of salve, rub, or lotion. If they the problem, contact your dealer or Precor Customer are, wash them. Support. Check that your hands are not too dry. If they are, ... - Page 39 Precision Series / Energy Series Elliptical Fitness Crosstrainer Owner's Manual: EFX 425 / 423 / 225 / 222 / 221 The Displayed Heart Rate Is Wrong Or SmartRate Doesn’t Work The touch-sensitive grips may not be making secure contact. Try the following solutions: Make sure that your hands are clean, slightly ...
-
Page 40: Choosing And Completing A Workout
Choosing and Choosing a Workout Completing a Your fitness equipment has been programmed with a library of workout plans to help you meet your fitness goals. Workout To choose a workout: Press the WORKOUTS key repeatedly to scroll The instructions shown earlier in this manual provide through the available workouts. -
Page 41: Available Workouts
Precision Series / Energy Series Elliptical Fitness Crosstrainer Owner's Manual: EFX 425 / 423 / 225 / 222 / 221 Available Workouts To adjust the duration of your workout and your personal information: Your fitness equipment includes a wide selection of At any time during your workout, press ENTER. - Page 42 Interval 1-1 and Interval 1-2 Interval workouts help exercisers improve strength, endurance, aerobic and anaerobic fitness. They Figure 17: Interval 1-1 alternate short bursts of high intensity activity with recovery periods. These workouts are designed to raise and lower your heart rate in a repeating fashion for a user-defined period of time by alternating rest and work intervals of two minutes each (for the Interval 1-1 workout) and...
- Page 43 Precision Series / Energy Series Elliptical Fitness Crosstrainer Owner's Manual: EFX 425 / 423 / 225 / 222 / 221 Weight Loss Training tip: For best results, wear a heart rate The American College of Sports Medicine monitor and maintain a target heart rate that is recommends that adults get at least 30-60 minutes of between 50% and 70% of your maximum heart rate.
- Page 44 Basic Heart Rate Control This workout monitors your heart rate to guide you through a moderate intensity program that is optimal for aerobic conditioning. During the workout, your target heart rate is based on the following calculation: Target heart rate = 70% × (207 – (0.67 × your age)) The equipment adjusts resistance, CrossRamp level, or both to maintain your target heart rate while you work Figure 20: Basic HRC...
-
Page 45: Hill Climb
Precision Series / Energy Series Elliptical Fitness Crosstrainer Owner's Manual: EFX 425 / 423 / 225 / 222 / 221 Hill Climb Note: If the equipment has a manually operated ramp, This workout engages a wider range of muscle groups we recommend adjusting it to the highest possible by adjusting the resistance and CrossRamp settings to setting before you begin. - Page 46 Cross Country Training tip: Advanced users can take their hands off This workout delivers true training variety and the handlebars to make better use of their core muscular engagement by continuously adjusting the stabilizer muscles throughout the workout. incline to simulate the dynamic terrain of an outdoor run.
- Page 47 Precision Series / Energy Series Elliptical Fitness Crosstrainer Owner's Manual: EFX 425 / 423 / 225 / 222 / 221 Aerobic You can modify the CrossRamp setting for each This workout is designed to condition your heart. After two-minute segment, and you can change the an accelerating warmup stage, the equipment reminds resistance at any time.
- Page 48 Gluteal Training tip: To increase your core activation Strong glutes contribute to better posture, improved throughout this workout, take your hands off the spine and hip stabilization, and reduction in lower body machine handles while maintaining an upright posture. injuries at the hips, knees and ankles. This workout targets your thighs and glutes as it gradually increases in intensity.
- Page 49 Precision Series / Energy Series Elliptical Fitness Crosstrainer Owner's Manual: EFX 425 / 423 / 225 / 222 / 221 Crosstrainer Manual This workout targets your thigh and calf muscles as it This workout motivates you by allowing you to define moves you through a gradual climb and decline.
-
Page 50: Ending A Session
Ending a Session Cooling down is an important aspect of your workout because it helps reduce muscle stiffness and soreness by transporting excess lactic acid out of the working muscles. In addition, a five-minute cooldown allows your heart rate to return to its normal, resting state. At the end of your workout, the Summary screen displays the following information: Total elapsed time... -
Page 51: Reading Diagnostic Information
7. To return to the Welcome screen, press PAUSE. Your fitness equipment keeps track of its own history. Table 5. Types of diagnostic information The details it stores about itself can be useful if you ever need to contact Precor Customer Support. Heading Contents ODOMETER... - Page 52 Heading Contents USAGE LOG List of the workouts that have been used, the number of times each one has been used, and the total amount of time each one has been in use ERROR LOG List of the last 30 error messages that the equipment has reported (or fewer, if the equipment hasn’t reported 30 error messages).
-
Page 53: Maintenance
Off, insert the locking pin and then unplug the power cord from its power source. Make sure other users know that the EFX needs service. To order parts or to contact a Precor authorized service provider in your area, refer to Obtaining Service. -
Page 54: Cleaning The Equipment
CAUTION: Do not use any acidic cleaners. Doing so will Long-Term Storage weaken the paint or powder coatings and void the Precor When the equipment is not in use for any length of Limited Warranty. Never pour water or spray liquids on time, turn it off. -
Page 55: Precor Residential Equipment Limited Warranty
only. To make claim under warranty, the buyer must notify EFX® 447, 425, 423, 245, 225, 222, and 221 Precor or their authorized Precor dealer within 30 days after the For Treadmills: date of discovery of any nonconformity and make the affected... - Page 56 Except in Canada, Precor does not pay labor outside the United States. Warranties outside the United States and Canada may vary.
- Page 57 Disclaimer and Release The warranties provided herein are the exclusive warranties Software version upgrades. given by Precor and supersede any prior, contrary or additional Cosmetic items, including, but not limited to the following: representations, whether oral or written. ANY IMPLIED...
- Page 58 Exclusion of Consequential and Incidental For any product described above that fails to conform to its Damages warranty, Precor will provide, at their option, one of the PRECOR AND/OR ITS SUPPLIERS SHALL HAVE NO following: (1) repair; (2) replacement; or (3) refund of the OBLIGATION OR LIABILITY, WHETHER ARISING IN purchase price.
- Page 59 Precision Series / Energy Series Elliptical Fitness Crosstrainer Owner's Manual: EFX 425 / 423 / 225 / 222 / 221 Notes:...
- Page 60 Notes: Notes...
- Page 61 Precision Series / Energy Series Elliptical Fitness Crosstrainer Owner's Manual: EFX 425 / 423 / 225 / 222 / 221 Notes:...
- Page 62 EFX 425 / EFX 423 / EFX 225 / EFX 222 / EFX 221 Elliptical Fitness Crosstrainers™ Product Specifications Electronic Readouts EFX 425 EFX 423 EFX 225 EFX 222 EFX 221 Calories Workout Percentage Complete Length: 84 in (213 cm) 84 in (213 cm) 76 in (193 cm) 75 in (191 cm) 75 in (191 cm) Calories per Minute Distance Width:...
- Page 63 Precor considers the unauthorized appropriation EFX 425 / 423 / 225 / 222 / 221 Owner’s Manual Woodinville, WA USA 98072-4002 of its proprietary rights to be a very serious matter. Precor will vigorously 303121-111 rev B, en 1-800-347-4404 pursue all unauthorized appropriation of its proprietary rights.
- Page 64 Assembly Guide PRECISION SERIES ELLIPTICALS MODELS: 447, 425, 423 WELCOME TO A PERSONALIZED FITNESS EXPERIENCE FOR YOUR HOME...
- Page 66 Table of Contents Getting Started ....................2 Obtaining Service ........................ 2 Installation Requirements ....................2 Unpacking the Equipment ....................2 Required Tools ........................2 Hardware Kit (not to scale) ....................3 Assembling the Equipment ................. 5 Beginning Assembly ......................6 Attaching the Moving Arm Assembly (EFX 447 and 425 Models Only)....
-
Page 67: Getting Started
The EFX is carefully tested and inspected before shipment. The unit is shipped in Thank you for choosing Precor. For proper installation, please read this guide two boxes. Ask for help from one or more people to unpack and assemble the thoroughly and follow the assembly instructions. -
Page 68: Hardware Kit (Not To Scale)
The hardware kit shipped with this equipment contains the fasteners and other Fasteners Quantity hardware components shown in the following table. Before you begin assembly, make sure that your hardware kit is complete. If not, please contact Precor Buttonhead cap screw Customer Support. (¹ ₄-inch x ⁷ ₈-inch) Table 1. - Page 69 EFX 400 Series Assembly Guide Table 4. Additional Parts and Accessories Two adjustable feet Bottle holder Two clamps Top cover Two device holders Heart rate chest strap (ships with all models except the EFX 423)
-
Page 70: Assembling The Equipment
Assembling the Equipment The following figure identifies the major components of the equipment referred to in this manual. Proper alignment and adjustment of the equipment is critical. When you install fasteners, leave room for adjustments. Do not fully tighten the fasteners until you are instructed to do so. -
Page 71: Beginning Assembly
EFX 400 Series Assembly Guide Beginning Assembly 3. A tab on each side of the front lift cover holds the front and back covers Remove the packaging around the lift covers. together. Gently squeeze the sides of the back covers to release the tabs and remove the front lift cover. - Page 72 2. Attach the base of the lift assembly using two ⁵ ₁₆-inch x ³ ₄-inch hex head 5. Fully tighten the two fasteners at the base of the lift motor assembly using a screws and two ⁵ ₁₆-inch flat washers. Partially tighten the fasteners. ¹...
-
Page 73: Attaching The Moving Arm Assembly (Efx 447 And 425 Models Only)
Any damage caused during installation is not arm and try again. Forcing the joint screw may cause crossthreading. covered by the Precor Limited Warranty. Refer to the following figure to position the movable arms for assembly. -
Page 74: Attaching The Stabilizer (Efx 423 Model Only)
Attaching the Stabilizer (EFX 423 Model Only) To attach the lower link arms to the movable arms: Attach the right lower link arm to the movable arm using one joint connector This assembly procedure applies to EFX 423 model only. For other models, the screw, one star washer, and one joint connector nut. - Page 75 EFX 400 Series Assembly Guide 3. Screw a foot into each stabilizer. 5. Have your assistant hold the stabilizer (with a cable protruding from both Note: Make sure the nut rests against the stabilizer. ends) next to the handlebar shaft and base frame while you connect the base cable.
- Page 76 6. Secure the stabilizer to the base frame using four ⁵ ₁₆-inch x ³ ₄-inch hex head To attach the handlebar shaft covers: screws and four ⁵ ₁₆-inch washers. Locate the four covers (two sets) for the handlebar shaft. Note: If you encounter difficulty aligning the base mounts, loosen the clamp 2.
-
Page 77: Attaching The Lift Cover
EFX 400 Series Assembly Guide Attaching the Lift Cover 2. Align the tabs and apply downward pressure and press the magazine rack and back cover together. A click is heard when the magazine rack is secured To attach the lift cover: properly. -
Page 78: Attaching The Stabilizers (Efx 447 And 425 Models Only)
Attaching the Stabilizers (EFX 447 and 425 3. For easier access to the base mounts, lift the front of the EFX off the floor Models Only) and place a wedge of packaging cardboard beneath its base. This procedure applies to EFX 447 and 425 models only. To attach the stabilizers: Insert a clamp into each stabilizer and secure it loosely with two buttonhead screws. - Page 79 EFX 400 Series Assembly Guide 5. Secure the stabilizer to the base frame using four ⁵ ₁₆-inch x ³ ₄-inch hex head screws and four ⁵ ₁₆-inch washers. Note: If you encounter difficulty aligning the base mounts, loosen the clamp screws and realign the stabilizer.
-
Page 80: Attaching The Console Bracket
Attaching the Console Bracket 4. Insert the four ⁵ ₁₆-inch x ³ ₄-inch hex head screws and four ⁵ ₁₆-inch washers Pull the cables out of the bracket and remove any kinks. into the side mounts and partially tighten them. To attach the console bracket: Feed the cable through the console bracket as shown in the following figure. -
Page 81: Attaching The Accessories
EFX 400 Series Assembly Guide Attaching the Accessories 6. Fully tighten the other six fasteners using a ¹ ₂-inch socket wrench. 7. Remove the two rear hex head screws and washers. Locate the device holders, bottle holder, and top cover. To attach the accessories: Place the device holders around the console bracket and slide them together. - Page 82 3. Secure the back of the bottle holder using two ⁵ ₁₆-inch x ³ ₄-inch hex head 5. Fully tighten the fasteners on the back of the bottle holder. screws and two ⁵ ₁₆-inch washers. Partially tighten the fasteners. 6. Place the top cover over the console bracket by hooking it in the back and rotating it forward.
-
Page 83: Attaching The Console
EFX 400 Series Assembly Guide Attaching the Console 2. Set the console onto the console bracket. It should sit flush on the bracket Three cables attach to the console. without gaps. If there is a gap, check to make sure that no wires are being pinched. -
Page 84: Completing The Assembly
Be sure to use the appropriate voltage. Refer to Grounding Instructions in the Owner’s Manual. 3. Use the power switch to turn the unit On. Check that the Precor banner appears on the display. If the display remains blank, recycle the power. If the display continues to remain blank, check the cable connections. -
Page 85: Changing The Efx 447 From Moving Arms To Fixed Arms
EFX 400 Series Assembly Guide Changing the EFX 447 from Moving Arms to 2. Twist the socket end toward the floor and insert the pin into the quick pin Fixed Arms release socket on the base frame in front of the back cover. The EFX 447 is assembled with movable arms;... - Page 87 U.S. and foreign patents for both the mechanical construction and the visual aspects P.O. Box 7202 of its product design. Any party contemplating the use of Precor product designs is hereby forewarned Precision™ Series EFX 400 Elliptical Assembly Guide...
Need help?
Do you have a question about the PRECISIONSERIES and is the answer not in the manual?
Questions and answers