Table of Contents
Advertisement
Advertisement
Table of Contents

Related Manuals for Welby Upper Arm


Summary of Contents for Welby Upper Arm
- Page 1 manual...
-
Page 2: Table Of Contents
Contents Introduction ........................5 Symbols and key words used in these instructions ........... 6 About this device ......................7 Safety instructions ....................... 8 Frequently Asked Questions ..................12 Before taking your blood pressure measurement ........... 16 How does the blood pressure monitor work ............18 What’s included ...................... - Page 3 Error messages and troubleshooting ............... 45 Cleaning, storing and servicing your blood pressure monitor ....... 47 Disposal ........................48 Technical specifi cations ..................... 49 FCC Statement ......................50 Limited Warranty ......................52...
-
Page 4: Introduction
Introduction Thank you for purchasing the Welby® Upper Arm Blood Pressure Monitor. This fully automatic device measures blood pressure and pulse rate and detects an irregular heart beat (arrhythmia) fast and easily and then displays the results on the LCD screen. -
Page 5: Symbols And Key Words Used In These Instructions
Symbols and key words used in these instructions CAUTION! Please note the following guidelines to avoid possibly injury and/or property damage. NOTICE! Additional information on using the device. • Bulleted item/information on operating steps and results Tasks to be performed... -
Page 6: About This Device
About this device This device is intended for use in dry, indoor areas only. The device is only intended for private use and not for industrial or commercial use. Use under extreme environmental conditions may result in damage to the device. If the results obtained give you cause to be concerned about your health, please discuss them with your physician or licensed healthcare processional. -
Page 7: Safety Instructions
Safety instructions General • This device is intended for personal home use only. • Do not use this device for self-diagnosis or self-treatment. Contact your physician or other licensed health care provider if you are concerned about your blood pressure. •... - Page 8 Safe handling of batteries Batteries may contain combustible materials. If not handled correctly, batteries can leak, become very hot, ignite or even explode, which could damage your device and/or cause injuries. It is very important that you follow the instructions below: •...
- Page 9 • Remove the batteries from the device if you do not intend to use it for an extended period. • Replace all of the old batteries in a device with new batteries of the same type. Service & Repairs Please contact the Customer Care line if you have questions about the device or experience technical problems.
- Page 10 Danger of disruption from electrical fields Measurements may be inaccurate in the proximity of strong electrical fields. Do not take any measurements near: − High voltage power lines − Microwave appliances − TV sets − Wireless telephones...
-
Page 11: Frequently Asked Questions
Frequently Asked Questions What is blood pressure? Blood pressure is the force exerted by blood against the walls of the arteries as blood is pumped through the circulatory system and is measured in millimeters of mercury (mmHg). The higher the pressure, the harder the heart has to work to supply blood to the vital organs in the body. - Page 12 diseased or abnormal in other ways High Blood Pressure can be controlled by altering one’s lifestyle, avoiding stress, and with medication under a physician’s supervision. To prevent hypertension or to keep it under control: • Do not smoke • Exercise regularly •...
-
Page 14: Measuring Blood Pressure
Measuring blood pressure Everybody’s blood pressure changes constantly. Fluctuations may be caused by mental and physical factors (such as diet, exertion, smoking, caffeine or stress). Blood pressure can also be affected by the time of day, time of year or temperature. This blood pressure measuring device helps you to take regular, comparative measurements. -
Page 15: Before Taking Your Blood Pressure Measurement
Before taking your blood pressure measurement Using this device, you can get an overview of your blood pressure by measuring it regularly and keeping clear records. To make sure that the values give a realistic picture of your blood pressure, please follow the instructions below: •... - Page 16 If you record a value that differs greatly from your normal blood pressure measurement, you should take another measurement around five minutes later. This will allow you to rule out any of the factors mentioned above, which could result in an incorrect measurement.
-
Page 17: How Does The Blood Pressure Monitor Work
The blood pressure monitor measures blood pressure indirectly using a cuff around the upper arm. Inflating the cuff presses the arteries together so that no more blood can flow through them. If the pressure in the cuff is then reduced, this creates a relation between the cuff pressure and the blood pressure. -
Page 18: What's Included
What’s included The following items were included in the box: • Blood pressure measurement device • 2 arm cuffs (standard and XXL cuff ) • 4 x 1.5V batteries type R6/LR6/AA • Storage bag • Blood pressure daily log • Instruction Manual and Quick Start Guide •... -
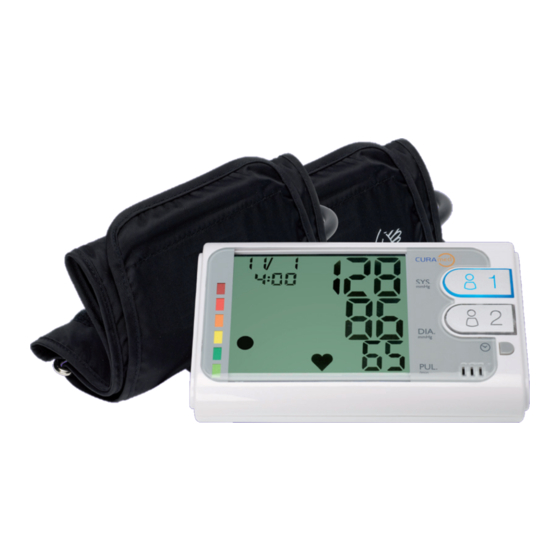
Page 19: Overview Of The Monitor
Overview of the monitor Description Blood pressure measurement Speaker device WHO Blood pressure range Display indicator scale User 1 Button/Set-up key Plug for arm cuff tube User 2 Button/Set-up key Arm cuff Button CLOCK... - Page 20 Display...
- Page 21 Description 1 Systolic value in mmHg 2 Diastolic value in mmHg 3 Heart beat and irregular heart beat (arrhythmia) detection indicator 4 Pulse rate (heart beats per minute) 5 Battery power remaining 6 Number of stored values 7 AVG (average values) 8 Cuff inflating/deflating indicator 9 WHO blood pressure range indicator display 10 Time...
-
Page 22: Preparing The Device
Preparing the device Inserting batteries Open the battery compartment on the bottom. - Page 23 Insert four 1.5V batteries of type R6/LR6/AA, observing the correct polarity. Close the battery compartment. Basic settings must be reset after changing the batteries. See page 25. NOTE Existing measurement values will be stored.
-
Page 24: Basic Settings
Basic Settings You must make the following basic settings before using the device for the first time or after changing the batteries: • Volume • Language • Year • Date (month, day) • Time (hour, minute) Press the TIME button for approximately 3 seconds. NOTE If you do not press any buttons for approximately 10 seconds, the monitor will switch into standby mode. - Page 25 The volume display flashes. To increase the volume, press button 1. To decrease the volume, press button 2. After pressing the button you will hear a confirmation tone in the corresponding volume. Press the TIME key.
- Page 26 The language setting display flashes. This monitor can provide your measurement results verbally. To select your language, choose from the list below. Then, using buttons 1 or 2, scroll up or down until you fi nd the abbreviation next to your desired language in the table below. ...
- Page 27 Press the TIME key. The digits indicating the year will flash. To set the required year, press User 1 button to advance or User 2 button to move backward. Press the TIME key. The digits indicating the month will flash. ...
- Page 28 To set the required day, press User 1 button to advance or User 2 button to move backward. Press the TIME key. The digits indicating the hours will flash. To set the required hour, User 1 button to advance or User 2 button to move backward.
- Page 29 To set the required minutes, press User 1 button to advance or User 2 button to move backward. Press the TIME key. The settings you have made are saved. You will see the following display:...
-
Page 30: Switch Device On And Off
Switch device on and off Press either User 1 or User 2 button to switch on the monitor. The corresponding button will light up. The measurement starts automatically. Press User 1 or User 2 button again to switch off the monitor. Press the TIME button to switch the monitor into standby mode. -
Page 31: Measuring Your Blood Pressure And Pulse
The cuff is suitable for an arm circumference of 8.6 to 12.6 inches. Remove any watches, jewellery etc. The upper arm must be exposed because the cuff must lie directly on the skin. Do not roll up tight shirt sleeves, as this will squash the arm and could produce an inaccurate measurement. - Page 32 Pull the cuff over the arm so that the tube lies over the top of the upper arm, in the direction of the underarm. The blue mark on the cuff points to the hand. The bottom edge of the cuff must end 0.8 to 1.2 inches above the elbow.
- Page 33 The cuff is in the right position on the arm: − When there is room for one finger between the cuff and the arm, − When it sits securely and doesn’t slip. The cuff must not be too tight because the pressure on the arm will increase further when the cuff is pumped up.
- Page 34 Posture To measure your blood pressure you should be sitting comfortably on a chair. Take fi ve or six deep breaths and relax. Rest your elbows on the table or other surface. Hold your arm so that the cuff is level with your heart. ...
- Page 35 Measuring and storing values If you know that your blood pressure is higher than 230mmHg, proceed as described on page 38. Press button 1 or 2 to interrupt the measurement. Make sure that the air tube is not kinked or being squashed. NOTE You can save 30 measurement values for each of two users in separate memories.
- Page 36 If you want to repeat the measurement, you should wait at least fi ve minutes. The cuff must be fully deflated. Measurement starts when the correct cuff pressure has been reached. The monitor also measures your pulse. The value displayed will fall during measurement. If the cuff pressure is too low, the monitor stops measuring and inflates the cuff again until sufficient cuff pressure is reached for the measurement.
- Page 37 Irregular heartbeat (arrhythmia) detection Normally, the pulse beats with a regular rhythm (rhythmically). When the device detects an abnormal pulse rhythm, the symbol appears on the display. In this case, repeat the measurement. Abnormal pulse rhythms can have diff erent causes. If the pulse is constantly arrhythmic, please consult your physician or licensed healthcare provider.
- Page 38 NOTE User 1 and User 2 button are used interchangeably in the following description. If you want to store the values in memory 1, use the first button mentioned for each action. If you want to store the values in memory 2, use the second button mentioned.
- Page 39 Wait until “0” is shown on the display. Press User 1 or User 2 button and hold it down until the required starting value has been reached, e.g. 250mmHg. The measurement is taken. The values measured are saved.
- Page 40 Classifying blood pressure 1 WHO blood pressure range indicator scale 2 WHO blood pressure range indicator display The colored bar chart to the left of the display has the following meanings: Color Explanation SYS. [mmHg] DIA. [mmHg] Severe high blood pressure Above 181 Above 111 light red...
-
Page 41: Retrieving Saved Measurements
Retrieving saved measurements Retrieving average measurements Proceed as follows to retrieve the average values of the last three measurements: Press User 1 or User 2 button and hold the button down for approximately 3 seconds. The average values of the last three measurements from the selected memory will be shown in the display. - Page 42 Retrieving values of individual measurements Saved measurement values can be displayed. To retrieve the measurements stored in User 1 memory, press button 1 and hold it down for approximately 3 seconds. To retrieve the measurements stored in User 2 memory, press button 2 and hold it down for approximately 3 seconds.
- Page 43 If you have switched on language output, this value will also be given verbally. To switch off the monitor, press the corresponding button for approximately three seconds. Deleting the values of a user Press button 1 for deleting User 1 memory (or button 2 for deleting User 2 memory) and hold it down for approximately 2 seconds.
-
Page 44: Error Messages And Troubleshooting
Error messages and troubleshooting Error message Possible cause Remedy Pulse rate measurement Put the cuff on correctly and take the has failed. measurement again. Measurement has failed Keep still and do not speak during because you moved or measurement. spoke. The cuff is not in the right Put the cuff on correctly and take position on the arm. - Page 45 Error message Possible cause Remedy The cuff is not at heart Read the instructions on measuring level. correctly. See page 16. The results of measurement The cuff is not in the right Put the cuff on correctly. See page are abnormally position on the arm.
-
Page 46: Cleaning, Storing And Servicing Your Blood Pressure Monitor
Cleaning, storing and servicing your blood pressure monitor Only use a dry, soft cloth to clean the monitor. Do not use chemical solutions and cleaning products as these may damage the monitor’s surface and/or inscriptions. Do not wash the cuff . Do not have the cuff dry-cleaned. ... -
Page 47: Disposal
Disposal Packaging Your monitor has been packaged to protect it against transportation damage. The packaging is made of environmentally friendly material which can be recycled. Monitor At the end of its life, this device should not be disposed of in household trash. Enquire about the options for environmentally friendly disposal. -
Page 48: Technical Specifications
Technical specifications Measurement method Oscillometric Blood pressure measurement range 30 to 250mmHg Pulse measurement range 40 to 180 beats/minute Blood pressure measurement accuracy ±3mmHg Pulse measurement accuracy ±5% of value displayed Number of storage spaces 2 x 30 Cuff s for arm circumference 8.6 to 12.6 inches (standard cuff ) 12.6 to 17.3 inches (XXL cuff ) Operating conditions... -
Page 49: Fcc Statement
FCC Statement NOTE: POTENTIAL FOR RADIO/TELEVISION INTERFERENCE (for U.S.A. only) This product has been tested and found to comply with the limits for a Class B digital device, pursuant to Part 15 of the FCC rules. These limits are designed to provide reasonable protection against harmful interference in a residential installation. - Page 50 You may also fi nd helpful the following booklet, prepared by the FCC: “How to Identify and Resolve Radio-TV Interference Problems. ” This booklet is available from the U.S. Government Printing Offi ce, Washington D. C. 20402. Changes or modifi cations not expressly approved by the manufacturer or registrant of this equipment can void your authority to operate this equipment under Federal Communications Commissions rules.
-
Page 51: Limited Warranty
PLEASE READ THIS LIMITED WARRANTY CAREFULLY TO UNDERSTAND YOUR RIGHTS AND OBLIGATIONS. MEDION warrants that the Welby® Premium Wrist Blood Pressure Monitor (MD 12450, Item 90115) accompanied by this limited warranty is free from manufacturing defects in material or workmanship for a period of 36 months from the date of original purchase. - Page 52 only through the end of the original limited warranty period. In no event shall MEDION or any of its distributors or resellers be liable for incidental, indirect or consequential damages relating to the product (including any repaired product or replacement product) or its use. Some States do not allow the exclusion or limitation of incidental or consequential damages, so the above limitation and exclusion may not apply to you.
- Page 54 YEAR MODEL: MD 12450 / ITEM CODE# 90115 / 02/2013 LIMITED WARRANTY Daily 8:00 am - 8:00 pm CST except holidays...
Need help?
Do you have a question about the Upper Arm and is the answer not in the manual?
Questions and answers