Table of Contents
Advertisement
Quick Links
TELEVISION WITH DVD RECEIVER
KVT-911DVD
INSTRUCTION MANUAL
This player has been designed to play back the DVD
software which has been encoded for specific region
areas. It cannot play back the DVD software encoded for
other region areas than the region areas for which it has
been designed.
COMPACT
COMPACT
COMPACT
COMPACT
DIGITAL AUDIO
DIGITAL AUDIO
DIGITAL VIDEO
TEXT
Take the time to read through this instruction manual.
Familiarity with installation and operation procedures will help you
obtain the best performance from your new Television with DVD receiver.
For your records
Record the serial number, found on the back of the unit, in the spaces
designated on the warranty card, and in the space provided below. Refer to
the model and serial numbers whenever you call upon your KENWOOD dealer
for information or service on the product.
Model KVT-911DVD Serial number
© PRINTED IN JAPAN B64-2253-00/01 (K)(DT)
Advertisement
Table of Contents

Related Manuals for Kenwood Excelon KVT-911DVD


Summary of Contents for Kenwood Excelon KVT-911DVD
-
Page 1: Instruction Manual
Record the serial number, found on the back of the unit, in the spaces designated on the warranty card, and in the space provided below. Refer to the model and serial numbers whenever you call upon your KENWOOD dealer for information or service on the product. -
Page 2: Table Of Contents
Contents Before Use ...4 Monitor Control Function ...8 •Opening/ Closing the Monitor •Power Off •Switching the Monitor’s Picture •Selecting the TV/Video Screen Mode •Adjusting the Picture Quality/ Slide Position •Turning the Monitor Picture Off •Switching the AV Output •Adjusting the Volume Menu Function ...10 •Switching to the Sound Effect Setting Menu Screen •Switching to the Source Control Screen... - Page 3 •External Amp Control •Adjusting the Volume Offset •Ending the Audio Control Screen •Switching to the Sound Preset Screen •Recalling the Kenwood Preset Sound •Adjusting the Center Frequency of the Bass •Adjusting the Bass Quality Factor •Adjusting the Center Frequency of the Treble •Switching the Bass Extend mode On/Off...
-
Page 4: Before Use
(e.g., coins or metal tools) inside the unit. • If the unit starts to emit smoke or strange smells, turn off the power immediately and consult your Kenwood dealer. • Do not touch the liquid crystal fluid if the LCD is damaged or broken due to shock. - Page 5 In such a situation, remove the disc and wait for the condensation to evaporate. If the unit still does not operate normally after a whilst, consult your Kenwood dealer. Playing a disc that is dirty, scratched or warped can cause the sound to skip and the unit to operate incorrectly, resulting in worsened sound quality.
-
Page 6: Restrictions Due To Difference Between Discs
Before Use Region codes in the world The DVD players are given a region code according to the country or area it is marketed, as shown in the following map. ;;;; ;;;; ; ; ; ;;;; ; ; ; ; This player has been designed to play back the DVD software which has been encoded for specific region areas. - Page 7 Glossary DVD: Digital Versatile Disc A type of disc which contains recording of audio/video packaged media with high video and audio quality, such as a movie, featuring large recording capacity and digital signal processing capability. VIDEO CD (VCD) A type of CD which contains the recording of moving images.
-
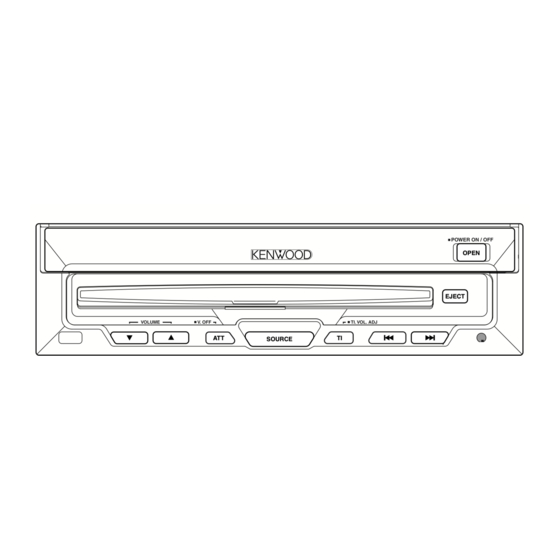
Page 8: Monitor Control Function
Monitor Control Function SOURCE TRACK/TUNE DISC/BAND V.SEL SOURCE Screen Mode [ FULL ] [ ZOOM ] [ JUST ] [ CINEMA ] [ NORMAL ] Opening/Closing the Monitor OPEN Opening the Monitor EJECT Closing the Monitor Set the lower the monitor so that it is completely flat. -
Page 9: Selecting The Tv/Video Screen Mode
Selecting the TV/Video Screen Mode Each time you press the SCREEN button for one second or more, the screen mode switches as follows: ∞ [FULL] : Full picture mode ∞ [JUST] : Just picture mode ∞ [CINEMA]: Cinema picture mode ∞... -
Page 10: Menu Function
Menu Function Menu Screen When using for the first time, the menu screen appears. Switching to the Sound Effect Setting Menu Screen Touch [ SOUND EFFECT ] to switch the sound effect menu screen. <see p.43> NOTE You cannot operate when the standby mode is selected. -
Page 11: Setup Menu Function
Setup Menu Function Setup Screen Selecting to the DAB Tuner Setup Screen Touch [ DAB ] to switch the DAB Tuner Setup Screen. <When the DAB tuner is connected> NOTE Refer to the DAB tuner's instruction manual for DAB tuner controls. Selecting to the Clock Adjustment Screen Touch [ Clock ] to switch the Clock Adjustment... -
Page 12: System Setup Function
" OFF " Touch sensor tone is turned off Setting the TV Control by Remote On/Off If this unit also runs when operating other units with different Kenwood remote controls, its remote control function can be turned off. System Setup Screen-1... -
Page 13: Setting The Auto Scroll Display Function
System Setup Screen-2 Each time you touch [ REMO ], the mode switches as follows: " ON " Remote control function is on " OFF " Remote control function is off Setting the Auto Scroll Display Function This function permits the text to be scrolled and the entire text to be displayed. -
Page 14: Clock Adjustment Function
Clock Adjustment Function Clock Adjustment Screen Turning the Automatic Time Adjustment On/Off With automatic time adjustment, you can set the clock time automatically according to time data sent from RDS stations (after receiving RDS signals for several minutes). You can also set the time manually if the automatic time adjustment function is turned off. -
Page 16: Dvd,Vcd Setup Function
DVD,VCD Setup Function DVD Setup Screen-1 Setting the Screen Mode Use the procedure described below to set the output screen. Each time you touch [ Screen ], the mode switches as follows: " 4:3 LB " Wide-screen software with pan & scan specification is played in a letter box screen (with black stripes on the top and bottom). -
Page 17: Setting The Optical Output Mode
" 4:3 LB " Setting the Optical Output Mode Converts linear PCM (LPCM) voice signals recorded on the DVD disc to down sampling 48 kHz digital signals and outputs them from the optical cable. Each time you touch [ Digital Out ], the mode switches as follows: Optical audio out put Audio recording... -
Page 18: Language Select Screen
DVD,VCD Setup Language Select Screen Inputing the Language Code Touch [ a ] - [ z ] and input the language code. NOTE If you enter the wrong letter, touch [ Clear ]. The last entered letter is cleared. Returning to the Original Language <Audio language only>... -
Page 19: List Of Language Codes
List of language codes Abbreviation Language Afar Abkhazian Afrikaans Amharic Arabic Assamese Aymara Azerbaijani Bashkir Byelorussian Bulgarian Bihari Bislama Bengali, Bangla Tibetan Breton Catalan Corsican Czech Welsh Danish German Bhutani Greek English Esperanto Spanish Estonian Basque Persian Finnish Fiji Faroese French Frisian Irish... -
Page 20: Parental Setup Screen
DVD,VCD Setup Setting the password Touch the number [ z ] - [ / ] and enter your password ( 4-digit ). Input numbers are displayed “*”. NOTE If you enter the wrong number, touch [Clear]. The entered number is cleared. Touch [ Enter ]. -
Page 21: Touch Panel Adjustment Function
Touch Panel Adjustment Function Touch Panel Adjustment Screen Adjusting the Touch Position The touch panel can be adjusted if the position touched and the operation performed do not match. Accurately touch the mark at the lower left. Accurately touch the mark at the upper right. When the mark at the upper right is touched, the adjustment is completed and the system setup menu screen reappears. -
Page 22: Code Security Function
Code Security Function Code Security Screen When the battery is removed from the unit's power switch, you cannot turn on the unit again unless the preset security code is input. This function helps prevent theft. Using the Security System NOTE You must follow steps 1 to 5 to be able to use the Security Code function. -
Page 23: Operating The Buttons For Basic Function
Operating the Buttons for Basic Function DISC/BAND V.SEL SOURCE Disc Slot Adjusting the Volume Press the 5 button to increase the volume. Press the ∞ button to decrease the volume. Turning Attenuator On/Off This function allows you to turn down the volume quickly. -
Page 24: Basic Operation For Source Control Screen
Basic Operation for Source Control Screen Source Control Screen The common controls are explained from each source screen. For the other functions, refer to each control screen. Increasing the volume Touch [ u ] to increase the volume. Decreasing the volume Touch [ d ] to decrease the volume. -
Page 25: Tv Control Function On The Tv Pictures
TV Control Function on the TV pictures Displaying the TV Picture Press the V.SEL button.(see page 8) Selecting the Preset Bands Each time you touch the upper center part, the preset band switches between the TV1 and TV2. Selecting the Channels Auto Seek Mode (AUTO1) •... -
Page 26: Tv Control Function
TV Control Function Selecting the Preset Bands Touch [ TV ] to select the TV preset band. Each time you touch [ TV ], the preset band switches between the TV1 and TV2. Selecting the Video Inputs Each time you touch [ VD ], the video input switches between the video 1 and video 2. -
Page 27: Recalling A Preset Channel
TV List Screen NOTE You cannot operate unless the parking brake is set. Switching the List Each time you touch [ ] or [ switches between the TV1 and TV2 bands. Recalling a Preset channel Touch the preset station number [ 1 ] - [ 6 ] for the desired channel. -
Page 28: Recalling A Preset Station
FM/AM Tuner Control Function Selecting the FM Bands Touch [ FM ] to select the FM band. Each time you touch [ FM ] , the band switches between the FM1, FM2 and FM3. Selecting the AM Band Touch [ AM ] to select the AM band. Selecting the Seek Mode You can choose from three seek modes: auto seek, preset station seek, and manual seek. -
Page 29: Turning Crsc On/Off
FM/AM List Screen Turning CRSC On/Off Temporarily have reception switched from stereo to mono to reduce multi-path noise when listening to the FM station. The factory default for this function is ON. Touch the [ CRSC ] to switch the CRSC function on and off. -
Page 30: Turning Ti Function On/Off
FM/AM Tuner Control Function DISC/BAND V.SEL SOURCE Turning TI function On/Off You can listen to traffic information. If you are listening to discs, they will continue playing until a traffic bulletin is broadcast. Press the [ TI ] button to turn the function on and off. -
Page 31: Select The Type Of Program To Be Received
PTY Search Screen Select the type of program to be received Touch [ ] or [ ] repeatedly to select the type of program lists you want to listen to. News Information Sports Talk Rock Classic Rock Adult Hits Soft Rock Top 40 Country Oldies... -
Page 32: Dvd/Vcd Control Function On The Pictures
DVD/VCD Control Function on the Pictures Displaying the DVD Picture Press the V.SEL button.(see page 8) Chapter Search Search forwards or backwards through the chapters on the disc until you reach the one that you want to look to. Making a Forward Search Touch the right part once to fast forward to the next chapter, twice to fast forward to the chapter after that, and so forth. -
Page 33: Viewing Zoom
DVD Menu Screen Viewing Zoom 1/4 of the image can be zoomed and viewed. Touch [ ZOOM ] to display the zoom control screen. Zoom Control Screen Zooming the image Each time the [ ZOOM ] is touched the image switches between zoom ( ON ) and normal ( OFF ). -
Page 34: Dvd/Vcd/Cd Control Function
DVD/VCD/CD Control Function Forward /Reverse Search Disc Play Forward search Touch [ ¡ ]. Reverse search Touch [ 1 ]. Canceling the search Touch [ 38 ] to resume normal playback. NOTE • Touch once to start and continue forward or reverse search at a low speed. -
Page 35: Cd Control Screen
Pausing and Restarting Disc Play Touch [ 38 ] to make the disc pause. Touch [ 38 ] again to start play again. Track Search Search forwards or backwards through the tracks on the disc until you reach the one that you want to listen to. -
Page 36: Selecting The Name Or Title Display For Discs
DVD/VCD/CD Control Function Selecting the Name or Title Display for Discs Each time you touch [ D ], the display during disc play switches as follows: ▼ Disc name ▼ Disc text ▼ Track text NOTE • You can give names to discs through the presetting disc name function. -
Page 37: External Disc Control Function
External Disc Control Function Pausing and Restarting Disc Play Touch [ 38 ] to make the disc pause. Touch [ 38 ] again to start play again. NOTE When one disc has finished playing its last track, the next disc in the changer starts playing. When the last disc in the changer has finished, the player returns to the first disc and starts playing Track Search... -
Page 38: Disc Search
External Disc control Function Disc Search (Function of disc changers) Search forwards or backwards through the discs in a disc changer until you reach the one that you want to listen to. Making a Forward Disc Search Touch [ D + ] to display the desired disc number. Each time [ D + ] is touched, the displayed disc number increases by one. -
Page 39: Switching To The Name Set Screen
Disc List Screen Switching to the Name Set Screen (Function of CD player/ CD changers) Touch [ ] for at least two seconds to switch to the name set screen.(see P.40) NOTE You cannot operate unless the parking brake is set. -
Page 40: Name Set Function
Name Set Function Name Set Screen Station Name Preset (SNPS) /Disc Name Preset (DNPS) If the cursor is in the desired character input position, go on to step 4. If not touch either [ 2 ] or [ 3 ] to move the cursor to the desired position. -
Page 41: Other Source Control Function
Other Source Control Function Weather Band Tuner Control Screen <Refer to the KTC-WB100 instruction manual for details on weather band tuner functions> Channel number Sensor Box Control Screen <Refer to the KPA-SS100 or KPA-HD100 instruction manual for details on sensor box functions>... -
Page 42: Graphic Screen Function
Graphic Screen Function Graphic Screen When you drag in the direction of A Increase the volume. When you drag in the direction of B Decrease the volume. When you drag in the direction of D • In TV,FM/AM tuner mode Seek up. -
Page 43: Sound Effect Menu Function
Sound Effect Menu Function Sound Effect Menu Screen Switching to the Audio Control Screen Touch [ Audio ] to switch to the Audio Control Screen (Page 44). Switching to the Crossover Network Setting Screen Touch [ X'OVER ] to switch to Crossover Network Setting Screen (Page 46). -
Page 44: Ending The Sound Effect Menu Screen
Audio Control Function Audio Control Screen Adjusting the Bass Level • Each time you touch [ ], the bass level is increased. • Each time you touch [ ], the bass level is decreased. NOTE No display this item when the DS-P900/P901 is connected. -
Page 45: Ending The Audio Control Screen
Touch [ PRO ] to switch to the Sound preset screen. NOTE No display [ PRO ] when the KDS-P900/P901 is connected. Recalling the Kenwood Preset Sound Each time you touch [ ] or [ setting switches between the “Flat“, “Easy“, “Jazz“, “Pops(Top40)“ and “Rock“. -
Page 46: Crossover Network Screen
Audio Control Function Crossover Network Setting Screen Adjusting the High-pass filter for Rear output Adjust the frequency of the High-pass filter Each time you touch [ frequency as follows: THR (through) / 40Hz / 60Hz / 80Hz / 100Hz / 120Hz / 150Hz / 180Hz / 220Hz Adjusting the High-pass filter for Front output... -
Page 47: 5.1 Channels Surround Processor Control Function
5.1 Channels Surround Processor Control Function Digital Effect Setting Screen Selecting the Digital Input Mode Each time you touch [ Input Select ] to switch the digital input mode as follows: " Digital " Optical digital input. " Analog " Analog input. -
Page 48: Position Setting Screen
5.1 Channels Surround Processor Control Function Position Setting Screen Selecting the Position Mode Touch [ ALL ], [ Front R ], [ Front L ], [ Front ] or [ Rear ], the listening position will be switched as follows: "... -
Page 49: Channel Level Setting Screen
Channel Level Setting Screen Setting the Channel Balance This item allows you to adjust the output level of each type of speaker using the built-in test signal.The output level must be adjusted from the listening position.The factory setup is “0 dB”... -
Page 50: Crossover Network Setting Screen
5.1 Channels Surround Processor Control Function Crossover Network Setting Screen Adjusting the High-pass filter for Rear output Adjust the frequency Each time you touch [ ] or [ frequency as follows: THR (through) / 30Hz / 60Hz / 90Hz / 120Hz / 150Hz / 180Hz / 250Hz Adjust the slope Each time you touch [... -
Page 51: Delay Time Setting Screen
Delay Time Setting Screen The ideal listening position for 5.1-channel surround playback is the point at equal distance from all speakers. By setting the delay time for the center and surround speakers, this item realizes the ideal listening position virtually. Adjusting the Front Left Speaker Touch the [ ] or [... -
Page 52: Parametric Equalizer Screen
Woofer with a large diameter " MIDDLE " Woofer with a small diameter Recalling the Kenwood Preset Sound Each time you touch [ 2 ] or [ 3 ] , the preset sound setting switches between the “FLAT“, “POPS“(TOP40), “ROCK“, “DANCE“, “VOCAL“... -
Page 53: Quick Effect Screen
Quick Effect Screen Adjusting the Balance Levels • Each time you touch [ ], the sound in the left channel is emphasized. • Each time you touch [ ], the sound in the right channel is emphasized. Adjusting the Fader Levels •... -
Page 54: Remote Control Function
Remote Control Function TV/DVD/AUD Joystick ENTER RETURN STOP ENTER STOP DIRECT RETURN DIRECT TOP MENU OPEN MODE ANGLE MEMU MENU TV/NAV ANGLE MENU Basic Source Control Function 3Switching the Audio Source Mode position> Each time you press the [ SRC ] button to switch the audio source mode. -
Page 55: Manual Search
DVD/VCD/CD Control Function < DVD position > 3Pausing and Restarting Disc Play • Press the Joystick to make the disc pause. • Press the Joystick to start play again. 3Manual Search Forward search Move the Joystick to front side. Reverse search Move the Joystick to back side. -
Page 56: Installation
Installation Accessories 2CAUTION The use of any accessories except for those provided might result in damage to the unit. Make sure only to use the accessories shipped with the unit, as shown above. -
Page 57: Installation Procedure
Installation Procedure 1. To prevent short circuits, remove the key from the ignition and disconnect the · terminal of the battery. 2. Make the proper input and output cable connections for each unit. 3. Connect the wiring harness wires in the following order: ground, battery, ignition. -
Page 58: Connection
Installation Connection 2WARNING If you connect the ignition wire (red) and the battery wire (yellow) to the car chassis (ground), you may cause a short circuit, that in turn may start a fire. Always connect those wires to the power source running through the fuse box. Ignition key switch Car fuse... - Page 59 Optical cable (Provided with the KDS-P900/P901) (AccessoryD) Receiver unit (rear side) MZ-BUS Connection cable (Provided with the KDS-P900/P901) NOTE Do not remove the protection caps of the unused BUS terminals. Protection cap TEL mute wire (Brown) Connect to the terminal that is grounded when either the telephone rings or during conversation.
- Page 60 Installation Connection for AV Equipments Audio/Visual input 1 • • • TO MONITOR UNIT AV INPUT VIDEO FM /AM ANTENNA AV OUTPUT AV INPUT VIDEO VIDEO Audio/Visual Output • Visual output (Yellow) • Audio left output (White) • Audio right output (Red) Connection for Disc Changer and Disc Player To the monitor unit MZ-BUS Changer...
- Page 61 ■ When two CD/MD changers are interconnected The disc changers are distinguished by source select disc-changer 1 and disc-changer 2. NOTE If the relevant connected device has a PROTOCOL SWITCH or O-N SWITCH, be sure to set the switch to “N”. TO 5L I/F Example 1 TO MZ-BUS...
-
Page 62: Installation
Installation Installation for Monitor Unit 2 CAUTION • When mounting the main unit after checking the operation, close the monitor first. • During installation, do not use any screws except for those provided. The use of different screws might result in damage to the main unit. -
Page 63: Removing The Hard Rubber Frame
Removing Monitor Unit ■ Removing the Hard Rubber Frame Engage the catch pins on the removal tool and remove the two locks on the lower level. Lower the frame and pull it forward as shown in the figure. When the lower level is removed, remove the upper two locations. - Page 64 Installation Installing the Antenna Units • Attach the antenna to the inner glass surface of the rear window using double-sided tape. Carefully check the installation location as the tape can only be stuck on once. • If the surface temperature of the glass of the rear window is low, warm it by turning on the power of the rear defogger. A cold window glass surface will weaken the adhesive strength of the double-sided tape.
-
Page 65: Troubleshooting Guide
Troubleshooting Guide What might appear to be a malfunction in your unit may just be the result of slight misoperation or miswiring. Before calling service, first check the following table for possible problems. PROBLEM The power does not turn on. Nothing happens when the buttons are pressed. - Page 66 Troubleshooting Guide PROBLEM The TEL mute function does not work. The TEL mute function turns on even though the TEL mute wire is not connected. The sound/picture skips on a DVD/VCD/CD. A track will not play. A VCD cannot be played using menus.
- Page 67 60°C (140°F), the disc will start playing again. The disc player is malfunctioning. Mecha Error ] Eject the disc and try inserting it again. Contact the Kenwood dealer if this indicator continues blinking or the disc cannot be ejected. The unplayable discs is inserted Disc Error The disc is upside-down.
-
Page 68: Specifications
Specifications Specifications subject to change without notice. Monitor Section Picture size...6.5 inches wide Display system ...Transparent TN LCD panel Drive system ...TFT active matrix system Number of pixels 336.960 pixels (480 H × 234 V × RGB) Effective pixels ...99.99% Pixel arrangement ...RGB striped arrangement Back lighting...Cold cathode tube DVD Player Section...
Need help?
Do you have a question about the Excelon KVT-911DVD and is the answer not in the manual?
Questions and answers