
Subscribe to Our Youtube Channel
Related Manuals for Orion CMK-01


Summary of Contents for Orion CMK-01
- Page 1 INSTALLATION MANUAL FLAT LCD DISPLAY MOUNT MODEL Ceiling Orion Images Corporation 10820 Walker St. Cypress, California 90630 Tel. 714-816-7000 Fax: 714-816-7014 Website: www.orionimages.com VISIT US AT WWW.ORIONIMAGES.COM...
- Page 2 WARNING! The wall, floor or ceiling should be capable of supporting a weight of at least five (5) times the monitor’s weight. If it cannot, the wall, floor o ceiling must be reinforced. Proper installation procedure by qualified personnel as outlined in the installation instructions must be adhered to Failure to do so could result in serious personal injury.
- Page 3 Step 1 Screw the CMK-01 coupling adapter to the adjustable suspension adapters or 1½" (NTP) Pipe. Secure the coupling with the M6 security screw (supplied). Figure 1. AST-2446 Adjustable Ceiling Adapter Single Stud Installation Step 2 Secure the ceiling plate to the ceiling structure (see WARNING).
- Page 4 Solid Structure Installation Step 1 Secure the ceiling plate to the ceiling structure (see WARNING). Step 2 Use suitable hardware (commercially available) depending on your installation environment to secure the four (4) mounting points found on the ceiling plate to the ceiling structure (Figure 3). Step 3 Refer to ceiling adapter installation instructions.
- Page 5 VESA 100: Secure the VESA 75/100 mounting bracket to the VESA 75 Using the four M4 x 10 Phillip screws. Raise and secure your monitor to the plate that has the VESA 100 now on you CMK-01 adapter and use the four (4) M4 x 10 (mm) Phillips screws (supplied) and a Phillips screwdriver. (Do not use other tools other than a Phillips screwdriver to prevent damage to the monitor or mounting points).
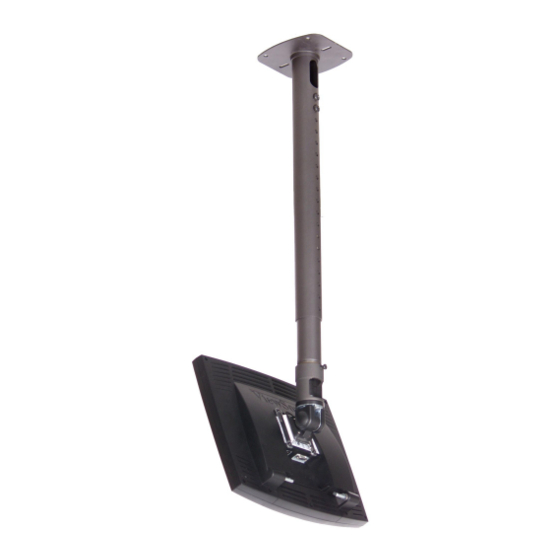
- Page 6 LCD CEILING MOUNT CMK-01 LCD CEILING MOUNT Features: Tilt mount allows of adjustments up and down of ±90° from center 360° swivel and cable access. Comes with a combination plate of VESA 75 and VESA 100 for optional mounting depending on monitor.
Need help?
Do you have a question about the CMK-01 and is the answer not in the manual?
Questions and answers