Table of Contents
Advertisement
Quick Links
Advertisement
Table of Contents

Related Manuals for Orion CMH-01


Summary of Contents for Orion CMH-01
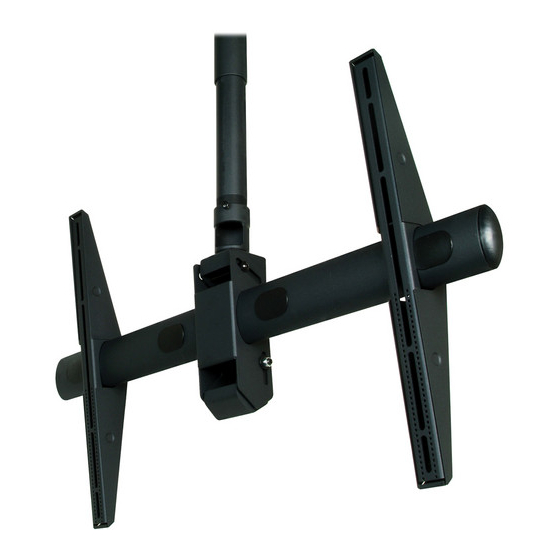
- Page 1 Installation and User’s Guide Installation and User’s Guide FLAT LCD DISPLAY MOUNT MODEL CMH-01 Elliptical Ceiling Mount http://www.orionimages.com All contents of this document may change without prior notice, and actual product appearance may differ from that depicted herein...
-
Page 2: Warning Statements
Installation and User’s Guide http://www.orionimages.com Warning Statements The wall, floor or ceiling should be capable of supporting a weight of at least five (5) times the monitor’s weight. If it cannot, the wall, floor or ceiling must be reinforced. Proper installation procedure by qualified personnel as outlined in the installation instructions must be adhered to Failure to do so could result in serious personal injury. -
Page 3: Table Of Contents
TABLE OF CONTENTS 1. PART LIST .……....................... 2. FEATURE .……........................……............2.1 Attaching CMH-01 to the Ceiling Adapter 2.2 Selecting the Appropriate Mounting Hardware ……........... 2.3 Griplate™ Washer Installation ……................3. FLAT PANEL INSTALLATION .…….................. 4. ATTACHING DECORATIVE COVERS .…….............. -
Page 4: Part List
NOTE: components. Make sure that none of these parts are missing and/or damaged before beginning installation. If there are parts missing and/or damaged, please stop the installation and contact ORION Images. 714-766-6300 CMH-01 Mount Hardware 1-1/2 pipe Adjustable Height Adapter... - Page 5 Installation and User’s Guide http://www.orionimages.com Part List (cont’d) CMH-01 Mount Hardware M4 x 16mm Phillips Head M6 x 20mm Phillips Head Screw (Qty 8) Screw (Qty 6) M4 x 25mm Phillips Head M6 x 30mm Phillips Head Screw (Qty 4)
-
Page 6: Feature
Installation and User’s Guide http://www.orionimages.com Features 1-½ ״Threaded Pipe Phillips Set Screw 1-½ ״Threaded Coupler 15° Tilt Slide Decorative Cover Cable Access Port Mounting Bracket Arm 7300 Bolsa Avenue, Westminster CA 92683 / Tel: 714-766-6300 / Fax: 714-766-6310... -
Page 7: Attaching Cmh-01 To The Ceiling Adapter
The coupler must be threaded onto the 1-½ threaded pipe a minimum of four (4) complete turns. Step2 Once the CMH-01 has been firmly threaded to the 1-½ threaded pipe, use a screwdriver to tighten the Phillips set screw on the threaded coupler. -
Page 8: Selecting The Appropriate Mounting Hardware
Installation and User’s Guide http://www.orionimages.com Features 2.2 Selecting the Appropriate Mounting Hardware Insert the Thread Depth Indicator into the thread inserts found on the back of the flat panel Use a pencil to mark the depth of the thread insert on the Thread Depth Indicator, as shown in Figure 1. -
Page 9: Griplate™ Washer Installation
Installation and User’s Guide http://www.orionimages.com Features 2.3 Griplate™ Washer Installation Griplate™ Washers are designed to accommodate the various M4, M5, M6 and M8 hole sizes required by flat panels. For Griplate™ installation, the dimples must be facing the flat panel for the lower mounting points. For the upper mounting points, the dimples must be facing away from the flat panel. -
Page 10: Flat Panel Installation
Raise the mounting bracket arms and the attached flat panel over the elliptical mounting bar of the CMH-01 The cable access ports face the rear of the flat panel. It may be easier to pre-wire any cables prior to flat panel installation (see Page 10). -
Page 11: Attaching Decorative Covers
Installation and User’s Guide http://www.orionimages.com Attaching Decorative Covers Step1 When attaching the decorative covers, verify the direction of the covers. The smaller mounting hole should be in position above the larger mounting hole. Mounting Place the first decorative cover over the first Bracket mounting bracket arm and push firmly into Arms... -
Page 12: Tilt Positioning
The CMH-01is designed for use with either a standard piece of 1-½˝ pipe or any the following ceiling mount adapters from ORION Images. Please refer to the ceiling mount adapter installation instructions when mounting. Please contact ORION Images at (714) 766-6300 with any questions. -
Page 13: Technical Specification
Installation and User’s Guide http://www.orionimages.com Technical Specification All measurements are in inches. pg13 7300 Bolsa Avenue, Westminster CA 92683 / Tel: 714-766-6300 / Fax: 714-766-6310... -
Page 14: Limited Warranty
2 Year Limited Warranty All Orion Images products carry a limited lifetime warranty from ship date against defects in materials and workmanship. Orion Images is not liable for improper installation that results in damage to mounts, adapters, display equipment or personal injury.
Need help?
Do you have a question about the CMH-01 and is the answer not in the manual?
Questions and answers