Table of Contents
Advertisement
Quick Links
DVR-4LCD
Caution .............................................................................................................................................................1
Package ...........................................................................................................................................................1
Specifications ...................................................................................................................................................2
CHAPTER.1 - Product Overview......................................................................................................................3
1-1 Front panel overview ..........................................................................................................................3
1-2 Back panel overview ..........................................................................................................................3
1-3 IR remote controller overview.............................................................................................................4
CHAPAPTER 2 - Installation ............................................................................................................................5
2-1 Camera and monitor installation.........................................................................................................5
2-2 Sensor and alarm installation .............................................................................................................6
2-3 Network installation ............................................................................................................................7
2-4 HDD installation..................................................................................................................................7
2-5 Mouse installation...............................................................................................................................8
2-6 Power plugging...................................................................................................................................8
CHAPTER 3 - Basic Operation........................................................................................................................9
3-1 Display configuration ..........................................................................................................................9
3-2 Mouse control.....................................................................................................................................9
3-3 Display setup menu............................................................................................................................9
3-4 Recording icons and status ..............................................................................................................10
3-5 Playback........................................................................................................................................... 11
CHAPTER 4 - Set Up Menu ...........................................................................................................................14
4-1 Log-In ...............................................................................................................................................14
4-2 DISPLAY SETUP..............................................................................................................................15
4-3 RECORD..........................................................................................................................................16
4-4 CONFIGURATION ...........................................................................................................................17
4-5 EXTRNAL DEVICE...........................................................................................................................21
4-6 BACK-UP .........................................................................................................................................24
4-7 FIRMWARE UPGRADE ...................................................................................................................25
4-8 FACTORY DEFAULT........................................................................................................................25
4-9 LANGUAGE .....................................................................................................................................25
CHAPTER 5 - PTZ camera control ................................................................................................................26
5-1 PTZ camera Installation ...................................................................................................................26
5-2 PTZ camera operation......................................................................................................................27
CHAPTER 6 - Software Installation ...............................................................................................................28
6-1 Install IRS (Internet Relative Software) ............................................................................................28
6-2 IRS Operation...................................................................................................................................29
Table of contents
- I -
DVR User Guide
Date: 2008/6/9 VER: 1.10
Advertisement
Table of Contents

Related Manuals for Velleman DVR-4LCD


Summary of Contents for Velleman DVR-4LCD
-
Page 1: Table Of Contents
DVR-4LCD DVR User Guide Date: 2008/6/9 VER: 1.10 Table of contents Caution ................................1 Package ................................1 Specifications ..............................2 CHAPTER.1 - Product Overview........................3 1-1 Front panel overview ..........................3 1-2 Back panel overview ..........................3 1-3 IR remote controller overview......................4 CHAPAPTER 2 - Installation ..........................5 2-1 Camera and monitor installation......................5... - Page 2 DVR User Guide 6-3 Remote viewer operation .........................34 6-4 Remote search operation .........................34 6-5 Remote backup process........................35 6-6 Backup player operation........................36 6-7 DDNS setup and operation ......................38 Appendix 1 - System configuration.........................40 Appendix 2 - Network setting .........................40 A2-1 Network installation and setup .......................41 A2-2 Router setup ..........................43 Disclaimer: The product names mentioned in this manual are used as identifications only, while the copyright of...
-
Page 3: Caution
DVR User Guide Caution For you safety, unplug the power before moving the DVR, installing, or replacing any parts or hard drive. Make sure all the power cable and wires are properly set up before using the DVR. Contact your distributor immediately if there is any defect. -
Page 4: Specifications
DVR User Guide Specifications Model 4 CH H.264 Stand Alone DVR 4CH VIDEO IN 1.0 VP-P,75OHM(BNC TYPE) Video input Video I/O Video Output 2CH (Monitor/SPOT) VGA Output Audio input AUDIO I/O Audio Output FULL: 720(H) × 480(V) (NTSC) / 720(H) × 576(V) (PAL) Display Resolution 360(H) ×... -
Page 5: Chapter.1 - Product Overview
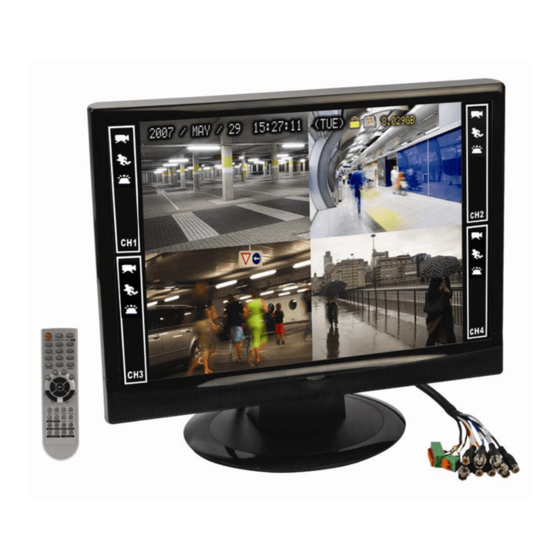
DVR User Guide CHAPTER.1 - Product Overview 1-1 Front panel overview IR Receiver & LED Lamps IR Remote Controller Receiver. DVR Status LED: POWER- Power LED. HDD ACTIVE- Flashing when playback or recording. USB Port HOST – For connecting to backup devices such as USB memory stick or USB HDD. 1-2 Back panel overview Audio Input/Output 1~4 Camera Video Input... -
Page 6: Ir Remote Controller Overview
DVR User Guide 1-3 IR remote controller overview Live view function control MODE - 4 split display. ZOOM- To enlarge the display. The selected area can be moved by the direction buttons. FRZ - Freeze the display. SEQ – Automatically change the display channel in sequence. PIP - Picture in Picture. -
Page 7: Chapapter 2 - Installation
DVR User Guide CHAPAPTER 2 - Installation 2-1 Camera and monitor installation 2-1-1 Camera installation Connect the camera to CH1~CH4 “camera in” at back panel of DVR. Note: Please do not power on the DVR before the camera installation is finished. 2-1-2 Monitor installation Connect the “video in”... -
Page 8: Sensor And Alarm Installation
DVR User Guide 2-1-4 SPOT installation SPOT of Video Out will only display the MOTION or ALARM triggered channel. 2-2 Sensor and alarm installation 2-2-1 Alarm Input & Output D1~D4 for Alarm Input /GND. 4 alarm input for connecting to external sensors. -
Page 9: Network Installation
DVR User Guide 2-2-3 Relay output installation Alarm output can be NO (Normal Open) or NC (normal Close), depending on the settings. NO-COM: the NO and COM is open-circuit, and will become closed-circuit when alarm is triggered. NC-COM: the NC and COM is close-circuit, and will become open-circuit when alarm is triggered. -
Page 10: Mouse Installation
DVR User Guide 2-5 Mouse installation PS/2 port in back panel 2-6 Power plugging Connect the power cord to the power adapter. Then connect the DC power plug to the power jack at back panel of DVR. Caution ! Only the original supplied power adaptor is allowed. -
Page 11: Chapter 3 - Basic Operation
DVR User Guide CHAPTER 3 – Basic Operation 3-1 Display configuration 3-2 Mouse control Left button - Execute all of the functions by left click on icons. - Increase the setup value in the Menu mode. Right button - Decrease the setup value in the Menu mode. - Setup menu On/Off. -
Page 12: Recording Icons And Status
DVR User Guide 3-4 Recording icons and status Recording status: Recording (Red dot) Under “Emergency recording mode”. Video recorded at max speed. Stop record (White dot) Not recording. Emergency recording Click this icon will start “Emergency recording mode”. Stop emergency recording Click this icon will stop “Emergency recording mode”... -
Page 13: Playback
DVR User Guide 3-5 Playback 3-5-1 Playback and Stop Left click “Play” icon to start playback. Click “Stop” icon to stop playback. Starting from the last playback time. - 11 -... - Page 14 DVR User Guide 3-9-2 Search mode Click SEARCH icon to open the search window. There are 3 modes for search: PERCENT, DATE/TIME, EVENT. [PERCENT SEARCH] Search by the percentage of recording. [DATE/TIME SEARCH] Search by the assigned time and date [EVENT SEARCH] Search by event list.
- Page 15 DVR User Guide 3-5-5 EVENT SEARCH [DATE/TIME] Shows the event date and time. [CH] Video channel in No. of happened event. [EVENT] Shows the type of events: Motion detection (MOT), Image lost (LOS), Alarm trigger(ALM). Max. Event list recorded: 1000 events. Select events: left click Change page: mouse wheel rolling.
-
Page 16: Chapter 4 - Set Up Menu
DVR User Guide CHAPTER 4 - Set Up Menu 4-1 Log-In 4-1-1 DVR LOG-IN Click “MENU” icon to enter setup menu. Click 0~9 icon to enter the password. Then click “ENTER” to confirm and enter setup menu. Note: Default user name: “ADMIN”, password: blank (No default password. -
Page 17: Display Setup
DVR User Guide 4-1-2 SYSTEM MENU [DISPLAY SETUP] SCREEN SETUP, OSD SETUP. [RECORD SETUP] RECORD CONFIGURATION, SCHEDULE SETUP. [CONFIGURATION] HDD MANAGEMENT, DATE/TIME SETUP, CAMERA SETUP, INTERVAL SETUP, ALARM SETUP, BUZZER SETUP, PASSWORD SETUP. [EXTERNAL DEVICE] TCP/IP SETUP, SPOT MONITOR SETUP, PAN-TILT SETUP, AUDIO SETUP. -
Page 18: Record
DVR User Guide 4-2-2 SCREEN SETUP [VERTICAL POSITION] Adjust the vertical position of display. [HORIZONTAL POSITION] Adjust the horizontal position of display. [BORDER ENABLE] Enable the display of border. [BORDER COLOR] Adjust the color of border. 4-2-2 OSD SETUP [TOP OSD OFFSET] OSD SETUP Adjust the location of Top OSD. -
Page 19: Configuration
DVR User Guide 4-3-2 SCHEDULE RECORD Program the recording schedule for the whole year. Set up the recording mode in different date / time: : Alarm recording. When there is an alarm triggered. : Motion recording when there is motion detected : Continuous recording. - Page 20 DVR User Guide 4-4-1 HDD MANAGEMENT HDD information display: MODEL: model No. SERIAL: serial No. BLOCKS: number of blocks SIZE: capacity SPEED: data process speed [FORMAT]: format HDD (all record will be erased). 4-4-2 CAMERA SETUP [CHANNEL]: Select the camera to be adjusted. TITLE: camera name, max.
- Page 21 DVR User Guide 4-4-4 ALARM SETUP [CHANNEL] Select the channel to be setup. [INPUT] Set up the Alarm input format. NORMAL CLOSE- when the alarm is triggered, alarm output becomes open circuit. NORMAL OPEN- when the alarm is triggered, alarm output becomes close circuit. [DURATION] For both post-alarm recording duration and the alarm output duration.
- Page 22 DVR User Guide 4-4-6 TIME/DATE SETUP Please set up the system date and time before the DVR starts recording. The date and time can be adjusted by Mouse wheel. DATE FORMAT- Asia/American/European. TIME FORMAT- 12 hours/24 hours. MONTH FORMAT- English/Numeric 1.
-
Page 23: Extrnal Device
DVR User Guide 4-5 EXTRNAL DEVICE [TCP/IP SETUP] TCP/IP configuration. [PANTILT SETUP] Speed Dome camera related setting. [MOUSE SETUP] Mouse sensitivity setup. [AUDIO SETUP] AUDIO input and output volume setup. [SPOT SETUP] SPOT monitor setup. 4-5-1 TCP/IP SETUP IP SETUP: [MAC ADDRESS] Display the DVR MAC address (not editable). - Page 24 DVR User Guide DDNS SETUP [DDNS ENABLE] Turn ON/OFF the DDNS function. [DNS SERVER] Set up DNS Server IP address. DDNS IP: 59.124.143.151 Use Mouse Wheel to change the value. [INTERVAL] Set up the interval for the DVR reports its IP address to the DDNS server automatically.
- Page 25 DVR User Guide 4-5-2 PAN/TILT SETUP COMMAND SETUP [CHANNEL] Select video channel. [MODEL] Select PTZ protocol. [PTZ ID] PTZ ID setup. [BUADRATE] Baud Rate setup for the connected PTZ camera. [CMD DELAY] Set up the delay time to run the command. [COMMAND] Display the COMMAND name (Click to change COMMAND)
-
Page 26: Back-Up
DVR User Guide 4-5-4 AUDIO SETUP [CHANNEL] Select video channel links with audio. The linked video channel will have audio in signal channel display and playback. [INPUT VOLUME] Volume setup for microphone [OUTPUT VOLUME] Volume setup for speaker. 4-5-5 SPOT SETUP [SWITCH INTERVAL] Channel switching time.(Range:01 ~ 99 sec) [ALARM POP UP]... -
Page 27: Firmware Upgrade
DVR User Guide 4-7 FIRMWARE UPGRADE The firmware can be upgraded via USB pen drive. Enter the FIRMWARE UPGRADE menu for firmware upgrade process through USB port. Through USB port: Click [CHECK USB], then click [UPGRADE]. The message “POWER OFF AND POWER ON” will be displayed when firmware process finished. -
Page 28: Chapter 5 - Ptz Camera Control
DVR User Guide CHAPTER 5 - PTZ camera control 5-1 PTZ camera Installation 5-1-1 Connection Setup Note: Connect the D+/D- of speed dome camera to the D+/D- of DVR. 5-1-2 PTZ setup Different baud rate setting may be required for different PTZ camera (speed dome camera). Please refer to speed dome camera user’s manual for proper baud rate setup. -
Page 29: Ptz Camera Operation
DVR User Guide 5-2 PTZ camera operation Left click PTZ icon to enter the PTZ control mode. [PAN/TILT control] Click these arrow keys to control Pain/Tilt of connected PTZ camera. [ZOOM IN/ZOOM OUT control] ZOOM IN: move moue cursor to “+” ZOOM OUT: move moue cursor to “-”... -
Page 30: Chapter 6 - Software Installation
DVR User Guide CHAPTER 6 – Software Installation 6-1 Install IRS (Internet Relative Software) 1. Insert software CD. 2. Click [Install Internet Relative Software] to start the installation. 3. Select a Destination Folder then click on “NEXT” 4. After installation process is finished. The new icon on PC [DESKTOP] will be added. -
Page 31: Irs Operation
DVR User Guide 6-2 IRS Operation ID & IP Display current ID and IP address. SEARCH Search and display the recorded video. VIEWER Remote monitoring over network. IRS SETUP IRS (Integrated Remote Station) setup. DVR SETUP Changes DVR setting over network. BACKUP PLAYER Play the backup video(AM4 file) in your PC. - Page 32 DVR User Guide REGSTERING SITE MANUAL/DDNS Select “Manual” to Enter IP address and port number manually. Select “DDNS” to use IP address and port number that you already registered in DDNS server. MEMBER ID / NAME Enter member ID which you registered in DDNS server.
- Page 33 DVR User Guide 6-2-2 DVR SETUP The functions listed below can be changed over network: Alarm, Buzzer, Interval, Record Configuration, Record Schedule, Audio MANUAL Enter IP address and port number of DVR manually. ADDRESS Enter IP address of DVR manually. PORT NUMBER Enter port number of DVR manually.
- Page 34 DVR User Guide CONFIGURATION /- BUZZER KEY BEEP Turn on/off the beeping while any key pressed. VIDEO LOSE Turn on/off the beeping for video lose. ALARM ACTIVE Turn on/off the beeping when any alarm is triggered. MOTION DETET Turn on/off the beeping when motion is detected.
- Page 35 DVR User Guide RECORD / SCHEDULE SETUP Set up a recording mode: ALARM: ALARM recording MOTION: MOTION recording CONTINONS: CONTINUOUS recording ALM+MOT: ALARM + MOTION recording NONE: No schedule recording ALL: All blocks set to activated or deactivated. 00~24 Hour: On/Off setup for different hour. SUN~SAT: On/Off setup for different weekday.
-
Page 36: Remote Viewer Operation
DVR User Guide 6-3 Remote viewer operation IP / PORT / ID / PW IP: Enter the IP address of DVR PORT: Enter the PORT of DVR ID: Enter ID (default: ADMIN) PW: Enter the password Status Window Shows the current connection status. Screen display Signal channel / Quad display selection. -
Page 37: Remote Backup Process
DVR User Guide 6-5 Remote backup process Backup Information IP Address: Enter the IP address of DVR Network Port: Enter the port of DVR User ID: Enter ID (default: “Admin”) User Password: Enter password Save File Path: Setup a path to save the backup file (This function is active only when the connection is established) Start Backup Time: The starting time of file... -
Page 38: Backup Player Operation
DVR User Guide 1. Select [Connect Test] to test the status to DVR connection 2. Select [Unlock] to get the record start/End time of DVR 3. Select [Set Backup Time] to setup the backup function 4. Click [Apply] to apply all setup 5. - Page 39 DVR User Guide 6-6-1 Save AVI file 1. Click to open the backup file and select single channel 2. Click to save as AVI format CHANNEL: Select a single channel. FRAME RATE: Set the frame rate. SIZE: Setup the file size limitation. START: Start AVI SAVE.
-
Page 40: Ddns Setup And Operation
DVR User Guide 6-7 DDNS setup and operation This DDNS service is free. We constantly the server and its data maintain base. Please note that the server may be turned off without notice for maintainence. Connect to DDNS SERVER(http://www.j2kdvr.com or http://59.124.143.151) by IE browser Select [REGISTER] to register a new account Add a new account by entering following information. - Page 41 DVR User Guide Select “Add DVR” to add DVR information Add DVR information: DVR NAME: Enter the DVR name MAC ADDRESS: Enter the DVR’s MAC address. DVR’s MAC address can be found in DVR’s [SYSTEM MENU] -> [EXTERNAL DEVICE] -> [TCP/IP SETUP] -> [IP SETUP] IP: Enter the current IP address for DVR PORT: Enter the port number for DVR Note:...
-
Page 42: Appendix 1 - System Configuration
DVR User Guide Appendix 1 - System configuration Configuration of DDNS connection 1. DVR connect to DDNS server automatically and update the IP address. 2. The client accesses to DDNS server and requests IP address from DDNS server. 3. DDNS server replies the IP address and port number for DVR. 4. -
Page 43: A2-1 Network Installation And Setup
DVR User Guide A2-1 Network installation and setup A2-1-1 Connecting to internet through a Cable modem [SYSTEM MENU] -> [EXTERNAL DEVICE] -> [TP/IP SETUP] -> [IP SETUP] -> [DHCP MODE] Place the cursor at DHCP MODE and press ENTER to switch the DHCP MODE to [AUTOMATIC]. Then, move the cursor over [DETECT IP] and press ENTER to detect IP. - Page 44 DVR User Guide With Static IP via Router In some very rare cases, we found the DVR did not support certain Static IP Addresses. If it happens, add a Router to the network system. The setup is the same as the next session. With Dynamic IP For Dynamic IP address, the IP address will be changed from time to time.
-
Page 45: A2-2 Router Setup
DVR User Guide A2-2 Router setup There is a wide selection of routers in the market. They may be very different in terms of configuration and operation. Here is an example of how to set up a router. For details, please read your router’s manual. First, connect a computer to the router for configuration. - Page 46 DVR User Guide PPPoE setup Select PPPoE in WAN connection Type Enter User Name and Password provided by your ISP The router will get the IP address upon connection. In this example, we get the IP address of 211.20.82.39. A2-2-2 Virtual server setup Enter Virtual Server setup.
Need help?
Do you have a question about the DVR-4LCD and is the answer not in the manual?
Questions and answers