Advertisement
Table of Contents
- 1 Important Safeguards
- 2 Parts Diagram
- 3 Before First Use
- 4 Operating Instructions
- 5 Filling the Water Reservoir
- 6 Preparing Espresso
- 7 Preparing Cappuccino
- 8 Preparing Latte
- 9 Cleaning and Maintenance
- 10 Storing the Appliance
- 11 Servicing the Appliance
- 12 Changing the Plug
- 13 Troubleshooting
- 14 Recipes to Get You Started
- Download this manual
Advertisement
Table of Contents

Subscribe to Our Youtube Channel
Related Manuals for Russell Hobbs CAFE BARISTA RHCM45


Summary of Contents for Russell Hobbs CAFE BARISTA RHCM45
- Page 1 INSTRUCTIONS AND WARRANTY MODEL NO. RHCM45 CAFÉ BARISTA ONE TOUCH AUTOMATIC COFFEE MAKER...
- Page 2 Congratulations on purchasing our Russell Hobbs Café Barista One Touch Coffee Maker. Each unit is manufactured to ensure safety and reliability. Before using this appliance for the first time, please read the instruction manual carefully and keep it for future reference. FEATURES OF THE RUSSELL HOBBS CAFÉ...
-
Page 3: Important Safeguards
1050W IMPORTANT SAFEGUARDS When using any electrical appliance, basic safety precautions should always be followed including the following: 1. Please read the instructions carefully before using any appliance. 2. Always ensure that the voltage on the rating label corresponds to the mains voltage in your home. - Page 4 15. A short cord is provided to reduce the hazards resulting from becoming entangled in or tripping over a longer cord. 16. Do not let the cord hang over the edge of a table or counter. Ensure that the cord is not in a position where it can be pulled on inadvertently.
- Page 5 30. Use caution when removing the porta-filter. The metal parts may still be very hot. There may also be hot water floating on the top of the filter. Hold it only by its handle and dispose of the brewed coffee ground by using the filter retention clip. 31.
-
Page 6: Parts Diagram
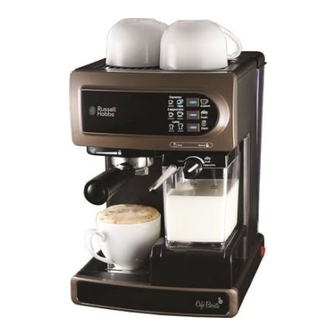
ensure to switch the unit OFF by pressing the red button on the side of the unit to the OFF position “0”. PARTS DIAGRAM Water tank lid Water reservoir lid Removable water tank Removable water reservoir (located on the back of the unit) Espresso/Custom button with indicator Cappuccino/Froth button with indicator... - Page 7 INTRODUCTION ESPRESSO A unique method of coffee brewing in which hot water is forced through finely ground coffee. Popular in Europe, it is a far richer and more full-bodied brew than regular drip coffee because of its richness. Espresso is usually served in 44 to 59ml (1.5 to 2 oz.) portions, in demitasse cups. CAPPUCCINO A drink made with about 1/3 espresso, 1/3 steamed milk and 1/3 frothed milk.
-
Page 8: Before First Use
BEFORE FIRST USE Before using your appliance for the first time, take the coffee maker out of the box and take off any protective wrappings. REMEMBER: DO NOT LEAVE PROTECTIVE PACKAGING LYING AROUND, AS IT COULD BE DANGEROUS AROUND INFANTS. Place the appliance on a dry, level surface. - Page 9 1. To prime the coffee maker, run the steam cycle for 90 seconds by following the steps below: 2. Fill water reservoir between the “Min” and “Max” levels. Fill the milk frothing container with water between the “Min” and “Max” levels. Select one of the crema filters and place it onto the porta-filter.
-
Page 10: Filling The Water Reservoir
find a regional coffee that you love. Pre-ground coffee will only retain its flavour for 7 – 8 days, provided it is stored in an airtight container and in a cool, dark area. Do not store in a refrigerator or freezer. Whole beans are recommended to be ground just before use. Coffee beans stored in an airtight container will keep its flavour for up to 4 weeks. - Page 11 “Min” and“Max” levels. When done, attach the milk frothing container onto the coffee maker ensuring that it fits tightly and correctly. Note: You can use the type of milk that you preference, i.e. whole milk, low fat milk, organic or soy milk.
- Page 12 ATTACHING THE PORTA-FILTER TO THE BREW HEAD a. Position the porta-filter underneath the brew head. Now attach the porta-filter by first moving the retainer clip back into its original position. b. Position the filter handle so that the handle lines up with the open lock icon “ ”...
-
Page 13: Preparing Espresso
CAUTION: when brewing cappuccino or latte, you will need to adjust the frothing tube lever in order to position the froth milk dispensing tube inside the selected cup. TURNING/ SWITCHING THE UNIT “ON” Make sure that the coffee maker is plugged into the appropriate power outlet. ... -
Page 14: Preparing Cappuccino
TIP: To brew less coffee than the preset serving, press the function button to stop the brewing process when the amount of coffee desired is reached. PREPARING CAPPUCCINO Prior to preparing your cappuccino, adjust the quantity of frothed milk according to your preference by turning the Froth Control knob to the right for more foam and to the left for less foam. -
Page 15: Cleaning And Maintenance
PREPARING FROTHED MILK The Café Barista One Touch Automatic Coffee Maker also allows you to prepare frothed milk separately. Press and hold the Cappuccino button for 3 seconds if you wish to add more foam to your beverage or to prepare frothed milk for any other beverage e.g. macchiato, hot chocolate, chai latte, etc. - Page 16 CLEANING THE MILK FROTHING CONTAINER AND FROTHING TUBE Even though you can store the milk frothing container with left over milk in the refrigerator, it is important to clean the container and the frothing tube regularly to avoid clogging and build-up of residues.
- Page 17 7. Press the Espresso button once and let the unit brew with water only until it stops automatically. CLEANING THE WATER RESERVOIR Discard the remaining water by removing the water reservoir and turning it upside down over the sink. It is recommended to empty the water reservoir between uses. Wash the water reservoir with soapy water, rinse it well and wipe it dry.
-
Page 18: Storing The Appliance
TO DESCALE THE WATER RESERVOIR: 1. Fill the water reservoir with fresh, undiluted white household vinegar. 2. Allow the coffee maker to sit overnight with the vinegar solution in the water reservoir. 3. Discard the vinegar by removing the reservoir and turning it upside down over the sink. 4. -
Page 19: Servicing The Appliance
Clean all the parts as instructed above. Ensure that all parts are dry before storing. Store the appliance in a clean, dry place. Never store the appliance while it is still wet or dirty. Never wrap the power cord around the appliance. SERVICING THE APPLIANCE There are no user serviceable parts in this appliance. - Page 20 Green/Yellow = Earth Blue = Neutral Brown = Live...
-
Page 21: Troubleshooting
TROUBLE SHOOTING PROBLEM POSSIBLE CAUSES SOLUTIONS Coffee does not dispense 1. No water in water 1. Add water. from the porta-filter. reservoir. 2. The coffee grind is too 2. Replace the ground fine. coffee with medium ground coffee. 3. There is too much 3. - Page 22 3. There may be too much 3. Fill the filter with less coffee in the filter. coffee grounds. Milk is not foamy after 1. The coffee maker ran out 1. Ensure there is enough frothing or it is not coming of steam.
-
Page 23: Recipes To Get You Started
RECIPES TO GET YOU STARTED Iced Latte Double shot of espresso 90ml fruit flavoured syrup Cold Milk Begin by filling up a 355ml (12-ounce) glass with ice. Then add the espresso, syrup and cold milk. # This is a great alternative to hot drinks for summer time. Café... - Page 24 A café latte has no frothed milk, just velvety smooth steamed milk. Flavourings can be added to vary the taste. # In the summer, you may want to add raspberry syrup, while caramel or hazelnut flavouring may be a nice addition for a cup of latte on a wintery day. Café...
- Page 25 IN THE EVENT OF A CLAIM UNDER WARRANTY THIS RECEIPT MUST BE PRODUCED. W A R R A N T Y Home of Living Brands (Pty) Limited warrants to the original purchaser of this product (“the customer”) that this product will be free of defects in quality and workmanship which under normal personal, family or household use and purpose may manifest within a period of 1 (one) year from the date of purchase (“warranty period”).
Need help?
Do you have a question about the CAFE BARISTA RHCM45 and is the answer not in the manual?
Questions and answers