Table of Contents
Advertisement
Quick Links
Advertisement
Table of Contents

Related Manuals for Night Owl CS-MINI-DVR-4GB


Summary of Contents for Night Owl CS-MINI-DVR-4GB
-
Page 3: Table Of Contents
Chapter 9 : Download Your Videos / Pictures ....... 12 Chapter 10 : Reset Your Mini DVR .......... 14 Chapter 11 : Warranty .............. 15 Interactive How-To videos are available for the chapters indicated with this icon. You can also visit Night Owl’s website at http://www.nightowlsp.com/Videos... -
Page 4: Chapter 1: Fcc Radiation Norm
Chapter 1: FCC Radiation Norm This equipment has been tested and found to comply with limits for Class B digital device pursuant to Part 15 of Federal Communications Commission (FCC) rules. FCC Compliance Statement These limits are designed to provide reasonable protection against frequency interference in residential installation. -
Page 5: Chapter 2: Package Contents
Chapter 2: Package Contents Your new Mini Video DVR will contain the following items. Mini Video DVR USB Cable 4GB Micro SD Card User Manual Neck Lanyard Clip on Case Mounting Bracket Protective Clear Case... -
Page 6: Chapter 3: System Requirements
Chapter 3: System Requirements Please be sure the computer that you will use the Mini DVR with complies with the following specifications: IBM PCs or 100% Compatible ® Windows 2000, XP, Vista, 7 ® OS 10.3 and above Available USB Port... -
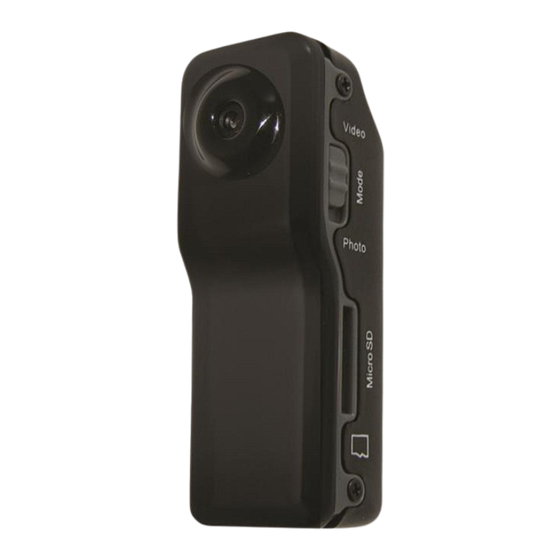
Page 7: Chapter 4: Hardware Description
Chapter 4: Hardware Description... -
Page 8: Chapter 5: Charging Your Mini Dvr
Chapter 5: Charging Your Mini DVR Prior to use, please charge your new Mini DVR using the included USB cable for 8 hours for optimal performance. To charge your Mini DVR, locate the USB cable that was provided in the packaging. Plug the smaller end of the cable into the USB connection slot on the mini DVR. -
Page 9: Chapter 6: Changing The Time And Date
Chapter 6: Changing the Time and Date To change the time on your mini DVR, connect it to your computer. A window will pop-up once you have inserted the USB into the computer. Click “Open folder to view files”. Create a text file named “Time.txt” to edit the time and date. - Page 10 Go to “File”, “Save” the document and safely remove the mini DVR from your computer. Turn on the mini DVR once to initiate the reset. When your mini DVR’s battery is too low, the time may reset to factory default. You will need to reset the time again if you want your recorded files to have the correct recording time.
-
Page 11: Chapter 7: Recording A Video
Chapter 7: Recording a Video Prior to recording any videos, make sure that the memory card is properly inserted into the mini DVR. To turn on the mini DVR, switch the mode to “Video” and turn it on. Your mini DVR will be in standby mode. Press and hold the Start/Stop button for 2 seconds, the red LED indicator will blink then turn solid green indicating the mini DVR is on and ready for use. -
Page 12: Chapter 8: Taking A Picture
Chapter 8: Taking a Picture Prior to taking any pictures, make sure that the memory card is properly inserted into the mini DVR. To turn on the mini DVR, switch the mode to “Photo” and turn it on. Your mini DVR will be in standby mode. Press and hold the Start/Stop button for 2 seconds, the LED indicator will flash red then turn solid green indicating the mini DVR is on and ready for use. -
Page 13: Chapter 9: Download Your Videos / Pictures
Chapter 9: Download Your Videos / Pictures For All Operating Systems Turn on your computer. Make sure your mini DVR is turned off. Locate the USB cable that was provided in the packaging. Plug the smaller end of the cable into the USB connection slot on the mini DVR. - Page 14 If you did not receive a pop-up window, your mini DVR can be found as “Removable Disk” under “My computer”. Double click the icon to open the folder. All of the recorded files/pictures can be found within the drive that indicates your mini DVR. Recorded files will be listed in the “Video”...
-
Page 15: Chapter 10: Reset Your Mini Dvr
Chapter 10: Reset Your Mini DVR If your mini DVR has stopped working you will need to reset your device. 1. Locate the On / Off switch on the side of the mini DVR. 2. Turn the mini DVR off then back on. 3. -
Page 16: Chapter 11: Warranty
Product at Purchaser’s cost (no CODs) to the address below, with the original proof of purchase receipt. In its sole discretion, Night Owl will either repair or replace the Product at no additional cost to the Purchaser. Any replacement Product (or parts) will be covered by the same warranty as the original Product through the expiration date of the original warranty period. - Page 17 Product. In no event shall Night Owl be liable for any special or consequential damages arising from the use of the Product or arising from the malfunctioning or non-functioning of the Product, or for any delay in the performance of this warranty due to any cause beyond its control.
- Page 18 Night Owl, and do not affect this provision of this warranty. Returns under this Warranty In order to obtain service, please make sure that you have registered your product on-line no later than thirty (30) days after purchase at www.NightOwlSP.com...
Need help?
Do you have a question about the CS-MINI-DVR-4GB and is the answer not in the manual?
Questions and answers