Table of Contents
Advertisement
Advertisement
Table of Contents

Related Manuals for Night Owl 8 channel digital video recorder


Summary of Contents for Night Owl 8 channel digital video recorder
-
Page 3: Table Of Contents
Table of Contents Chapter 1 FCC Radiation Norm .............. 5 Chapter 2 Package Contents ..............6 Chapter 3 System Requirements ............7 Chapter 4 Safety Instructions ..............8 Chapter 5 Troubleshooting ..............10 Chapter 6 Layout of DVR Components ..........12 6.1 Back Panel of DVR .............. - Page 4 Table of Contents 12.3 Language Menu ..............30 12.4 HDD Management Menu ............31 12.5 Video Audio Setup Menu ............32 12.6 Maintain Menu ............... 33 12.6.1 Load Defaults Submenu ..........34 12.6.2 Log Submenu ............35 12.7 Firmware Update ..............36 12.8 System Information Menu .............
- Page 5 Chapter 23 Mobile Application ............108 Chapter 24 Specifications of DVR ............120 Chapter 25 Information Log ..............121 Chapter 26 Warranty ................122 Interactive How-To videos are available for the chapters indicated with this icon. You can also visit Night Owl’s website at http://www.nightowlsp.com/Videos...
-
Page 6: Chapter 1 Fcc Radiation Norm
Chapter 1 FCC Radiation Norm This equipment has been tested and found to comply with limits for Class B digital device pursuant to Part 15 of Federal Communications Commission (FCC) rules. FCC Compliance Statement These limits are designed to provide reasonable protection against frequency interference in residential installation. -
Page 7: Chapter 2 Package Contents
Chapter 2 Package Contents Your new DVR Security Kit will contain the following items. 8 Channel DVR Power Adapter 12V 2A Remote Control USB Mouse BNC to RCA Cable Ethernet (RJ45) Cable Quick Setup Guide ... -
Page 8: Chapter 3 System Requirements
Chapter 3 System Requirements Please be sure the computer that you will use the LTE DVR Security Kit with complies with the following specifications: IBM PCs or 100% Compatible ® Windows XP, Vista, 7, and 8 ® OS 10.6 and above ... -
Page 9: Chapter 4 Safety Instructions
Chapter 4 Safety Instructions Use provided power adapter. Do not use this product with a power source that applies more than specified voltage (100-240V AC). Never insert metal into the DVR case or its openings. Inserting metal into the DVR case may cause electric shock. ... - Page 10 Chapter 4 Safety Instructions Do not attempt to remove the top cover. If any abnormal operation is observed, unplug the DVR immediately and contact technical support. Do not attempt to open the DVR to diagnose the cause of the malfunction yourself. (Warning: You may be subjected to severe electrical shock if you remove the cover of the DVR.) ...
-
Page 11: Chapter 5 Troubleshooting
Chapter 5 Troubleshooting When a malfunction occurs, it may not be serious and can be corrected easily. The following information describes the most common problems with their solutions. Please refer to the following before calling Night Owl Technical Support. - Page 12 Chapter 5 Troubleshooting...
-
Page 13: Chapter 6 Layout Of Dvr Components
Chapter 6 Layout of DVR Components 6.1 Back Panel of DVR... -
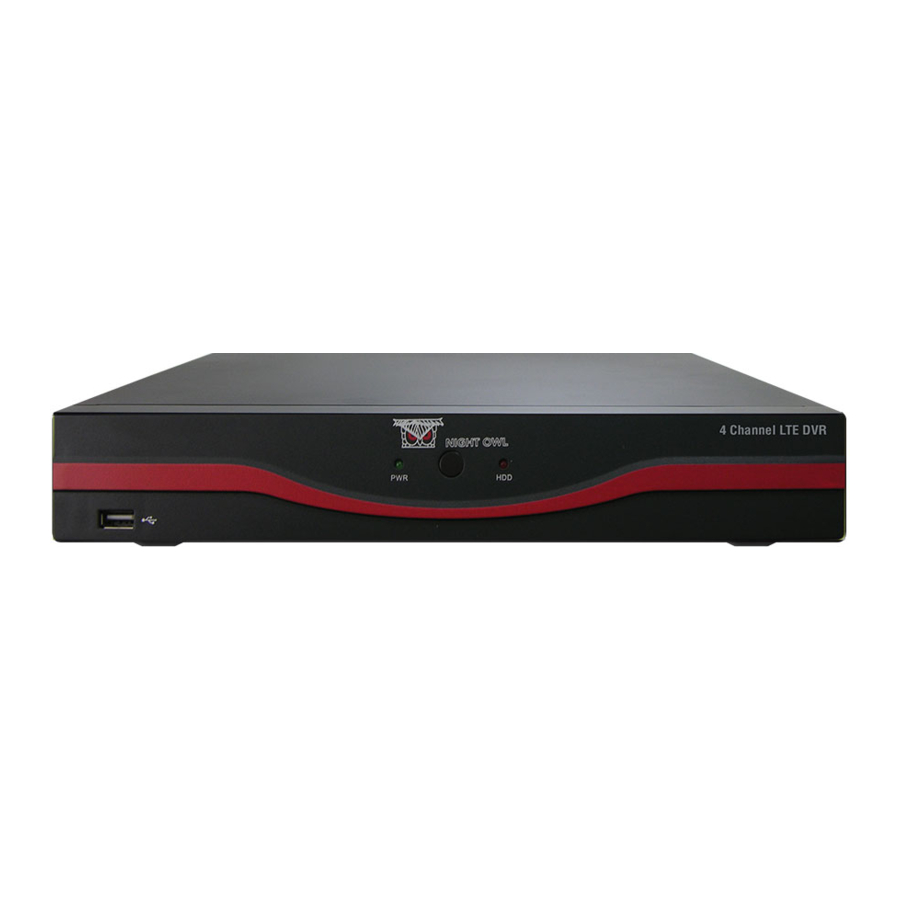
Page 14: Front Panel Of Dvr
Chapter 6 Layout of DVR Components 6.2 Front Panel of DVR... -
Page 15: Mouse
Chapter 6 Layout of DVR Components 6.3 Mouse You can use a mouse instead of the remote control to navigate through your DVR’s menus. Connect the included mouse to the USB port on the back panel of the DVR. Use the mouse buttons to perform the following: 1. -
Page 16: Remote
Chapter 6 Layout of DVR Components 6.4 Remote Control Use the remote control to navigate through the DVR’s menus. Item Functions Select channels / Input numbers in currently selected field Display all channels Menu Enter / Exit Menu ▲ ▼ Down Select Rewind... -
Page 17: Chapter 7 Dvr Installation
Chapter 7 DVR Installation 7.1 Connecting the Power Supply 1. Plug the included power supply into the DVR. 2. Plug the other end of the power adapter cable into an available 110/220V wall outlet (or, if you are using an uninterruptable power supply, plug the adapter cable into one of its output sockets). -
Page 18: Connecting The Dvr To A Tv Or Monitor
Chapter 7 DVR Installation 7.2 Connecting the DVR to a TV or Monitor Using the supplied BNC to RCA connector 1. Connect the BNC to RCA connector to the back of the DVR’s Video Output port. 2. Connect the other end of the cable to an available RCA video input on your TV or monitor. -
Page 19: Chapter 8 Camera Installation
Chapter 8 Camera Installation 8.1 Connecting Cameras to the DVR 1. Your DVR system comes with one 60 foot coaxial cable per camera. Connect each cable to a camera using the BNC connectors (yellow connector) and the DC connectors (red connector). 2. -
Page 20: Mounting The Cameras
Chapter 8 Camera Installation 8.2 Mounting the Cameras 1. Choose a Position: Decide where you would like to mount the camera. 2. Screw Positions: Mark three holes on the surface where you plan to mount the camera, using the holes in the camera base as a guide. 3. -
Page 21: Chapter 9 Dvr Start Up
9.1 System Initialization After connecting the power adapter, the system will automatically start up and display the Night Owl logo while initializing the system for use. After initialization, the view of your screen will change to a live camera view, showing all the cameras that are currently connected to the DVR. -
Page 22: On-Screen Display
Chapter 9 DVR Start Up 9.2 On-Screen Display The on-screen display will also show the following information. Date & Time: Displays the date and time on the system. Channel Title/Number: Displays the channel name, configurable in the Camera Menu. ... -
Page 23: Chapter 10 Quick Function Menu
Chapter 10 Quick Function Menu Use the Quick Function menu to access several system options, including the Main Menu. To open the quick function menu, right-click anywhere on the screen with the mouse or press the Menu button on the remote control. ... -
Page 24: Chapter 11 Main Menu
Chapter 11 Main Menu Use the Main Menu to access the System Menu, Record Functions Menu, Playback Menu, Camera Menu, and Network Menu. These menus will allow you to change the configurations of the DVR. To access the Main Menu using a mouse: 1. -
Page 25: Chapter 12 System Menu
Chapter 12 System Menu System Menu Use this menu to access the Date/Time, Password, Language and Advanced menus. Use the Advanced menu to access the Hard Drive, A/V Setup, Maintain and Info Menus. Be sure to “Apply” all changes made to the menus. If you do not apply the changes, they will not be saved. -
Page 26: Time Setting Menu
Chapter 12 System Menu 12.1 Time Setting Menu It is highly recommended to set up the Date and Time when first setting up your system. You can also configure Daylight Saving Time (DST) settings. To access the Time Setting menu select System from the Main Menu, and then select Date/Time from the System menu. -
Page 27: Dst Setting Submenu
Chapter 12 System Menu 12.1.1 DST Setting Submenu The DST Setting Submenu is used to configure Daylight Saving Time settings. To access the DST Setting Submenu select System from the Main Menu, and then select Date/Time from the System menu. Select the DST Setting button in the Date and Time Menu. -
Page 28: Password Menu
Chapter 12 System Menu 12.2 Password Menu Use this menu to change the user name, passwords, and permissions of the admin and the users from the User Setup menu. To access the User Setup menu select System from the Main Menu, and then select Password from the System menu. -
Page 29: User Password Setup Submenu
Chapter 12 System Menu 12.2.1 User Password Setup Submenu Use this submenu to change the user names and passwords and to enable user names and passwords. To access the User Password Setup Submenu select System from the Main Menu, and then select Password from the System menu. Place a check mark into the box for the user you would like to edit and then select the Edit button. -
Page 30: User Authority Submenu
Chapter 12 System Menu 12.2.2 User Authority Submenu Use this submenu to grant the users access to specific menus of the DVR. To access the User Authority Submenu select System from the Main Menu, and then select Password from the System menu. Place a check mark into the box for the user you would like to grant access to and then select the Authority button. -
Page 31: Language Menu
Chapter 12 System Menu 12.3 Language Menu Use this menu to change the displayed language the DVR’s menus. To access the Language Menu select System from the Main Menu, and then select Language from the System menu. From the drop down menu, click on the language you prefer. You can choose between English, Spanish and French. -
Page 32: Hdd Management Menu
Chapter 12 System Menu 12.4 HDD Management Menu The HDD Management Menu shows the capacity and available recording time of the installed hard drive (HD) and to configure the hard drive settings. To access the HDD menu select System from the Main Menu, and then select Advanced from the System menu, then select Hard Drive. -
Page 33: Video Audio Setup Menu
Chapter 12 System Menu 12.5 Video Audio Setup Menu Use the Video Audio Setup Menu to set the video system, monitor resolution, output device, rotation time and volume on the DVR. To access the Video Audio Setup Menu select System from the Main Menu, and then select Advanced from the System menu, then select A/V Setup from the Advanced menu. -
Page 34: Maintain Menu
Chapter 12 System Menu 12.6 Maintain Menu Use the Maintain Menu to update the system’s firmware, restore factory default settings, and set an automatic system reboot schedule. To access the Maintain Menu select System from the Main Menu, and then select Advanced from the System menu, then select Maintain from the Advanced menu. -
Page 35: Load Defaults Submenu
Chapter 12 System Menu 12.6.1 Load Defaults Submenu Use this submenu to choose which menus that you would like to load factory defaults. To access this submenu select System from the Main Menu, and then select Advanced from the System menu. Select Maintain from the Advanced menu, then select Load Defaults. -
Page 36: Log Submenu
Chapter 12 System Menu 12.6.2 Log Submenu Use this submenu to list all actions of the DVR. To access this submenu select System from the Main Menu, and then select Advanced from the System menu. Select Maintain from the Advanced menu, then select Log. ... -
Page 37: Firmware Update
Chapter 12 System Menu 12.7 Firmware Update Your system will periodically need a firmware update to ensure optimal performance. Visit www.NightOwlSP.com to check if updates are available for your system. To update firmware: Download and Save the latest firmware update for your system from www.NightOwlSP.com to your desktop. -
Page 38: System Information Menu
Chapter 12 System Menu 12.8 System Information Menu This menu lists various pieces of information about the DVR system. It is recommended to leave the Device Name and Device ID fields at their default values. To access the System Information Menu select System from the Main Menu, and then select Advanced from the System menu, then select Info from the Advanced menu. -
Page 39: Chapter 13 Record Functions Menu
Chapter 13 Record Functions Menu Record Functions Menu Use this menu to access the Record Menu, Time Sechedule Submenu, Motion Menu, Motion Detection Mask Submenu, and the Alarm Menu. Be sure to “Apply” all changes made to the menus. If you do not apply the changes, they will not be saved. -
Page 40: Record Menu
Chapter 13 Record Functions Menu 13.1 Record Menu The Record Menu allows you to create personalized settings to each individual video channel. To access the Record Menu select Record Functions from the Main Menu, and then Record from the Record Functions Menu. ... -
Page 41: Resolution
Chapter 13 Record Functions Menu 13.1.1 Resolution Choose between D1 (704x480) (High), HD1 (704x240) (Medium), or CIF (352x240) (Low) resolutions to record videos. To help maximize the hard drive space, use the lowest resolution. D1 Resolution (704x480 pixels): Highest Resolution at 704x480 pixels. ... -
Page 42: Framerate Setup Submenu
Chapter 13 Record Functions Menu 13.1.2 Framerate Setup Submenu Use this submenu to allocate the FPS per channel. To access this submenu select Record Functions from the Main Menu, and then Record from the Record Functions Menu. Select Manual under the Frame Rate drop-down menu and then select Framerate Setup. -
Page 43: Record Schedule Submenu
Chapter 13 Record Functions Menu 13.1.3 Record Schedule Submenu Use this submenu to configure the recording schedule of the DVR. To access the Record Schedule Submenu, select Record Functions from the Main Menu. Select Record from the Record Functions Menu, and select the Schedule Setup button when Record Mode is set to Time Schedule. -
Page 44: Motion Detect Menu
Chapter 13 Record Functions Menu 13.2 Motion Detect Menu The Motion Detect Menu allows you to configure the motion detection settings of the DVR. To access the Motion Detect Menu select Record Functions from the Main Menu, and then Motion from the Record Functions menu. ... -
Page 45: Detection Area
Chapter 13 Record Functions Menu 13.2.1 Detection Area Submenu The Detection Area Submenu allows you to set the area where you want motion to be detected. To access the Detection Area Submenu select Record Functions from the Main Menu, and then Motion from the Record Functions menu. Select the “Setup”... -
Page 46: Alarm Setup Menu
Chapter 13 Record Functions Menu 13.3 Alarm Setup Menu Use this menu to configure the alarm, pre-recording and post recording settings. To access the Alarm Setup menu select Record Functions from the Main Menu, and then Alarm from the Record Functions menu. ... -
Page 47: Chapter 14 Playback Menu
Chapter 14 Playback Menu Use the Playback Menu to search and playback previously recorded files. To access the Record Search menu select Playback from the Main Menu. You can also access this menu by selecting Video Search from the Quick Function Menu. -
Page 48: Playback Screen
Chapter 14 Playback Menu 14.1 Playback Screen This is the screen you will see during the playback of any recorded videos. To access this screen you will need to search for videos in the Playback Menu and select a time that has recording. The buttons from left to right are as follows: ... -
Page 49: Detail Files Submenu (Backup Files)
Chapter 14 Playback Menu 14.2 Detail Files Submenu (Backup Files) Use the Detail Files Submenu to backup previously recorded files onto a USB drive. To access the Detail Files Submenu select Playback from the Main Menu and then File List located at the bottom of the Playback Menu. You can also access this menu by selecting Video Search from the Quick Function Menu and then File List located at the bottom of the Playback Menu. -
Page 50: Chapter 15 Converting Files To Avi
Chapter 15 Converting Files to AVI Converting the .246 files to AVI format allows you to playback the recorded files in most multimedia players. AVI conversion involves selecting a file, and then converting the file. Download and install the AVI Generator software from the included CD or from www.NightOwlSP.com. -
Page 51: Chapter 16 Camera Menu
Chapter 16 Camera Menu Use this menu to access the Camera Settings Menu, Color Setup Submenu, Privacy Zone Submenu, and PTZ Menu. Be sure to “Apply” all changes made to the menus. If you do not apply the changes, they will not be saved. You can also select the “Default”... -
Page 52: Camera Settings Menu
Chapter 16 Camera Menu 16.1 Camera Settings Menu Use the Camera Menu to customize channel titles, show/hide the date and time in live viewing and playback, and enable/disable channel images. To access the Camera Setting Menu select Camera from the Main Menu, and then select Camera Settings from the Camera menu. -
Page 53: Privacy Zone Submenu
Chapter 16 Camera Menu 16.1.1 Privacy Zone Submenu Use the Privacy Zone Submenu to mask certain areas of the scree. To access the Camera Setting Menu select Camera from the Main Menu, and then select Camera Settings from the Camera menu. Select the Privacy Zone button in the lower left corner. -
Page 54: Color Setup Submenu
Chapter 16 Camera Menu 16.1.2 Color Setup Submenu Use this menu to change the hue, brightness, contrast, and saturation color settings of each camera. To access the Camera Setting Menu select Camera from the Main Menu, select Camera Settings from the Camera menu, then select the color setup button. -
Page 55: Ptz Menu
Chapter 16 Camera Menu 16.2 PTZ Menu Use the PTZ setup menu to configure settings for a connected PTZ camera (not included). To access the PTZ Setup menu select Camera from the Main Menu, and then select PTZ from the Camera menu. Please refer to the documentation of your PTZ camera for proper settings. -
Page 56: Ptz Quick Functions
Chapter 16 Camera Menu 16.3 PTZ Quick Functions Use the PTZ Quick Functions to control a connected PTZ camera (not included). To access the PTZ Quick Functions right click anywhere on the screen with the mouse and then select PTZ, Cruise Setting or Start Cruise. ... - Page 57 Chapter 16 Camera Menu 16.3 PTZ Quick Functions Use the PTZ Quick Functions to control a connected PTZ camera (not included). To access the PTZ Quick Functions right click anywhere on the screen with the mouse and then select PTZ, or Start Cruise. ...
-
Page 58: Chapter 17 Network Menu
Chapter 17 Network Menu Use this menu to access the Internet/LAN Menu, DDNS Submenu, Mobile Menu, and Email Menu. This will explain the informaiton in each menu. Complete step by step instructions on how to connect your DVR to obtain online access can be found in the Chapter 18 Remote Access. -
Page 59: Internet/Lan Menu
Chapter 17 Network Menu 17.1 Internet/LAN Menu Use this menu to configure the type of internet connection, the media and web ports, IP address, Subnet Mask, Gateway, DNS and UPnP settings. To access this menu select Network from the Main Menu and then select Internet/LAN. - Page 60 Chapter 17 Network Menu IP Address: This is the identification of the DVR when it is connected to a network. Subnet Mask: This should always be set to 255.255.255.000. It described the range of IP addresses that can be found in the network.
-
Page 61: Ddns Submenu
Chapter 17 Network Menu 17.1.1 DDNS Setting Submenu Use this menu to configure DDNS setup after you have registered for a free domain name at http://www.nightowldvr.com. To access this submenu select Network from the Main Menu, select Internet/LAN and then select DDNS Setup at the bottom of the screen. ... -
Page 62: Mobile Menu
Chapter 17 Network Menu 17.2 Mobile Menu Use this menu to configure the mobile port, mobile user name and mobile password settings. To access this menu select Network from the Main Menu and then select Mobile. Mobile Username: This will be the username that will be entered into the mobile application for your Smartphone and Tablet PC. -
Page 63: Email Menu
Chapter 17 Network Menu 17.3 Email Menu Use this menu to configure the email alert settings. To access this menu select Network from the Main Menu and then select Email. Email: This will allow you enable/disable email alerts. If you have the DVR set to motion, you will receive an email alert with an attached image of the object that triggered the alarm. -
Page 64: Chapter 18 Remote Access
Chapter 18 Remote Access Use this chapter to connect your DVR to the Internet. This chapter will teach you how to properly connect your DVR to your router/modem, port configuration, Internet configurations, Mobile configurations, and DDNS registration. You will need to ensure the following in order to be able to successfully setup the DVR to the Internet. -
Page 65: Connection Of Dvr And Router/Modem
Chapter 18 Remote Access 18.1 Connection of DVR and Router/Modem Use this section to show you how to connect the DVR to the router/modem. 1. Make sure that your DVR is connected to a power outlet. 2. Connect the DVR directly to the router through an open port with the included Ethernet cable. -
Page 66: Windows Network Configuration
Chapter 18 Remote Access 18.2 Windows Network Configuration Determine Basic Information about Your Network Ensure that the DVR is properly connected to the router/modem and that you have a Windows computer connected to the same router. Follow the next steps to determine the basic information about your network. - Page 67 Chapter 18 Remote Access 4. Find the IPv4 Address (or may be named IP Address in some versions of Windows). 5. Change the last digits to 150. Example, you wrote down the IP Address 10.1.10.11. When the last digits are changed the IP address will now be 10.1.10.150.
- Page 68 Chapter 18 Remote Access Changing the Network Settings on the DVR Use the information that you just wrote down for the next steps. Access the Internet/LAN Menu by selecting Network from the Main Menu and then select Internet/LAN. TCP/IP Type: Change this setting to Static. ...
-
Page 69: Apple (Mac) Network Configuration
Chapter 18 Remote Access 18.3 Apple (Mac) Network Configuration Determine Basic Information about Your Network Ensure that the DVR is properly connected to the router/modem and that you have an Apple (Mac) computer connecter to the same router. Follow the next steps to determine the basic information about your network. - Page 70 Chapter 18 Remote Access Changing the Network Settings on the DVR Use the information that you just wrote down for the next steps. Access the Internet/LAN Menu by selecting Network from the Main Menu and then select Internet/LAN. TCP/IP Type: Change this setting to Static. ...
-
Page 71: Chapter 19 Port Forwarding
Chapter 19 Port Forwarding Port Forwarding After you have configured the Network Settings, you will now need to forward the necessary ports to be able to view the DVR over the Internet from anywhere in the world. Refer to the manual/documentation of your router to see the process of port forwarding for your router. - Page 72 Chapter 19 Port Forwarding 5. You will need to enter a separate port forwarding entry for each port that your DVR uses – Media Port (9000), Web Port (80), and Server Port (2050). Repeat the below steps for each entry. 6.
-
Page 73: Checking The Ports After Port Forwarding
Chapter 19 Port Forwarding 19.1 Checking the Ports after Port Forwarding Once you have forwarded the necessary ports on your router, you should check to ensure that they have been correctly forwarded. 1. Go to http://www.yougetsignal.com/tools/open-ports/. 2. Type in port 9000 and select the Check button to see if the port test as open or closed. -
Page 74: Chapter 20 Ddns Registration
Chapter 20 DDNS Registration 20.1 Registering a Free Domain Name (DDNS) This option allows you to set up a free website address that will point back to the DVR regardless if the IP Address changes. If you do not have a static IP Address it is recommended to use this option. - Page 75 Chapter 20 DDNS Registration 4. Create a domain name. 5. If your domain name that you have chosen is available, you will receive a window that says that your domain was successfully created. 6. Your domain name has now been created. Write this information in the Information Log at the end of the manual.
-
Page 76: Adding Your New Domain Name To Your Dvr
Chapter 20 DDNS Registration 20.2 Adding your New Domain Name to your DVR Use DDNS Submenu to configure DDNS setup after you have registered for a free domain name. To access this submenu select Network from the Main Menu, select Internet/LAN and then select DDNS Setup at the bottom of the screen. -
Page 77: Chapter 21 Netviewer Software
Chapter 21 NetViewer Software Use this software to access your DVR remotely over the Internet or within your local area network. Ensure that you have completed Chapter 18 Remote Access of this manual before trying to access the DVR using this software. - Page 78 Chapter 21 NetViewer Software NetViewer Login IP Address: Using the software on the same network as the DVR, you will enter the internal IP Address that you assigned to the DVR in the Chapter 18 Remote Access. Using the software remotely, you will enter the public IP address.
- Page 79 Chapter 21 NetViewer Software NetViewer Interface Channel Information The channel names, date and time will be indicated on every channel in real time. Menu Bar This will allow you access to the Live Viewing, Playback screen, Remote Setting, Local Setting, Firmware Update and Log Out of the software.
- Page 80 Chapter 21 NetViewer Software Play Control This will stop and play the live video feed. This will take a snapshot of the video. This will start and stop recording on all channels. This will show the different viewing options. ...
- Page 81 Chapter 21 NetViewer Software PTZ Control These control settings can only be used for cameras that have the Pan, Tilt, and Zoom features. A PTZ camera is not included. Arrows: These will move the camera manually in the direction of the arrow.
- Page 82 Chapter 21 NetViewer Software Playback This screen will allow you to search, playback, and backup recorded videos. To access this menu select the Playback button from the Menu Bar. Calendar (Upper right corner): This will show the days with recordings in bold numbers, select a date to view a file list.
- Page 83 Chapter 21 NetViewer Software Playback Use the bottom control panel for various video controls. The circle indicator on the bottom bar will show the current location of the video during playback. This button will allow you to play the video. ...
- Page 84 Chapter 21 NetViewer Software Remote Setting This screen will allow you to access all of the DVR setting menus. The menus will include the Record, Network, Camera, and System Menus. To access this menu select the Remote Setting button from the Menu Bar. ...
- Page 85 Chapter 21 NetViewer Software Local Setting This screen will allow you to choose where recordings, snapshots, and file downloads are saved on the remote computer. To access this menu select the Local Setting button from the Menu Bar. Record Save Path: This will indicate the location on the computer that the recordings will be saved.
- Page 86 Chapter 21 NetViewer Software Firmware Update This screen will allow you to perform a firmware update to the DVR remotely. To access this menu select Firmware Update from the Menu Bar. Firmware File Path: This will allow you to choose the firmware file that was saved to the computer that will be uploaded.
-
Page 87: Chapter 22 Control Management Software (Cms)
Chapter 22 Control Management Software (CMS) Control Management Software (CMS – Video Client) Use this software to access one or more DVRs remotely over the Internet or within your local area network. Ensure that you have completed the Remote Access chapter of this manual before trying to access the DVR using this software. - Page 88 Chapter 22 Control Management Software (CMS) Starting the CMS You will have to register an administrator when starting the CMS. User Name: Create a user name with a maximum of 12 characters that you will use to login to the CMS. ...
- Page 89 Chapter 22 Control Management Software (CMS) Device List This menu will show all DVRs that have been added to the CMS. Search Field: This will allow you to search for a specific DVR. Device List: This will list all DVRs that have been added to the CMS...
- Page 90 Chapter 22 Control Management Software (CMS) Device List Settings of the Device To access these options, right click on the device you would like to configure. Login: This will log you into the device. Logout: This will log you out of the device. ...
- Page 91 Chapter 22 Control Management Software (CMS) Device List Remote Setup To access these menu options, right click on the device you would like to configure and select Remote Setup. The menus listed below will configure the settings on the DVR. Refer to the specific chapters for configuration details for each menu.
- Page 92 Chapter 22 Control Management Software (CMS) Live Screen To access the live screen menu, right click anywhere on the channel. Capture: This will take a snapshot of the channel you are viewing. You can also use the camera icon in the upper right corner of the channel.
- Page 93 Chapter 22 Control Management Software (CMS) PTZ Control These control settings can only be used for cameras that have the Pan, Tilt, and Zoom features. A PTZ camera is not included. Arrows: These will move the camera manually in the direction of the arrow.
- Page 94 Chapter 22 Control Management Software (CMS) PTZ Control Preset Tab This will allow you to set specific points to move the camera to from the current position. To add a preset point perform the below steps. 1. Move the PTZ camera to the desired position using the PTZ tab. 2.
- Page 95 Chapter 22 Control Management Software (CMS) PTZ Control Cruise Tab This will allow the camera to move to the preset points that have been configured in the preset tab. To start a cruise route perform the below steps. 1. Ensure that there have been preset points configured under the Preset Tab.
- Page 96 Chapter 22 Control Management Software (CMS) Top Menu Bar Live: This will show live viewing of the channels. Playback: This will open the Playback screen. E-Map: This will open the electronic map. Config: This will open the local parameter configuration menus. ...
- Page 97 Chapter 22 Control Management Software (CMS) Bottom Menu Bar This will hide/show the side bar. This will allow you to adjust the volume. This will allow you to turn the PTZ controls on/off. This will hide the channel names and dates. ...
- Page 98 Chapter 22 Control Management Software (CMS) Config Device Manage To access this menu select Config from the Top Menu Bar and then select Device Manage. Add: This will allow you to add a new device. Delete: This will allow you to delete an existing device. ...
- Page 99 Chapter 22 Control Management Software (CMS) Config Adding a Device To add a device select Config, select Device Manage, and select the group where you would like to add the device. Right click the group and select add device or select the Add button. ...
- Page 100 Chapter 22 Control Management Software (CMS) Config Changing Channel Information To change the channel information select Config, select Device Manage, and select the device where you would like to change information on the channels. You can either double left click on the channel or highlight the channel and select the Change button.
- Page 101 Chapter 22 Control Management Software (CMS) Config User Parameters To access this menu select Config from the Top Menu Bar and then select User Parameters. Add: This will allow you to add a new user. Change: This will allow you to change the settings on an existing user.
- Page 102 Chapter 22 Control Management Software (CMS) Config Path Parameters To access this menu select Config from the Top Menu Bar then select Path Parameters. Warning Volume: This will allow you to set a warning volume. This must be in .wav format. ...
- Page 103 Chapter 22 Control Management Software (CMS) Playback This screen will allow you to search, playback, and backup videos. To access this menu select the Playback button from the Top Menu Bar. Device: This will allow you to choose one channel of a DVR at one time to playback files.
- Page 104 Chapter 22 Control Management Software (CMS) Playback Use the bottom control panel for various video controls. The bottom bar will turn blue when in playback and backup. The indicator on the bottom bar will show the current location of the video during playback.
- Page 105 Chapter 22 Control Management Software (CMS) E-Map Configurations This will allow you to add an image of the location where the system is configured. You can place the cameras in the exact locations of where they are installed in the location. To access this menu select the E-Map button from the Top Menu Bar.
- Page 106 Chapter 22 Control Management Software (CMS) Adding a new Map This will allow you to add a new map to the E-Map. To access this menu select E-Map from the Top Menu Bar and select the EditMap button. Follow the steps below to add a new map. 1.
- Page 107 Chapter 22 Control Management Software (CMS) Editing a Map This will allow you to edit a map by adding/deleting cameras. To access this menu select E-Map from the Top Menu Bar and select the EditMap button. Follow the steps below to edit a map. 1.
- Page 108 Chapter 22 Control Management Software (CMS) Editing the Map List This will allow you to edit the Maps in the Map List. To access this menu select E-Map from the Top Menu Bar and select the EditMap button. The Map List is located in the right column list. ...
-
Page 109: Chapter 23 Mobile Application
Chapter 23 Mobile Application (Apple and Android) This mobile application (Night Owl Lite) will offer a number of different features by accessing the DVR remotely on an iPad, iPhone, or Android device. This application can be found in the App Store or Android market. - Page 110 Chapter 23 Mobile Application (Apple and Android) Device Page This page will allow you to add, edit and delete devices. Ensure that you have completed the Remote Access and Mobile Menu chapters of this manual before trying to access the DVR using this application. ...
- Page 111 Chapter 23 Mobile Application (Apple and Android) Adding / Editing a Device This screen will allow you to add / edit a device based on information that was gathered in the Remote Access and Mobile Menu chapters. DVR Title: This will name the DVR on the application. ...
- Page 112 Chapter 23 Mobile Application (Apple and Android) Control Panel This will allow you to perform different functions during live viewing on a mobile device. These will move a PTZ camera manually in the direction of the arrow. The + zooms a camera in and the – zooms a camera out. ...
- Page 113 Chapter 23 Mobile Application (Blackberry, Symbian, Windows Mobile) This mobile application (ASee) will offer a number of different features by accessing the DVR remotely on a Blackberry, Symbian and Windows Mobile device. This application can be found on www.NightOwlSP.com. Blackberry ...
- Page 114 Chapter 23 Mobile Application (Blackberry, Symbian, Windows Mobile) To access on a Blackberry device follow the below steps. 1. Download and install the “Blackberry Desktop Manager” on your computer. 2. Connect your phone to your computer with a USB cable. 3.
- Page 115 Chapter 23 Mobile Application (Blackberry, Symbian, Windows Mobile) Using ASee on a Blackberry device. Please ensure you have edited the ASee Application permission. Select “Settings” > “Options” >“Applications”, then highlight the “ASee” application and select “Edit Permissions” in the drop down menu. Make sure Connections, Interactions, and User Data are set to “Allow”.
- Page 116 Chapter 23 Mobile Application (Blackberry, Symbian, Windows Mobile) User Interface for Blackberry Devices The functions of the various icons are as follow: 1 - Connect/Disconnect 2 - Full screen 3 - Snapshot 4 - Setup 5 - Help 6 - Next Channels/Group 7 - Navigation Controls You can save the connection settings for different DVRs when you give the Settings different names under Settings and click save.
- Page 117 Chapter 23 Mobile Application (Blackberry, Symbian, Windows Mobile) To access on a Windows Mobile device follow the below steps. 1. Install the webcam program that is included on the supplied CD by copying the “Aseesetup.CAB” file to the mobile phone. You can do this by connecting the mobile phone to a computer and copying the file from the CD to the phone.
- Page 118 Chapter 23 Mobile Application (Blackberry, Symbian, Windows Mobile) After installation is complete on the Windows Mobile device, select the icon named “Asee” to run the program. This will display the program screen. Select the “Setting” button to enter the Setting menu. ...
- Page 119 Chapter 23 Mobile Application (Blackberry, Symbian, Windows Mobile) To access on a Symbian device follow the below steps. 1. Install the ASee application that is on the included CD by copying the “ASee_AL_3rd _0901.sisx” file to the mobile phone if you are using Version 3.
- Page 120 Chapter 23 Mobile Application (Blackberry, Symbian, Windows Mobile) Once the installation is complete on the Symbian device, go to the Applications folder and select the “Asee” program. Select “Open” to display the software interface, and select the “Setup” button to open the “Setting” screen.
-
Page 121: Chapter 24 Specifications Of Dvr
Chapter 24 Specifications of DVR... -
Page 122: Chapter 25 Information Log
Chapter 25 Information Log Be sure to write down all of the important information below and place in a secure location. General DVR Information: Admin Password: User Password: Mac Address: Serial Number: Internet Login Information: Internal IP Address: ... -
Page 123: Chapter 26 Warranty
Product is defective, the Purchaser must return the Product at Purchaser’s cost (no CODs) to the address below, with the original proof of purchase receipt. In its sole discretion, Night Owl will either repair or replace the Product at no additional cost to the Purchaser. Any replacement Product (or parts) will be covered by the same warranty as the original Product through the expiration date of the original warranty period. - Page 124 Product. In no event shall Night Owl be liable for any special or consequential damages arising from the use of the Product or arising from the malfunctioning or non-functioning of the Product, or for any delay in the performance of this warranty due to any cause beyond its control.
- Page 125 Chapter 26 Warranty Disclaimer Certain uses, publication and/or distribution of video/audio recordings from security cameras and/or audio devices are prohibited or restricted by federal, state and local laws. When enabling and/or using audio recording features with your hidden security camera, be sure to comply with the laws in your country, state and locality.
Need help?
Do you have a question about the 8 channel digital video recorder and is the answer not in the manual?
Questions and answers