Table of Contents
Advertisement
Renew Series Inserts
Installation and Operating Manual
LG-INS (NG/LP) Large Direct Vent Insert
SM-INS (NG/LP) Small Direct Vent Insert
D O N O T D I S C A R D
D O N O T D I S C A R D
This appliance may be installed in an aftermarket permanently located, manufactured (mobile) home, where not
prohibited by local codes. A manufactured home (USA only) or mobile home OEM installation must conform with
the Manufactured Home Construction and Safety Standard, Title 24 CFR, Part 3280, or when such a standard is
not applicable, the Standard for Manufactured Home Installations, ANSI/NCSBCS A225.1, or Standard for Gas
Equipped Recreational Vehicles and Mobile Housing, CSA Z240.4
WARNING: If the information in these instructions are not followed exactly, a fi re or explosion may result
causing property damage, personal injury or loss of life.
— Do not store or use gasoline or other fl ammable vapors and liquids in the vicinity of this or any other
appliance.
WHAT TO DO IF YOU SMELL GAS
—
•
Do not try to light any appliance.
•
Do not touch any electrical switch; do not use any phone in your building.
•
Immediately call your gas supplier from a neighbor's phone. Follow the gas supplier's instructions.
•
If you cannot reach your gas supplier, call the fi re department.
— Installation and service must be performed by a qualifi ed installer, service agency or the gas supplier.
IMPORTANT: This appliance is only for use with the type(s) of gas indicated on the rating plate. An LP conversion
kit is available when using Liquid Propane gas; order separately.
WARNING
HOT GLASS
WILL
CAUSE BURNS.
DO NOT TOUCH
GLASS
UNTIL COOLED.
NEVER
ALLOW CHILDREN
TO TOUCH GLASS.
Installer:
Leave this manual with the appliance.
Consumer: Retain this manual for future reference.
These products have
been tested and listed
for use in the USA and
Canada by:
Underwriters
Laboratories,
Northbook, IL
File #MH47882
www.stellarhearth.com
Page 1
Advertisement
Table of Contents

Related Manuals for Stellar Hearth LG-INS


Summary of Contents for Stellar Hearth LG-INS
-
Page 1: What To Do If You Smell Gas
Renew Series Inserts Installation and Operating Manual LG-INS (NG/LP) Large Direct Vent Insert SM-INS (NG/LP) Small Direct Vent Insert D O N O T D I S C A R D D O N O T D I S C A R D Installer: Leave this manual with the appliance. - Page 2 Installers, please leave manual for the homeowner to use for future reference. Please have the fi replace model information available when contacting a dealer or Stellar Hearth for additional information and service work. The model information regarding your fi replace can be found on the rating plate located in the valve control area underneath the burner assembly of the fi...
- Page 3 TABLE OF CONTENTS Listing Label Information & Homeowner Reference Log Installation (SM-INS & LG-INS) Continued 19-31 C. LG-INS Log Set Identifi cation Safety Information D. LG-INS Log Set Installation 26-31 Clinkers and Embers, Log 1 Commonwealth of Massachusetts Requirements Log 2 & 3 Log 4 &...
-
Page 4: Table Of Contents
E. Complete the Conversion F. Testing For Leaks G. Inlet Pressure Test Replacement Parts 50-53 A. SM-INS Exploded View B. SM-INS Replacement Parts List C. LG-INS Exploded View D. LG-INS Replacement Parts List Limited Lifetime Warranty Page 4 INS_RENEW INS Rev B... -
Page 5: Safety Information
Do not operate this appliance with the glass/frame assembly removed, cracked or broken. The glass assembly shall only be replaced as a complete unit, as supplied by Stellar Hearth Products. Replacement of the glass assembly must only be performed by a licensed or qualifi ed service person. DO NOT SUBSTITUTE MATERIALS. -
Page 6: Commonwealth Of Massachusetts Requirements
COMMONWEALTH OF MASSACHUSETTS REQUIREMENTS IMPORTANT NOTE The following requirements reference various Massachusetts and national codes not contained in this manual. For all sidewall horizontally vented gas fueled equipment installed in every dwelling, building or structure used in whole or in part for residential purposes, including those owned or operated by the Commonwealth and where the side wall exhaust vent termination is less than (7) feet above fi... -
Page 7: Listing And Code Approvals
Inc. 11 West 42nd St., New York, N.Y. 10036. • Modifi cation of the fi replace insert or direct vent system. • Installation other than as instructed by Stellar Hearth Products WARNING • Improper positioning of the logs or glass door assembly. - Page 8 26,500 30,000 Orifi ce 0.125 Air Shutter Opening 3/8” Fully Open 3/8” Fully Open MODEL B. DIMENSIONS SM-INS (NG/LP) LG-INS (NG/LP) INCHES INCHES Front Width 29-1/8 33-1/8 Glass Opening Width 28-3/4 32-3/4 Glass Opening Height 17-3/8 21-3/8 Actual Viewing Area...
-
Page 9: C. Minimum Fireplace Dimensions
FRONT REAR HEIGHT DEPTH Refer To: WIDTH WIDTH Figure 4C Below SM-INS Inches 19-1/8 14-1/2 17-1/4 LG-INS Inches 23-1/8 16-1/2 21-1/2 For Both Zero-Clearance and Masonry Woodburning Fireplaces * Interior Rear Width Figure 4C Page 9 INS_RENEW INS Rev B... -
Page 10: Mantel And Trim Clearances
5 - MANTEL AND TRIM CLEARANCES A. PERPENDICULAR SIDE WALL CLEARANCE WARNING DO NOT OVERLAP THE SURROUND WITH COMBUSTIBLE MATERIAL. ½ ►◄ Minimum clearance to side of the surround Figure 5A B. MANTEL CLEARANCES WARNING NO COMBUSTIBLES OF ANY TYPE SHOULD BE PLACED ▲... -
Page 11: A. Gas Conversion Important Notes
This fi replace insert is manufactured for use with Natural Gas or LP Gas. NG and LP Gas conversion kits are available. Natural Gas to LP Gas Converstion Kit (LPC-SM-INS and LPC-LG-INS) and LP Gas to NG Conversion Kits (NGC-SM-INS and NGC-LG-INS are sold separately. -
Page 12: B. Gas Line Connection
6 - GAS LINE SPECIFICATIONS B. GAS LINE CONNECTION NATURAL GAS LP GAS 5.0 inches W.C. 11.0 inches W.C. Minimum Inlet Gas Pressure (7.0 W.C. recommended) (recommended) Maximum Inlet Gas Pressure 10.5 inches W.C 13.0 inches W.C. Manifold Pressure (HI) 3.5 inches W.C 10.0 inches W.C. -
Page 13: Venting Installation
7 - VENTING INSTALLATION Before beginning, remove glass door and log package from The solid fuel fi replaces’ fl ue damper must be fully locked in unit. Also check to make sure there is no hidden damage the open position or removed for installation of the gas fi re- to the unit. - Page 14 7 - VENTING INSTALLATION ▲ 10’ Minimum 40’ Maximum ▼ Screw liner to collar (4 total) High temperature sealant recommended on intake 2000° stove cement recommended on exhaust Figure 7.1 Page 14 INS_RENEW INS Rev B...
- Page 15 7 - VENTING AND INSTALLATION Vent System Approvals 3.6 X 2.3 Connecting Vent Pipe Figure 8 shows the vent termination caps and systems approved Level The Insert for use with these models. Approved vent system terminations are labeled for identifi cation. 3-inch diameter listed fl exible aluminum Install the insert into fi...
-
Page 16: Vertical Termination
8 - VERTICAL TERMINATION Determining Minimum Vent Height Above the Roof. Note : If the original solid fuel chimney is shortened, refer to Figure 8.1 for minimum vent height above the roof. WARNING When terminating the vent cap near an exterior wall or overhang, Major U.S. -
Page 17: Surround Panel Installation
9 - SURROUND PANEL INSTALLATION WARNING WHEN FINISHING THE FIREPLACE INSERT, NEVER OBSTRUCT OR MODIFY THE AIR INLET/OUTLET LOUVERS ON THE FIREPLACE INSERT AT ANYTIME INSTALLING THE TRIM SURROUNDS The front surround will cover over the surround backing attached to the insert fi rebox. To attach the front surround, simply place over and in front of the backing plate such that the top return fl... -
Page 18: Glass Removal And Installation
11 - GLASS REMOVAL AND INSTALLATION A. GLASS REMOVAL B. GLASS INSTALLATION Drop the bottom tabs on the glass frame behind the bottom CAUTION glass retainers. Push down and bring the top of the glass frame against the insert. DO NOT REMOVE THE GLASS IF IT IS HOT! Using the hook tool, hook the retainer through the hole and pull around the glass tab and in front of the tab to secure. - Page 19 12 - OPTIONAL REFRACTORY LINER (LG-INS ONLY) PARTS: Locate the deeper liner clips (qty. 2 ) from the parts bag. Remove the grate and set aside. Locate the left and right screw heads on the roof of the fi rebox and remove.
- Page 20 13 - LOG INSTALLATION (SM-INS) Section 13 A & B are the SM-INS Log Installation found on Pages 20-24. Section 13 C & D are the LG-INS Log Installation found on Pages 25-31. IMPORTANT NOTE If converting to LP (propane) or NG, do so now before installing log set. Follow instructions included with kit A.
-
Page 21: B. Sm-Ins Log Set Installation
13 - LOG INSTALLATION (SM-INS) B. SM-INS LOG SET INSTALLATION - Steps 1 & 2 Step 1- Clinkers and Embers Clinkers: Place the clinkers around the fi replace base between the burner and the fi replace walls. Cover the fl oor evenly. Embers: Tab 1 Place dime size pieces of the mineral wood... - Page 22 13 - LOG INSTALLATION (SM-INS) B. SM-INS LOG SET INSTALLATION - Steps 3 & 4 Step 3 - Log 2 Log Part Number: SMINS-Log 2 Log 2 - View 1 Figure 13B.3 Tab 2 Log 2 - View 2 Place Log 2 over Log 1. The hole in the bottom of Log 2 matches the pin molded into the top of Log 1.
- Page 23 13 - LOG INSTALLATION (SM-INS) COPY B. SM-INS LOG SET INSTALLATION - Steps 5 & 6 Step 5 - Log 4 Log Part Number: SMINS-Log 4 Figure 13B.5 Log 4 - View 1 Log 4 - View 2 Place Log 4 onto the left side of the burner. Place the log so the burner ports are equal distance from it all the way around the log.
-
Page 24: B. Sm-Ins Log Set Installation
13 - LOG INSTALLATION (SM-INS) B. SM-INS LOG SET INSTALLATION - Steps 7 & 8 Step 7 - Log 6 Log Part Number: SMINS-Log 6 Figure 13B.7 Log 6 - View 1 Log 6 - View 2 Place Log 6 onto Log 3. The hole in the bottom of Log 6 matches the pin molded into the top of Log 3. - Page 25 13 - LOG INSTALLATION (LG-INS) IMPORTANT NOTE If converting to LP (propane) or NG, do so now before installing log set. Follow instructions included with kit. C. LG-INS LOG SET IDENTIFICATION CAUTION Do not place logs directly over burner port holes. Improper log placement may affect fl ame appearance and cause excessive soot to build up on logs and glass.
-
Page 26: D. Lg-Ins Log Set Installation
13 - LOG INSTALLATION (LG-INS) D. LG-INS LOG SET INSTALLATION - Steps 1 & 2 Step 1- Embers Clinkers: Place the clinkers around the fi replace base between the burner and the fi replace walls. Cover the fl oor evenly. - Page 27 13 - LOG INSTALLATION (LG-INS) D. LG-INS LOG SET INSTALLATION - Steps 3 & 4 Step 3 - Log 2 Log Part Number: LGINS-Log 2 Log 2 - View 1 Figure 13D.3 Log 2 - View 2 Place Log 2 on the left side of the fi rebox. The left end will touch the back and side walls of the refractory.
- Page 28 13 - LOG INSTALLATION (LG-INS) D. LG-INS LOG SET INSTALLATION - Steps 5 & 6 Step 5 - Log 4 Log Part Number: LGINS-Log 4 Log 4 - View 1 Figure 13D.5 Place Log 4 on top of Log 2. The rectangular pin on the top of Log 2 will match the slot on the bottom of Log 4.
- Page 29 13 - LOG INSTALLATION (LG-INS) D. LG-INS LOG SET INSTALLATION - Steps 7 & 8 Step 7- Log 6 Log Part Number: LGINS-Log 6 Figure 13D.7 Log 6 - View 1 Log 6 - View 2 Place Log 6 on top of the center of the burner. The split end will point forward and to the left.
- Page 30 13 - LOG INSTALLATION (LG-INS) D. LG-INS LOG SET INSTALLATION - Steps 9 & 10 Step 9- Log 8 Log Part Number: LGINS-Log 8 Figure 13D.9 Log 8 - View 1 Log 8 - View 2 Place Log 8 on top of Log 6. The circular indent on the bot- tom of the log will match the circular pin on top of Log 6.
-
Page 31: D. Lg-Ins Log Set Installation
13 - LOG INSTALLATION (LG-INS) D. LG-INS LOG SET INSTALLATION - 11 Step 11 - Log 10 Log Part Number: LGINS-Log 10 Figure 13D.11 Log 10 - View 1 Log 10 - View 2 Place Log 10 on top of Log 4. The circular indent on the bottom of the log will match the circular pin on the top center of Log 4. -
Page 32: Valve Wiring Schematic
14 - VALVE & PILOT ASSEMBLY COMPONENTS VALVE WIRING SCHEMATIC AND IDENTIFICATION *DRAWINGS NOT TO SCALE. Figure 14 Page 32 INS_RENEW INS Rev B... -
Page 33: Remote Control Operation
15 - REMOTE CONTROL OPERATION INSTRUCTIONS A. REMOTE ICON IDENTIFICATION Profl ame 2 Remote Control by SIT IMPORTANT NOTE ON/OFF Rocker Switch must be ON for the remote to operate. Features: Blue back lit LCD display · Main Burn ON/OFF ·... -
Page 34: B. Remote Control Information
15 - REMOTE CONTROL OPERATION B. REMOTE CONTROL INFORMATION Supply Voltage: 4.5 V (three 1.5 V AAA batteries) Ambient Temperature Ratings: 0-50 °C (32 - 122 °F) Radio Frequency: 315 MHz IMPORTANT NOTE THE TRANSMITTER AND RECEIVER ARE RADIO FREQUENCY DEVICES. PLACING THE RECEIVER IN OR NEAR METAL SEVERLY REDUCES THE SIGNAL RANGE. -
Page 35: D. Temperature Indication Display
15 - REMOTE CONTROL OPERATION D. TEMPERATURE INDICATION DISPLAY With the system in the “OFF” position, press the THERMOSTAT key and the MODE key at the same time. Look at the LCD screen on the Transmitter to verify that a °C or °F is visible to the right of the Room Temperature display. -
Page 36: F. Remote Flame Control
15 - REMOTE CONTROL OPERATION F. REMOTE-FLAME CONTROL The Profl ame has six (6) fl ame levels. With the system ON and the fl ame level at the maximum in the appliance, pressing the DOWN ARROW key once will reduce the fl ame height by one step until the fl... -
Page 37: H. Smart Thermostat (Transmitter Operation)
15 - REMOTE CONTROL OPERATION H. SMART THERMOSTAT (TRANSMITTER OPERATION) The Smart Thermostat function adjusts the fl ame height in accordance with the difference between the set point temperature and the actual room temperatures. As the room temperature gets closer to the set point the Smart Function will modulate the fl... - Page 38 15 - REMOTE CONTROL OPERATION J. CONTINUOUS PILOT/INTERMITTENT PILOT (CPI/IPI) SELECTION With the system in “OFF” position press the MODE key (Figure 15A.1) to index to the CPI mode icon. (Figure 15M.1 & 15M.2) Pressing the UP ARROW key will activate the Continuous Pilot Ignition mode (CPI).
-
Page 39: L. Low Battery Power Detection
15 - REMOTE CONTROL OPERATION L. LOW BATTERY POWER DETECTION TRANSMITTER The life span of the remote control batteries depends on various factors: quality of the batteries used, the number of ignitions of the appliance, the number of changes to the room thermostat set point, etc. - Page 40 16 - LIGHTING & SHUTDOWN FOR YOUR SAFETY - READ BEFORE LIGHTING WARNING IF YOU DO NOT FOLLOW THESE INSTRUCTIONS EXACTLY, A FIRE OR EXPLOSION MAY RESULT, CAUSING PROPERTY DAMAGE, PERSONAL INJURY OR LOSS OF LIFE. DUE TO HIGH SURFACE TEMPERATURES, KEEP CHILDREN, CLOTHING AND FURNITURE AWAY. This appliance needs fresh air for safe operation and must be installed so there are provisions for adequate combustion and ventilation air.
- Page 41 A. LIGHTING STOP! Read safety information on previous page and front cover of this manual before continuing. IMPORTANT NOTE This fi replace is equipped with an ignition device which automatically lights the pilot. DO NOT try to light the pilot by hand. Turn off all electrical power to fi...
-
Page 42: Pressure Testing
17 - PRESSURE TESTING IMPORTANT NOTE The appliance and its individual shutoff valve must be disconnected from the gas supply piping system during any pressure testing of that system at pressures in excess of ½ psi. IMPORTANT NOTE The appliance must be isolated from the gas supply piping system by closing its individual manual shut-off valve during any pressure testing of the gas line at test pressures equal to or less than ½... -
Page 43: Error Codes
18 - OPERATION AND ERROR CODES DEFINITION OF OF LOCKOUT A lockout will occur when there is a anomalous fl ame detection or too many unsuccessful ignition tries. A lockout will remain in memory as long as the power supply is present. To unlock the module, turn OFF all system power for 2 minutes. -
Page 44: Finalizing The Installation
19 - FINALIZING THE INSTALLATION A. FLAME APPEARANCE Flame appearance is affected by several factors including altitude, venting confi guration and fuel quality. Although the venturi setting has been factory set, adjustments may be necessary for optimal performance and visual aesthetics. When fi... -
Page 45: Maintenance
Do not operate this fi replace with glass/frame assembly removed, cracked or broken. • The glass assembly, part #011-044, shall only be replaced as a complete unit, as supplied by Stellar Hearth Products. • Replacement of glass & frame assembly, must only be performed by a licensed or qualifi ed service person. -
Page 46: Troubleshooting
21 - TROUBLESHOOTING A. REMOTE DOES NOT WORK • Ensure new batteries are installed correctly in the transmitter. • Verify the insert is plugged in and power is present. • Learn the transmitter to the remote. See Section 15C. • Does the transmitter have a lock icon? If so it is locked. -
Page 47: Conversion Kit Instructions
Refer to appliance owner’s manual or product data plate for proper inlet and manifold pressure adjustments and orifi ce sizing. Kit Includes: (1) Gas Conversion Label (1) Pilot Orifi ce LP (1) Gas Label (1) Burner Orifi ce LP Conversion Kit Part #’s LPC-SM-INS LPC-LG-INS Input Btu/hr Maximum 30,000 38,500 Btu/hr Minimum 23,500 30,000 KWH (Maximum) 11.3... -
Page 48: Replace Burner Orifi Ce
22 - NG to LP CONVERSION KIT INSTRUCTIONS C. REPLACE THE BURNER ORIFICE: 1. Remove existing orifice and replace with orifice included with kit. Tighten securely - DO NOT OVER TIGHTEN. D. CONVERT GAS CONTROL VALVE: Follow the instructions included with the gas valve stepper motor conversion kit. E. -
Page 49: Testing For Leaks
22 - NG to LP CONVERSION KIT INSTRUCTIONS F. TESTING FOR LEAKS: 1. Turn on the gas and electricity to the fi replace. Light the pilot by pressing the "Pilot" button. CONSTANT PILOT will appear on the LCD screen (Figure 17J). The pilot should light. 2. -
Page 50: Replacement Parts
23 - REPLACEMENT PARTS A - SM-INS EXPLODED VIEW Figure 24A Page 50 INS_RENEW INS Rev B... -
Page 51: Sm-Ins Replacement Parts List
* Consult your dealer information on optional accesories available for this fi replace. This appliance tested & certifi ed by: Underwriters Laboratories Northbook, IL Stellar Hearth Products 14351 Ewing Avenue S Burnsville, MN 55306 (P) 952.224.4072 Page 51 INS_RENEW INS Rev B... -
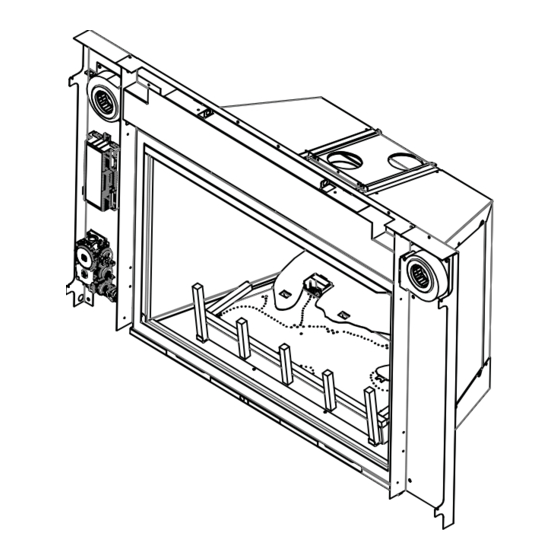
Page 52: Lg-Ins Exploded View
23 - REPLACEMENT PARTS C - LG- INS EXPLODED VIEW Figure 24A Page 52 INS_RENEW INS Rev B... -
Page 53: Lg-Ins Replacement Parts List
23 - REPLACEMENT PARTS B - LG-INS REPLACEMENT PARTS LIST Replacement part are available through your local dealer. Contact them for availabiity and pricing. Log Set CONTROL BOARD SYSTEM AND PARTS Part Number Description Part Description Number STL-411-500 Gas Valve - NG... -
Page 54: Limited Lifetime Warranty
Limited Lifetime Warranty Stellar Hearth Products, a brand of Big Woods Hearth Products Inc, warrants the following components for life to the original owner, subject to proof of purchase: Firebox, Heat Exchanger, Combustion Chamber, Grate and Stainless Steel Burners. Electrical components and wearable parts (gas valve, blowers, wiring, switches, remote controls, gasketing, and pilot assembly) are covered and will be provided free of charge for a period of one year from date of purchase.
Need help?
Do you have a question about the LG-INS and is the answer not in the manual?
Questions and answers