Nivona NICR7 Operating Instructions Manual
Fully automatic coffee centre
Hide thumbs
Also See for NICR7:
- Operating instructions manual (36 pages) ,
- Manual and user tips (186 pages)

Subscribe to Our Youtube Channel
Related Manuals for Nivona NICR7


Summary of Contents for Nivona NICR7
- Page 1 CafeRomatica NICR7.. Fully automatic coffee centre Operating Instructions and Useful Tips Neue Lust auf Kaffee.
- Page 2 NICR7..
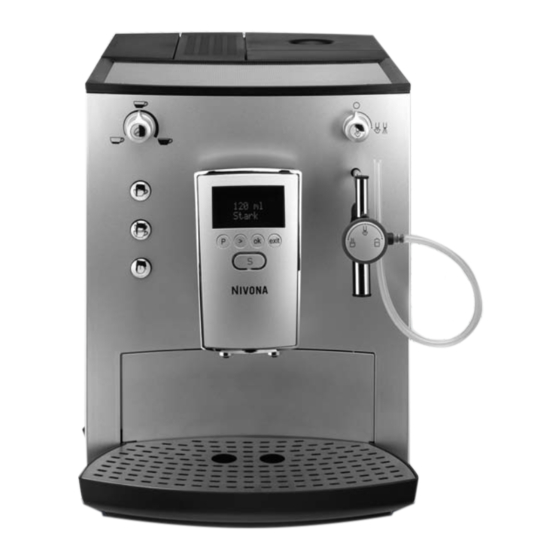
- Page 3 Equipment Text display screen with control keys Removable water reservoir Cupwarming / holding plate Water quantity control knob Coffee strength button 1-cup button 2-cup button On / Off button Service button ‘S’ Height-adjustable coffee spout Cup-warming function (On / Off switch, NICR770 only) Nameplate with model name Grinder settings control knob (inside) Bean container with lid...
- Page 4 Equipment Control knob Air inlet valve Air inlet pipe Inlet valve Steam / hot water jet Liquid inlet hose...
- Page 5 Operating Instructions and Useful Tips Dear Customer, Congratulations and many thanks for choosing a high-quality NIVONA product. To get the most out of your NIVONA machine, please read this manual carefully before use. Please start by reading the safety notes.
-
Page 6: Table Of Contents
Contents 1. Safety instructions ........36 2. -
Page 7: Safety Instructions
Afterwards send the extended periods of absence. machine to the dealer from whom it • Do not leave the machine switched was purchased – or to NIVONA natio- on unnecessarily. nal customer services. • Never submerge the machine in If the appliance’s power cord should... -
Page 8: Set Up
... 1. Safety instructions similarly qualified specialist, in order • Only touch the plastic parts of the to avoid any hazards. steam jet (fig. 1/T) and never point it at people. Caution: Electrical appliances must be repaired by qualified personnel. •... -
Page 9: Getting Started
... 2. Set up 2.2 Getting started you can turn the valve control knob (fig. 1/Q and 7) back to The left to shut. ➔ Remove the plug from the power ➔ After the machine has warmed up, cord compartment (fig. 1/V) and plug the service button (fig. -
Page 10: Making Coffee
(NICR770: 5 levels). They are shown hardness settings. in the display screen as follows: Tip: The NIVONA fully automatic cof- “VERY MILD”* = less than 7 g of fee centre NICR770 is equipped with ground coffee , e.g. for very mild Latte a personal “My Coffee”... -
Page 11: Selecting Water Quantity
... 3. Making coffee 3.2 Selecting water quantity The brewing operation can be cancel- led at any point by pressing the 1-cup You can freely select the quantity of (fig. 1/F) or 2-cup button (fig. 1/G). water used by turning the water quantity control knob (fig. -
Page 12: Using Pre-Ground Coffee
... 3. Making coffee ➔ Press the 2-cup button (fig. 1/G). chamber, and use only fresh or vacuum- ➔ The machine now starts the grind - packed coffee ground from beans. Do ing and brewing operation and pro du- not add instant coffee powder! ces two consecutive cups of coffee. -
Page 13: Frothing Up Milk
... 3. Making coffee Note: Steam can be drawn for about that it points to symbol ‘hot milk / 2 minutes. Then the machine will cafè latte’. ➔ Now turn the steam / hot water automatically switch the operation off. You can prolong the operation by turn- valve control knob (fig. -
Page 14: Programming Functions
4. Programming functions ➔ Afterwards please press the exit The function keys under the text dis - play screen are used to program func- key. You can now either continue in t ions (fig. 1/A and 4): programming mode to change other = Programming mode function settings or press exit again to >... -
Page 15: Water Hardness
... 4. Programming functions reservoir using the assembly tool on must be re placed anyway after no the end of the measuring spoon. longer than two months (see chapter 5.2 “Washing filter manually”). ➔ Fill up the reservoir with fresh water and put it back in the machine. -
Page 16: Temperature
... 4. Programming functions First, test your water with the test MUM” as desired. The default setting strips provided: is “HIGH”: ➔ Dip the strip into the water and then ➔ Press the program key P to enter shake it lightly off. programming mode. -
Page 17: Language
... 4. Programming functions 4.6 Language gramming mode to change other func- tion settings or press exit to You can set 14 different languages: leave programming mode. German, English, French, Italian, Dutch, Polish, Russian, Estonian, 4.8 Rinsing setting Czech, Swedish, Danish, Lithuanian, Hungarian and Turkish. -
Page 18: Maintenance And Care
... 4. Programming functions ➔ Press the > key until “PROGRAM remains on power-saving ECO Mode with minimal heat output 3 minutes ECO-MODE” appears. ➔ Press the ok key. The display reads after its last use – therefore using less electricity. -
Page 19: Cleaning Program - Manual Cleaning
... 5. Maintenance and Care replace it in the machine. Caution: Once running, the clean ing ➔ Press the program key P to enter program must not be inter rupted. programming mode. Only add cleaning tablet when the ➔ Press the > key until “PROGRAM machine instructs you to. -
Page 20: Descaling - Manual Descaling
... 5. Maintenance and Care ➔ Press the program key P to enter ➔ Empty the drip tray (fig. 1/Z) and programming mode. replace it in the machine. The display ➔ Press the > key until “SELECT reads “REMOVE TANK”. ➔... -
Page 21: General Cleaning - Cleaning The Brewing Unit
... 5. Maintenance and Care ➔ The system is rinsed out in inter- 5.5 General cleaning vals once more through the steam / Caution: Never submerge the machine hot water jet (fig. 1/T) (about 5 in water. Do not use abrasive materials mins.). -
Page 22: System Messages
... 5. Maintenance and Care ➔ Then extract the brewing unit care- FROM MODEL NICR 750 ONLY: Your fully by the handle (fig. 9). appliance is equipped with moveable ➔ Wash the brewing unit under runn - rear rollers (see image 1/S). This allows ing water and then let it dry. - Page 23 ... 6. System messages ➔ Meaning ➔ What to do Message ➔ Drip tray (fig. 1/Z) ➔ Position water and TRAYS MISSING and used coffee tray used coffee trays (fig. 1/U) are absent correctly or not correctly positioned ➔ Contacts on back of ➔...
-
Page 24: Troubleshooting
7. Troubleshooting ➔ Meaning ➔ What to do Fault ➔ Jet (fig. 1/T) is ➔ Clean jet thoroughly No hot water / steam comes out blocked ➔ The system may have ➔ Please use a large of jet a build-up of limescale dose of descaler (see 5.4) ➔... -
Page 25: Further Instructions
NIVONA machine less often. MilkCooler NICT 500: Standard accessory for the NICR770, optional for all NIVONA fully automatic coffee Cleaning tablets centres with milk NIRT 700 frothing devices: The Your fully auto matic coffee centre... - Page 26 Customer service NIVONA products are designed to meet the highest quality standards. However, if questions do arise while you operate your machine, we would like to hear from you. Your support is...
Need help?
Do you have a question about the NICR7 and is the answer not in the manual?
Questions and answers