Table of Contents
Advertisement
Quick Links
Advertisement
Table of Contents

Related Manuals for Topcon System 350


Summary of Contents for Topcon System 350
- Page 1 System 350 X30 Console Operator’s Manual Spreader Controller www.topconpa.com...
-
Page 3: X30 Spreader Controller
© Copyright Topcon Precision Agriculture August 2012 All contents in this manual are copyrighted by Topcon. All rights reserved. The information contained herein may not be used, accessed, copied, stored, displayed, sold, modified, published or distributed, or otherwise reproduced without express written consent from Topcon. - Page 4 Preface This manual provides information about operating and maintaining this Topcon Precision Agriculture product. Correct use and servicing is important for safe and reliable operation of the product. It is very important that you take the time to read this manual before using the product.
- Page 5 - All information COPYRIGHT contained at the website of TPA or contained in this manual is the any other Topcon Group company or intellectual property of, and in any other advertisements or TPA copyrighted material of TPA. All literature or made by an employee or rights are reserved.
- Page 6 warrants that all valves, hoses, cables WARRANTY DISCLAIMER and mechanical parts manufactured OTHER THAN FOR THE ABOVE by TPA shall be free of defects in WARRANTIES, WARRANTIES materials and workmanship for a PROVIDED IN AN APPLICABLE period of one year from the date of WARRANTY CARD, APPENDIX OR END USER LICENSE purchase.
- Page 7 costs (including attorneys’ fees) publication. TPA reserves the right to make product changes at any time arising from, or relating to (a) your operation use, or maintenance of the without notice. product and/or software other than as If any part of these Terms and provided for in this manual or the Conditions would be unenforceable, applicable end user license...
- Page 8 Communications Regulation Information FCC Compliance Statement (USA) This equipment has been tested and found to comply with the limits for a Class ‘A’ digital device, pursuant to Part 15 of the FCC Rules. Operation of this equipment in a residential area is likely to cause harmful interference in which case the user will be required to correct the interference at the user's expense.
- Page 9 You can check if interference is being caused by this equipment by turning the Topcon equipment off to see if the interference stops. If the equipment is causing interference to a radio or other electronic device, try: ...
- Page 10 General Safety DANGER: It is essential that the following information and the product specific safety information is read and understood. Most incidents arising during operation, maintenance and repair are caused by a failure to observe basic safety rules or precautions. Always be alert to potential hazards and hazardous situations.
- Page 11 Good safety practices not only protect you, but also the people around you. Study this manual as part of your safety program. This safety information only relates to Topcon equipment and does not replace other usual safe work practices. WARNING: In some of the illustrations or photos used in this manual, panels or guards may have been removed for demonstration purposes.
- Page 12 However, it is always advisable not to handle damaged electronic equipment. This Topcon product may contain a sealed lithium battery. Always dispose of any electronic equipment thoughtfully and responsibly.
-
Page 13: Preparation For Operation
Check all controls in an area clear of people and obstacles before starting work. Identify possible hazards. Warning: Topcon equipment must not be used by an operator affected by alcohol or drugs. Seek medical advice if using prescription or over-the-counter X30 Spreader Controller 0-10... - Page 14 Topcon accepts no responsibility or liability for damages to property, personal injuries, or death resulting from the misuse or abuse of any of its products. Further, Topcon accepts no responsibility for the use of Topcon equipment or the GNSS signal for any purpose other than the intended purpose.
-
Page 15: Electrical Safety
X30 Important Safety Information Operator Alertness and Responsibility The X30 helps the operator to steer the vehicle, but the operator remains in charge and must be alert and in complete control of the vehicle at all times. The operator is ultimately responsible for safe operation of this equipment. - Page 16 Away from high voltage power lines or other overhead obstructions (identify any clearance problems before activating the X30) On private property without public access Within cleared fields Off public roads or access ways. Note that: The operator needs to know the vehicle’s position and the field conditions at all times.
- Page 17 The operator must disengage assisted steering and use manual control if an obstacle is in the line of travel or moves into the line of travel, or if the vehicle steers away from the desired wayline. To disengage assisted steering: ...
- Page 18 Be aware of file format compatibility. Discuss compatible formats with the dealer. Topcon Agricultural Products are hardy and designed to work in tough conditions. However, should equipment be unused for a length of time, store away from water and direct heat sources.
-
Page 19: Table Of Contents
Table of Contents Chapter 1 - Introduction ............1-1 Chapter 2 - Implement Setup ..........2-1 2.1 Setting up a New Implement ................2-2 2.2 Connecting to ECUs .................... 2-5 2.3 Setting up the ECU ..................... 2-6 ... -
Page 20: Chapter 1 - Introduction
Chapter 1 - Introduction The X30 Spreader and Auto Section Controller is used with the X30 Guidance and Auto Steering Console. Refer also to the X30 Guidance and Auto Steering Operator's Manual. The X30 Spreader Controller allows better control of the amount of product being applied to a field. -
Page 21: Chapter 2 - Implement Setup
Chapter 2 - Implement Setup This chapter explains how to setup and configure the X30 Console for use with the Spreader Controller features. The Spreader Controller option is only available when the Electronic Control Units (ECUs) have been set up. To return to the screen from operations X30 Main Setup... -
Page 22: Setting Up A New Implement
Chapter 2 - Implement Setup 2.1 Setting up a New Implement 2.1 Setting up a New Implement Follow the steps below to create a new implement. Implement information files can be imported from a USB. Refer to the X30 Guidance and Auto Steering manual. Select Implement and Select New. - Page 23 Chapter 2 - Implement Setup 2.1 Setting up a New Implement You may choose between: Rigid Front Mount Pivoted (Tow behind) Double Pivoted (Tow between). 2. Use the side arrows to choose an Implement Type and Confirm 3.
- Page 24 Chapter 2 - Implement Setup 2.1 Setting up a New Implement 4. Select Implement Name if you wish to name your implement. 5. Enter the name and Confirm 6. Confirm the new implement details to continue. X30 Spreader Controller...
-
Page 25: Connecting To Ecus
Chapter 2 - Implement Setup 2.2 Connecting to ECUs 2.2 Connecting to ECUs ECUs should be connected to the CAN2 connector on the console’s termination harness. Start with all ECUs disconnected from the CAN line and confirm that the harness is connected to the console. -
Page 26: Setting Up The Ecu
Chapter 2 - Implement Setup 2.3 Setting up the ECU 2.3 Setting up the ECU This will involve configuring ECU type, control function and bin. The number of ECUs depends on the number of bins, belts and spinners in your setup. Setup for the ECU will begin automatically as part of creating a new implement. - Page 27 Note that the Spreader Controller interface described in Chapters 3 and 4 of this manual is only used to control spreaders equipped with the Topcon ASC-10 ECUs. If ISOBUS ECU is chosen, functionality will depend on the ISOBUS unit connected. The ISOBUS ECU can be operated through the Virtual Terminal feature of the X30 software.
- Page 28 Chapter 2 - Implement Setup 2.3 Setting up the ECU 5. Select Implement Function. 6. Choose Spreader, Confirm and select Next. 7. Select the type of Spreader, Confirm and select Next. X30 Spreader Controller...
- Page 29 Chapter 2 - Implement Setup 2.3 Setting up the ECU The choice of Actuator controlled or Belt Driven spreader will affect the options offered and the number of steps shown on the screens. Follow the screen prompts. 8. Select Number of Spinners. Use plus or minus to choose the number of spinners, Confirm and select Next.
- Page 30 Chapter 2 - Implement Setup 2.3 Setting up the ECU 9a. Select Number of Spinner Controllers. Use plus or minus to enter the number of spinner controllers, Confirm and select Next. 9b. Select Number of Spinner Monitors, and use plus or minus to enter the number, Confirm and select Next.
- Page 31 Chapter 2 - Implement Setup 2.3 Setting up the ECU 11. Use plus or minus to enter the number of bins and Confirm. 11a. For belt driven spreaders, select Split Belt, if required. 11b. Choose Yes or No and Confirm. 12.
- Page 32 Chapter 2 - Implement Setup 2.3 Setting up the ECU 14. Select Click to Detect to begin detecting ECU. Each ECU will need to be connected and then detected one at a time. 15. For bins, select Bin Name to change the default name. 16.
-
Page 33: Setting Up Implement Geometry
Chapter 2 - Implement Setup 2.4 Setting up Implement Geometry 2.4 Setting up Implement Geometry Follow these steps to configure the implement geometry. 1. From the menu, select Geometry. 2. Select a measurement. The type of measurement will appear in the Title Bar. ... - Page 34 Chapter 2 - Implement Setup 2.4 Setting up Implement Geometry 3. Enter the measurement and Confirm. 4. Repeat for each measurement. X30 Spreader Controller 2-14...
-
Page 35: Setting Up Section Control
Chapter 2 - Implement Setup 2.5 Setting up Section Control 2.5 Setting up Section Control Follow these steps to set up Section Control for the implement. 2.5.1 Setting On Time and Off Time 1. Select Section Control and select Timing. 2. - Page 36 Chapter 2 - Implement Setup 2.5 Setting up Section Control 4. Repeat for Off Time and Confirm. This will set how many seconds delay there is between switching a section off and stopping product flow. X30 Spreader Controller 2-16...
-
Page 37: Setting Up The Switch Box
Chapter 2 - Implement Setup 2.5 Setting up Section Control 2.5.2 Setting up the Switch Box The Master Switch can be either Virtual (on the X30 screen) or External (a physical Master Switch connected to the ASC- 10 ECU). Type of switch box cannot be selected with spreaders as the spinners’... -
Page 38: Enabling Auto Section Control
Chapter 2 - Implement Setup 2.6 Enabling Auto Section Control 2.6 Enabling Auto Section Control Auto Section Control needs to be enabled to use the feature during operations. If this has not been done earlier, return to screen from operations screens, by X30 Main Setup selecting 1. - Page 39 Chapter 2 - Implement Setup 2.6 Enabling Auto Section Control 4. Choose Enabled and Confirm (or choose Disabled and Confirm to turn the feature off). X30 Spreader Controller 2-19...
-
Page 40: Chapter 3 - Spreader Controller Setup
Chapter 3 - Spreader Controller Setup The X30 Spreader Controller allows the operator to manage the amount of product being applied. Through the controller bins, spinners and rates can be set and then adjusted as needed during work in a field. To do this the system needs information about the type of spreader that is being used and how the operator wants it to work. -
Page 41: Setting Up Spreader Controller
Chapter 3 - Spreader Controller Setup 3.1 Setting up Spreader Controller 3.1 Setting up Spreader Controller Follow the steps to set up Spreader Controller bin requirements. 1. Select Spreader and select Bin. 2. Select Name. 3. Enter a name and Confirm. 4. - Page 42 Chapter 3 - Spreader Controller Setup 3.1 Setting up Spreader Controller 5. Enter the bin capacity and Confirm. X30 Spreader Controller...
-
Page 43: Setting Up Actuator
Chapter 3 - Spreader Controller Setup 3.2 Setting up Actuator 3.2 Setting up Actuator The Actuator manages the flow and timing of the product. If the implement uses a belt drive, go to Section 3.3 Setting up Control Valve (Proportional) or Section 3.4 Setting Control Valve (Regulator). - Page 44 Chapter 3 - Spreader Controller Setup 3.2 Setting up Actuator 3. Select Enabled and Confirm. 4. In some cases the actuator may have been wired to work in the opposite direction. 4a. To allow the actuator to work in reverse, select Reverse Actuator.
- Page 45 Chapter 3 - Spreader Controller Setup 3.2 Setting up Actuator 6. Choose response time and Confirm. 7. Select Maximum On Time. This sets the maximum time to apply power to move the actuator to position. 8. Choose maximum time and Confirm. 9.
- Page 46 Chapter 3 - Spreader Controller Setup 3.2 Setting up Actuator target rate and take time to adjust, searching for the right level. Find the best gain percentage for the equipment being used. 10. Choose setting and Confirm. 11. To change the percentage of time for the Pulse Width Modulation (PWM) to be active, select PWM Setting.
- Page 47 Chapter 3 - Spreader Controller Setup 3.2 Setting up Actuator 12. Choose the desired percentage and Confirm. Go to Section 3.5 Setting up Spinners. X30 Spreader Controller...
-
Page 48: Setting Up Control Valve (Proportional)
Chapter 3 - Spreader Controller Setup 3.3 Setting up Control Valve (Proportional) 3.3 Setting up Control Valve (Proportional) The Bin Control Valve manages the flow and timing of the product. If the implement uses an Actuator, refer to Section 3.2 Setting up Actuator. These settings aim to ensure that the spreader is operating at an efficient flow rate. - Page 49 Chapter 3 - Spreader Controller Setup 3.3 Setting up Control Valve (Proportional) 1c. Choose Proportional and Confirm. 2. Select Controller Response. This will set how quickly the spreader will respond to adjustment. If set too high, the spreader may pass the target rate and take time to adjust, searching for the right level.
- Page 50 Chapter 3 - Spreader Controller Setup 3.3 Setting up Control Valve (Proportional) 4. To enable dither, select Add Dither. Dither makes the valve vibrate slightly to help prevent sticking. Do not use this feature with Sauer Danfoss PWM Valves. 5. Choose Enabled and Confirm. 6.
- Page 51 Chapter 3 - Spreader Controller Setup 3.3 Setting up Control Valve (Proportional) 7. Choose percentage and Confirm. 8. Repeat for Maximum PWM. This is the maximum amount of power that can be applied that will increase the valve speed. Anything over this figure and the valve speed will not increase.
- Page 52 Chapter 3 - Spreader Controller Setup 3.3 Setting up Control Valve (Proportional) 11. To allow gradual increase in the valve signal when the valve is activated, select Soft Start. 12. Choose Enabled and Confirm. 13. To allow gradual decrease in the valve signal when the valve is de-activated, select Soft Stop, choose Enabled and Confirm.
-
Page 53: Setting Up Bin Control Valve (Regulator)
Chapter 3 - Spreader Controller Setup 3.4 Setting up Control Valve (Regulator) 3.4 Setting up Control Valve (Regulator) The Bin Control Valve manages the flow and timing of the product. These settings aim to ensure that the spreader is operating at an efficient flow rate. If the implement uses an Actuator, refer to Section 3.2 Setting up Actuator. - Page 54 Chapter 3 - Spreader Controller Setup 3.4 Setting up Control Valve (Regulator) 3. Choose Regulator and Confirm. 4. Select Valve Speed. The valve speed selected will depend on the regulator valve fitted to the machine and how fast this valve can operate. 5.
- Page 55 Chapter 3 - Spreader Controller Setup 3.4 Setting up Control Valve (Regulator) 6. To close the valve when the spreader or bin is not in use, Select Close Valve When Off. 7. Choose Enabled and Confirm. 8. In some cases the valve in a bin may have been wired to work in the opposite direction.
- Page 56 Chapter 3 - Spreader Controller Setup 3.4 Setting up Control Valve (Regulator) 10. Select Minimum On Time. This sets the minimum time to apply power to start the actuator moving. 11. Set minimum time and Confirm. 12. Repeat for Maximum On Time if necessary. This sets the maximum time to apply power to move the actuator to position.
- Page 57 Chapter 3 - Spreader Controller Setup 3.4 Setting up Control Valve (Regulator) level. Find the best gain percentage for the equipment being used. 14. Choose the setting and Confirm. 15. To change the minimum percentage of time for the Pulse Width Modulation (PWM) to be active, select PWM Setting.
-
Page 58: Setting Up Spinners
Chapter 3 - Spreader Controller Setup 3.5 Setting up Spinners 3.5 Setting up Spinners Follow the steps to set up spinners. 1. Select Implement, Spreader and Spinner. 2. To set the number of pulses recognized with each revolution of the spinners, select Pulses/Revolution. 3. - Page 59 Chapter 3 - Spreader Controller Setup 3.5 Setting up Spinners 4. To set the minimum speed for spinners for auto control, select Minimum RPM. 5. Enter the minimum RPM and Confirm. 6. To set the size of incremental changes in spinner speed, select Speed Increment.
- Page 60 Chapter 3 - Spreader Controller Setup 3.5 Setting up Spinners 8. To link the operation of individual spinners to the Spreader Master Switch, select Master Switch. 9. Choose Spinners Track Master (Master Switch will turn spinners on and off) or Spinners Ignore Master and Confirm.
- Page 61 Chapter 3 - Spreader Controller Setup 3.5 Setting up Spinners 10. To set the vehicle’s low speed that will turn off the spinners automatically, select Low Speed Shutoff. 11. Enter the shutoff speed and Confirm. X30 Spreader Controller 3-22...
-
Page 62: Setting Spinner Control Valves
Chapter 3 - Spreader Controller Setup 3.6 Setting up Spinner Control Valves 3.6 Setting up Spinner Control Valves Follow the steps to set up spinner control valves. 1. Select Spinner Control Valve. 2. To enable or disable valve dither, select Add Dither. Dither makes the valve vibrate slightly to help prevent sticking. - Page 63 Chapter 3 - Spreader Controller Setup 3.6 Setting up Spinner Control Valves 4. To set the minimum PWM (usually approximately 25%), select Minimum PWM. Minimum PWM is the minimum amount of power required to allow the valve to respond. Anything under this figure the valve will not respond. 5.
- Page 64 Chapter 3 - Spreader Controller Setup 3.6 Setting up Spinner Control Valves 7. Select Controller Response. This will set how quickly the spreader will try to achieve the required spinner speed. If set too high, the spreader may pass the target speed and take time to adjust, searching for the right level.
- Page 65 Chapter 3 - Spreader Controller Setup 3.6 Setting up Spinner Control Valves 10. Choose frequency (high is faster and low is slower) and Confirm. 11. To allow gradual increase in the valve power when the valve is activated, select Soft Start. 12.
-
Page 66: Setting Up The Wheel Sensor
Chapter 3 - Spreader Controller Setup 3.7 Setting up Wheel Sensor 3.7 Setting up Wheel Sensor Follow the steps to set up the Wheel Sensor. 1. Select Wheel Sensor. 2. Select Wheel Factor. This sets how many meters per pulse so that the wheel sensor can measure distances. 3. -
Page 67: Setting Alarms
Chapter 3 - Spreader Controller Setup 3.8 Setting Alarms 3.8 Setting Alarms Follow the steps to set up the Alarms. The alarm can be enabled for all alarms or individual alarms. Use the All Spreader Alarms option to universally enable or disable all Spreader alarms. - Page 68 Chapter 3 - Spreader Controller Setup 3.8 Setting Alarms 4. Choose Enabled (or Disabled) and Confirm. 5. Select Incorrect Rate. This alarm will sound and display if the detected actual rate is different from the preset rate by the threshold amount. Select Threshold. 6.
- Page 69 Chapter 3 - Spreader Controller Setup 3.8 Setting Alarms 7. Select Spinner RPM Diff. This alarm will sound and display if the detected spinners’ rates differ from each other by a set amount. Select Threshold Type and Confirm. 8. Select Threshold, enter the threshold value and Confirm. 9.
- Page 70 Chapter 3 - Spreader Controller Setup 3.8 Setting Alarms 11. Use the scroll bar to see other alarms. 12. If using a belt driven spreader, select Conveyor Speed High. This alarm will sound and display if the speed of the conveyor belt is greater than the threshold. This alarm is only offered for belt driven spreaders.
-
Page 71: Chapter 4 - Operations
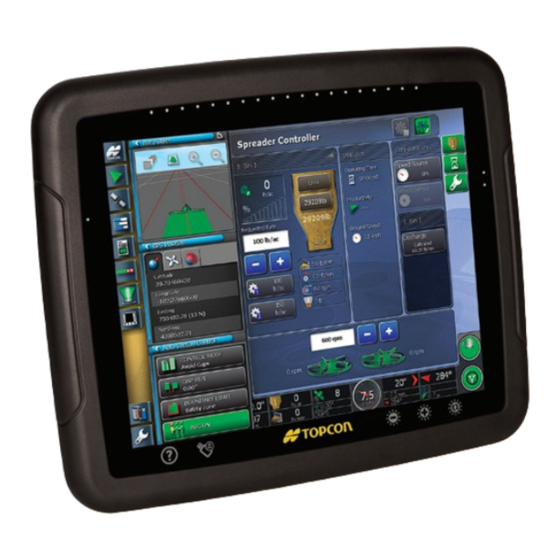
Chapter 4 - Operations Once setup is complete, the Auto Section Control enabled) and icons appear on the Spreader Controller and Spreader Controller information is Navigation Bar added to the Dashboard. The Spreader Master Switch appears in the lower right corner. Auto Section Control and Spreader Controller icons Spreader Dashboard Spreader Master Switch... -
Page 72: Using The Spreader Dashboard
Chapter 4 - Operations 4.1 Using the Spreader Dashboard 4.1 Using the Spreader Dashboard Spreader information is added to the Dashboard. The example below shows the default display for a split bin spreader. Spreader Dashboard 1. Select any part of the dashboard to customize the information it displays. - Page 73 Chapter 4 - Operations 4.1 Using the Spreader Dashboard 4. Choose the information to appear and Confirm. 5. Monitor information. This displays spinner information and spreading width. This displays bin and rate information for a single split bin. If two bins are used, the panel will show Tanks 1 and 2.
-
Page 74: Opening Auto Section Control
Chapter 4 - Operations 4.2 Opening Auto Section Control 4.2 Opening Auto Section Control Auto Section Control 1. Select Auto Section Control. Use the mini-view to adjust control mode, gaps, boundary limits and turn Auto Section Control on/off. X30 Spreader Controller... - Page 75 Chapter 4 - Operations 4.2 Opening Auto Section Control 2. Select Control Mode to avoid overlap or avoid gaps. If Avoid Gaps is chosen, some overlap of application is likely near boundaries. If Avoid Overlap is chosen, there may be some spaces where product is not applied. 3.
- Page 76 Chapter 4 - Operations 4.2 Opening Auto Section Control 7. Choose the preferred boundary limit and Confirm. X30 Spreader Controller...
-
Page 77: Opening Spreader Controller
Chapter 4 - Operations 4.3 Opening Spreader Controller 4.3 Opening Spreader Controller The Spreader Controller interface can appear either in a mini- view or in full screen. When the is in Spreader Controller full screen, the can appear as a mini-view, so Guidance Map that the operator can still monitor guidance. - Page 78 Chapter 4 - Operations 4.3 Opening Spreader Controller To open the Spreader Controller to full screen, touch anywhere in the mini-view and slide towards the full screen, or use Maximize (top right). full screen interface shows a Spreader Controller number of Panels. If desired, select Spreader Controller again to display full screen and a mini-view of the Spreader Controller at the same time.
-
Page 79: Choosing / Changing Bins And Rates
Chapter 4 - Operations 4.4 Choosing / Changing Bins and Rates 4.4 Choosing / Changing Bins and Rates Bin Panel Bin Icons 1. Select Bin icons on the to open the Spreader Tool Bar panel for the bin being used. Use the arrow (top right) to expand and show product information. -
Page 80: Choosing / Changing A Product And Rate
Chapter 4 - Operations 4.5 Choosing / Changing a Product and Rate 4.5 Choosing / Changing a Product and Rate Bin On/Off 1. Select Bin On/Off to allow the bin to operate. 2. To choose or change the product being used, select Select Product. - Page 81 Chapter 4 - Operations 4.5 Choosing / Changing a Product and Rate 3b. Choose Create New and Confirm. 3c. Enter a name for the new product and Confirm. Actuator Driven Belt Driven 4. To allow the system to calculate the rate accurately, select and enter values to use in calculations.
- Page 82 Chapter 4 - Operations 4.5 Choosing / Changing a Product and Rate 5. To set the rate increment for changes to the rate, select Rate Increment. This is the amount that the rate will change when the plus and minus symbols are used. 6.
- Page 83 Chapter 4 - Operations 4.5 Choosing / Changing a Product and Rate 7. Select Rate Preset 1, enter the rate and Confirm. 8. Repeat for Rate Preset 2. Confirm to return to Spreader Controller Panel. 9. Select Tank Fill and Volume. Enter the amount of product in the bin and Confirm.
- Page 84 Chapter 4 - Operations 4.5 Choosing / Changing a Product and Rate 11. Enter the increment and Confirm. 12. To change Requested Rate during operations, select Preset Rate 1 or 2. 13. Use plus or minus to set or change the rate. 14.
- Page 85 Chapter 4 - Operations 4.5 Choosing / Changing a Product and Rate Belt Driven: Discharge Rate Belt Speed Belt RPM Volume Used X30 Spreader Controller 4-15...
-
Page 86: Monitoring Statistics
Chapter 4 - Operations 4.6 Monitoring Statistics 4.6 Monitoring Statistics The following panel allows the operator to monitor information during a job. Statistics Icon 1. Select on the Statistics Spreader Toolbar. Time Spent on the Job Current Productivity Current Ground Speed X30 Spreader Controller 4-16... -
Page 87: Choosing And Changing Sub Areas
Chapter 4 - Operations 4.7 Choosing and Changing Sub Areas 4.7 Choosing and Changing Sub Areas Sub Area Icon 1. Select on the to open the Sub Area Spreader Toolbar Panel. The top section of the panel can set sub Sub Area areas for the job so that information on those sub areas can be recorded. - Page 88 Chapter 4 - Operations 4.7 Choosing and Changing Sub Areas 3. Use the blue arrows to view other sub areas. Note that the system will continue to record information on the active sub area. 4. Use the green arrows to choose between tanks. 5.
-
Page 89: Configuring And Calibrating
Chapter 4 - Operations 4.8 Configuring and Calibrating 4.8 Configuring and Calibrating Configuration Icon 1. Select from the Configuration Spreader Toolbar open the Calibration Panel. 2. Select Speed Source to set how the system will measure speed, (GPS, wheel sensor or remote). This will be used to calculate application rates. - Page 90 Chapter 4 - Operations 4.8 Configuring and Calibrating 3. Choose the source and Confirm. 4. If Wheel Sensor has been chosen, select Wheel Sensor to calibrate the wheel sensor. Follow the prompts. 5. If an Actuator is being used, select Actuator to calibrate the actuator.
-
Page 91: Managing The Spinners
Chapter 4 - Operations 4.9 Managing the Spinners 4.9 Managing the Spinners If only one spinner controller is setup, the following Spinner will appear. Panel If two spinners and controllers are set up the following will display. Spinner Panel Spinner Lock Spinner On/Off Switches 1. -
Page 92: Using The Master Switch
Chapter 4 - Operations 4.10 Using the Master Switch 4.10 Using the Master Switch When Virtual Master has been chosen in the setup options, turns the spreader system on Spreader Master Switch from the X30 Console. This switch does not work if External ECU Sense was chosen during setup. -
Page 93: Using Map Views And Layers
Chapter 4 - Operations 4.11 Using Map Views and Layers 4.11 Using Map Views and Layers Map Layer and Map View Icons 1. Select to choose which coverage will appear on the screen. X30 Spreader Controller 4-23... - Page 94 Chapter 4 - Operations 4.11 Using Map Views and Layers Coverage shows in Green Application rate shows in Blue. If working with Variable Rate Control, variable application rate shows in shades of Blue. Legend displays for rate. 2. Select to choose which information layers will appear.
- Page 95 Chapter 4 - Operations 4.11 Using Map Views and Layers 3. Select to toggle views the map (north up, heads up or perspective) North Up View places North at the top of the screen. Heads Up View places vehicle with its current direction at the top of the screen.
- Page 96 Chapter 4 - Operations 4.11 Using Map Views and Layers Perspective View places map into perspective with the implement at bottom of screen. X30 Spreader Controller 4-26...
-
Page 97: Chapter 5 - Variable Rate Control
Chapter 5 - Variable Rate Control In order to use Variable Rate Control (VRC) on a job, the VRC prescription map must be set up in the X30 Console. Variable Rate Control must be enabled in setup. If this has not been enabled, go to the Menu, select System Main Setup... -
Page 98: Loading Vrc Map Files
Chapter 5 - Variable Rate Control 5.1 Loading VRC Map Files 5.1 Loading VRC Map Files Configure VRC for this Job Icon 1. Select the from the toolbar on the right of the Job Menu screen and select Configure VRC for this job. 2. - Page 99 Chapter 5 - Variable Rate Control 5.1 Loading VRC Map Files 3. Select the file format of the VRC map file and select Next. 4. Locate and choose the VRC map file and select Next. X30 Spreader Controller...
- Page 100 Chapter 5 - Variable Rate Control 5.1 Loading VRC Map Files 5. Select Choose File Name next to the channel for Bin 1. 6. Choose the file and Confirm. X30 Spreader Controller...
- Page 101 Chapter 5 - Variable Rate Control 5.1 Loading VRC Map Files 7. Under Attribute, select Select from List. 8. Choose the product type and Confirm. 9. Select Units if needed. X30 Spreader Controller...
- Page 102 Chapter 5 - Variable Rate Control 5.1 Loading VRC Map Files 10. Select Choose File Name next to the channel for the next bin and repeat steps 5 to 9. 11. Check your settings are correct and then select Next. 12.
- Page 103 Chapter 5 - Variable Rate Control 5.1 Loading VRC Map Files 13. The VRC map will appear on the screen. If the map does not appear, check that the console location and the chosen map location match. X30 Spreader Controller...
-
Page 104: Using Variable Rate Control
Chapter 5 - Variable Rate Control 5.2 Using Variable Rate Control 5.2 Using Variable Rate Control Auto Control and Variable Rate Control Icons 1. Use the to select Spreading Modes Toolbar Variable Rate Control or Auto Rate Control Variable Rate Control is only available if Variable Rate Control has been enabled and VRC maps have been loaded. - Page 105 Chapter 5 - Variable Rate Control 5.2 Using Variable Rate Control 3. Select Variable Rate Control and choose Enabled. Confirm. 4. Return to the and VRC Spreading Operations Screen Mode can now be selected. X30 Spreader Controller...
-
Page 106: Downloading Vrc Map Files With Agjunction
Chapter 5 - Variable Rate Control 5.3 Downloading VRC Map Files with AgJunction 5.3 Downloading VRC Map Files with AgJunction If AgJunction creates the VRC map files, the X30 console can now download files from the website using a Link ID and login. - Page 107 Chapter 5 - Variable Rate Control 5.3 Downloading VRC Map Files with AgJunction AgJunction Icon 4. Select the AgJunction icon to open a mini-view. 5. Select Login and enter the appropriate user name and password and Confirm. Login/out can be done manually. X30 Spreader Controller 5-11...
- Page 108 Chapter 5 - Variable Rate Control 5.3 Downloading VRC Map Files with AgJunction 6. To choose a different location from the list, select Location List, choose the location and Confirm. If this feature is enabled, the system will login automatically each time the console is started. This system will automatically check for new downloads.
- Page 109 Appendix – Start up Checklist Read safety information. Drive to the working area. Turn the X30 Console on. Select vehicle and implement, if necessary. System may restart. Have the necessary system features been enabled? Has the field been selected? ...
- Page 110 Select Spreader Master Switch to begin. Monitor displays and any alarm warnings. X30 Spreader Controller...
- Page 112 Phone: 913-928-2630 Topcon Precision Agriculture Avenida de la Industria 35 Tres Cantos 28760, Spain Phone : +34-91-804-92-31 Fax : +34-91-803-14-15 Topcon Positioning Systems, Inc. 7400 National Drive, Livermore CA 94551 USA Phone: 925-245-8300 Fax: 925-245-8599 Topcon Corporation 75-1 Hasunuma-cho, Itabashi-ku...
Need help?
Do you have a question about the System 350 and is the answer not in the manual?
Questions and answers