Marco Qwikbrew 2 Twin Service Manual
Twin boiler-brewer
Hide thumbs
Also See for Qwikbrew 2 Twin:
- Instructions for use manual (9 pages) ,
- Service manual (37 pages) ,
- Service manual (26 pages)
Table of Contents
Troubleshooting

Related Manuals for Marco Qwikbrew 2 Twin


Summary of Contents for Marco Qwikbrew 2 Twin
- Page 1 QWIKBREW 2 TWIN BOILER-BREWER SERVICE MANUAL Ireland Tel: (01) 295 2674 Marco Beverage Systems Ltd. Ireland Fax: (01) 295 3715 63d Heather Road, Sandyford Industrial Estate, Dublin 18, UK Tel: (0207) 274 4577 Republic of Ireland UK Fax: (0207) 978 8141...
-
Page 2: Table Of Contents
Operation – Heat Fill Mode 4.7. Operation – Continuous Fill Mode 4.8. Troubleshooting – Diagnostic guide 4.9. Level Probes 4.10. Elements 4.11. Descaling procedure 4.12. Wiring Diagram 4.13. Spare Parts List Service Manual 1000495 QWIKBREW 2 TWIN 01-10-12 Page 2 of 28... -
Page 3: Introduction
1. INTRODUCTION: The information provided in this manual is intended to assist in the installation and maintenance of the Marco Qwikbrew 2 Twin Boiler Brewer. Please read the instructions carefully to prevent accidents and ensure an efficient installation. This manual is not a substitute for any safety instructions or technical data affixed to the machine or its packaging. -
Page 4: Safety Instructions
Allow to cool before removing components. The use of spares and accessories not recommended by Marco may cause damage and/or injuries. Do not use outdoors. Do not place on or near a hot gas or electric burner. -
Page 5: Basic Instructions
Plumbing installation procedure: Note: Marco recommend that this machine be positioned on a counter with a drainage facility. Marco cannot be held responsible for any flood damages. Mains water pressure required (limits): 5-50psi (35-345kPa) ... -
Page 6: Operation
3.2. OPERATION: The Marco Qwikbrew 2 Twin uses the ‘Continous fill cycle’ as standard. Continuous Fill Mode: Water will be taken in until the machine is full. The heating begins when the quantity of water is at a safe level above the elements and stops when the machine is full and up to temperature. -
Page 7: Hot Water
3.6. TROUBLESHOOTIN G: The Marco Qwikbrew 2 Twin uses an electronic diagnostic system to help determine faults. If an error is detected a sequence of flashes is displayed through the POWER light. This sequence is repeated (cycled) until: 1) The problem is rectified by an service agent, or 2) In the case of the 6 flash cycle –... -
Page 8: Maintenance
Marco suggest that the machine be descaled every 3 months if the unit is in a hard water area. In soft water environments every 6 months should suffice. -
Page 9: Technical Data
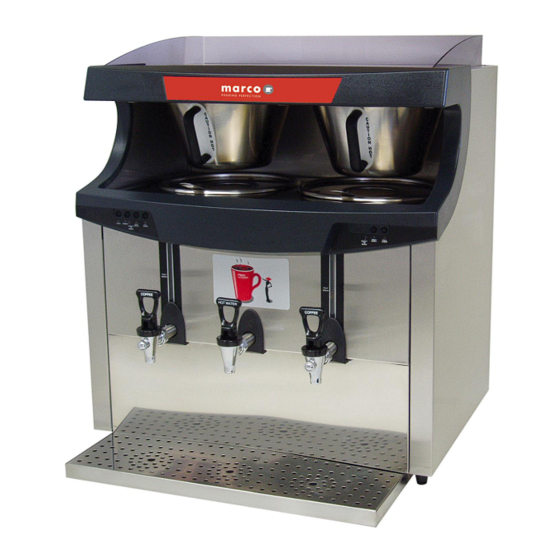
4.Technical Data: 4.1. GENERAL DESCRIPTION: QWIKBREW 2 TWIN – 5.6 kW (STANDARD) Electrical Connection 5.6kW,230Vac c/w 1.5m flex Plumbing Fittings 0.75” BSP Pressure Food grade inlet hose supplied 5-50 psi (35-345 kPa) Dimensions Height 695mm Height incl. Cup Rail 745mm... - Page 10 Immediate Draw Off: Heat Fill Mode: Up to 22.5 litres (40 pints)when full. Continuous Fill Mode: 6 litres (10.5 pints) recommended max. 80 litres/hr (141 pints/hr) Total Recovery rate at 8.4kW: Service Manual 1000495 QWIKBREW 2 TWIN 01-10-12 Page 10 of 28...
-
Page 11: External Arrangement
(13 right). Slide the front panel down. Lever the top of the front panel away from the plastics. Lift the Front Panel away. All the internal components are now accessible. Service Manual 1000495 QWIKBREW 2 TWIN 01-10-12 Page 11 of 28... -
Page 12: Internal Arrangement
Inlet Solenoid Valve – (1502170) Mains Cable Right Brew Pump – (1501540) Left Brew Pump – (1501540) Top Tray (Brew) Overflow pipe PCB Brewer Display Right- 1600324 Low,Brew and High Level Probe Assembly Service Manual 1000495 QWIKBREW 2 TWIN 01-10-12 Page 12 of 28... -
Page 13: Pcbs
4.5. PCBs: 4.5.1. PCB Layout: INTERNAL PCB LAYOUT: PCB Brew Board (Twin 2004) (Marco part no. 1600326) Controls the heater switching Switches one element only (daughter PCBs switch the other elements) Controls the water inlet switching Controls tank temperature/temperature adjustment ... -
Page 14: Pcb Brewer 2004 - 1600326
The default position is no jumper or jumper away from the transformer side. The default mode is CONTINUOUS FILL. To change the mode to HEAT-FILL move the jumper so that the two pins nearest the transformer are connected (as shown in picture above). Service Manual 1000495 QWIKBREW 2 TWIN 01-10-12 Page 14 of 28... -
Page 15: Pcb Dual Timer - 1600323
21. Relay – Inlet Solenoid Switches the inlet solenoid 22. Fuse 23. Neutral Mains tab (high voltage) 24. Neutral Mains tab – spare (high voltage) 4.5.3. PCB Dual Timer (1600323): Service Manual 1000495 QWIKBREW 2 TWIN 01-10-12 Page 15 of 28... - Page 16 Connector for Right Display PCB – left ribbon cable Connector for Left Display PCB – right ribbon cable Connector for Left Display PCB – middle ribbon cable Connector for Left Display PCB – left ribbon cable Service Manual 1000495 QWIKBREW 2 TWIN 01-10-12 Page 16 of 28...
-
Page 17: Pcb Daughter - 1600317
Live Tab - connects to mains live 2. 4way Connector J2 connects to another Daughter PCB if another one used (only one Daughter PCB on 5.6Kw Qwikbrew 2 Twin) 4way Connector J1 connects Daughter PCB to Brewer PCB ... -
Page 18: Operation - Heat Fill Mode
The machine naturally gives priority to the coffee. The machine will effectively run out of hot water (no water will be available out of the hot water tap), but brews will still be finished. Service Manual 1000495 QWIKBREW 2 TWIN 01-10-12 Page 18 of 28... -
Page 19: Operation - Continuous Fill Mode
– BUT - if a large amount of hot water is used at the same time, brew temperatures can be affected, because cold mains water replaces the hot water used immediately. Service Manual 1000495 QWIKBREW 2 TWIN 01-10-12 Page 19 of 28... -
Page 20: Troubleshooting - Diagnostic Guide
4.8. TROUBLESHOOTING – DIAGNOSTIC GUIDE: The Marco Qwikbrew 2 Twin uses an electronic diagnostic system to help determine faults. If an error is detected a sequence of flashes is displayed through the POWER light – shown in the picture below. -
Page 21: Level Probes
The level probes provide much of the control inputs into the PCB and are critical to the operation of the machine. The wiring to these should be checked regularly and the probes themselves should be cleaned whenever the machine is serviced. Service Manual 1000495 QWIKBREW 2 TWIN 01-10-12 Page 21 of 28... -
Page 22: Elements
There are 3 level probes on the Qwikbrew 2 Twin. Low Level Probe High Level Probe Brew Level Probe All the probes are mounted on one assembly on the top right side of the tank. The pictures below show how to remove this assembly: The Level Probe assembly is shown in the picture. -
Page 23: Descaling Procedure
Attempt to remove as much scale as possible by hand, through the clean out door (see below). Note: ensure that internal components are protected if a hose is going to be used to flush the tank. Service Manual 1000495 QWIKBREW 2 TWIN 01-10-12 Page 23 of 28... - Page 24 Remove the cup rail and lid of the machine.Add a descale solution to the tank through the large sprayhead hose (shown below). This runs directly into the top of the tank. Wait 20 minutes before draining and flushing the tank again. Service Manual 1000495 QWIKBREW 2 TWIN 01-10-12 Page 24 of 28...
-
Page 25: Wiring Diagram
4.13. Wiring Diagram Service Manual 1000495 QWIKBREW 2 TWIN 01-10-12 Page 25 of 28... - Page 26 Service Manual 1000495 QWIKBREW 2 TWIN 01-10-12 Page 26 of 28...
- Page 27 Service Manual 1000495 QWIKBREW 2 TWIN 01-10-12 Page 27 of 28...
-
Page 28: Spare Parts List
Plastic Rose (around Tap) 1801570 Plastic Fascia MB2T 2300085 Basket Complete MB2 2300350 Urn Lid Complete 2300175 Drip Tray Complete Qwikbrew 2 Twin 8000240 Urn Cleanser (800g Tub) 1801511 Cup Rail Acrylic Service Manual 1000495 QWIKBREW 2 TWIN 01-10-12 Page 28 of 28...
Need help?
Do you have a question about the Qwikbrew 2 Twin and is the answer not in the manual?
Questions and answers