Table of Contents
Advertisement
Quick Links
Advertisement
Table of Contents

Related Manuals for GBC ORCA III


Summary of Contents for GBC ORCA III
- Page 1 ORCA III/ ORCA III T OPERATION & MAINTENANCE MANUAL © February 2001 GBC Films Group Do not duplicate without written permission. GBC Pro - Tech 4151 Anderson Road DeForest, WI 53532 Revision : Ph: ( 608 ) 246 - 8844...
- Page 2 The information in this publication is provided for reference and is believed to be accu- rate and complete. GBC Films Group is not liable for errors in this publication or for incidental or consequential damage in connection with the furnishing or use of the information in this publication, including, but not limited to, any implied warranty of fitness or merchantability for any particular use.
- Page 3 Read me file Orca III/ Orca III T Operation and Maintenance Manual This page intentionally left blank. © GBC Films Group February 2001...
- Page 4 From : Company : Address : Phone number : ( Fax number : ( Re : Orca III/ Orca III T Operations and Maintenance Manual ( 930062 ) Section #: Page #: Correction (s): Additional comments: © GBC Films Group February 2001...
- Page 5 Read me file Orca III/ Orca III T Operation and Maintenance Manual This page intentionally left blank. © GBC Films Group February 2001...
-
Page 6: Table Of Contents
Orca III/ Orca III T Operation and Maintenance Manual Table of Contents Table of Contents Section 1.0 Safety 1.1 Symbols ......................1 - 1 1.2 Pneumatic safety ..................1 - 2 1.3 Safety features ....................1 - 2 1.4 Mechanical safety ..................1 - 4 1.5 Heating safety .....................1 - 4... - Page 7 Table of Contents Orca III/ Orca III T Operation and Maintenance Manual Section 3.0 Specifications 3.1 General .......................3 -1 3.2 Consumables....................3 - 2 3.3 Function ......................3 - 3 3.4 Electrical ....................3 - 4 3.5 Dimensions ....................3 - 5 Section 4.0 Installation 4.1 Pre-installation check list ................4 - 1...
- Page 8 Orca III/ Orca III T Operation and Maintenance Manual Table of Contents 4.11 Unwind/ rewind brake ................4 - 14 4.12 Slitter assemblies ..................4 - 15 4.13 Calibrations .....................4 - 16 Section 5.0 Operations 5.1 Power ON/ OFF ..................5 - 1 5.2 Front control panel ..................5 - 2...
- Page 9 Table of Contents Orca III/ Orca III T Operation and Maintenance Manual Section 6.0 Applications 6.1 Temperature chart ..................6 - 1 6.2 Helpful hints ....................6 - 2 6.3 Temp conversion chart ................6 - 3 Figure 6.3.1 Temperature conversion chart .........6 - 4 6.4 Charts and diagrams .................6 - 5...
- Page 10 Orca III/ Orca III T Operation and Maintenance Manual Table of Contents Diagram - 6 ....................6 - 19 Chart - 7 ( Thermal encapsulation ) ............6 - 20 Diagram - 7 ....................6 - 21 Chart - 8 ( Roll to roll thermal encapsulation ) ........6 - 22 Diagram - 8 ....................6 - 23...
- Page 11 Table of Contents Orca III/ Orca III T Operation and Maintenance Manual Section 7.0 Troubleshooting 7.1 Wave problems ..................7 - 1 7.2 Film problems .....................7 - 3 7.2.1 Thermal laminates ................7 - 3 7.2.2 Pressure sensitive .................7 - 3 7.3 Machine problems ..................7 - 4 7.4 Glossary ......................7 - 5...
-
Page 12: Section 1.0 Safety
Orca III/ Orca III T Operation and Maintenance Manual Safety 1.0 Safety CAUTION Indicates a potentially hazardous situation which, if not avoided, could result in minor C A U T IO N or moderate injury, or alerts against unsafe practices or alerts against actions which D o not attem p t to operate you r O rca III/ could damage the product. -
Page 13: Pneumatic Safety
Safety Orca III/ Orca III T Operation and Maintenance Manual 1.2 Pneumatic safety 1.3 Safety features The Orca III/ Orca III T laminator has been Important safety features of the Orca III/ Orca designed with safety as a primary consideration;... - Page 14 E- CABLE PHOTO-EYE To engage the front or rear E-CABLE, push The Orca III/ Orca III T is equipped with three in on the cable using your foot. Either cable, when sets of PHOTO-EYEs, one at the main roller nip,...
-
Page 15: Mechanical Safety
Safety Orca III/ Orca III T Operation and Maintenance Manual 1.4 Mechanical safety 1.5 Heating safety The heating components of the Orca III/ Orca III T can reach temperatures of over 200 F ( 100 C ). W AR N IN G N ever rem ove or open any guarding or covers from the m achine. -
Page 16: Maintenance Safety
Orca III/ Orca III T Operation and Maintenance Manual Safety 1.6 Maintenance safety 1.7 Installation Any maintenance requiring the cabinets to be The following symbols are positioned at opened with electrical power connected should be only various points in Section 4 Installation. - Page 17 Safety Orca III/ Orca III T Operation and Maintenance Manual INFORMATION W AR N IN G Depending on the destination and customer T he O rca III/ O rca III T L am inator is a preference, your machine may be shipped in large and heavy piece of equipm ent.
- Page 18 Orca III/ Orca III T Operation and Maintenance Manual Safety INFORMATION CAUTION About recycling: The crate components can Do not allow the top to fall into the crate. It be reused for shipping the laminator again can damage the laminator.
-
Page 19: Operation
Safety Orca III/ Orca III T Operation and Maintenance Manual 1.8 Operation W AR N IN G D o not operate the m achine w ith the The following symbols are positioned at control side or drive side cabinet various points in Section 5 Operation. - Page 20 Orca III/ Orca III T Operation and Maintenance Manual Safety IN F O R M AT IO N IN F O R M AT IO N W hen requiring top and bottom heat, it is T op tem perature control unit on/ off...
-
Page 21: Applications
Safety Orca III/ Orca III T Operation and Maintenance Manual 1.9 Applications C AU T IO N D o not use an open blade to cut The following symbols are positioned at the w eb near the rollers. various points in Section 6 Applications. - Page 22 Orca III/ Orca III T Operation and Maintenance Manual Safety IN F O R M AT IO N IN F O R M AT IO N U se film brake tension to control the E xcessive brake tension m ay cause the separation point of the release liner.
-
Page 23: Troubleshooting
Safety Orca III/ Orca III T Operation and Maintenance Manual 1.10 Troubleshooting 1.11 Maintenance The following symbols are positioned at The following symbols are positioned at various points in Section 7 Troubleshooting. various points in Section 8 Maintenance. WARNING WARNING... - Page 24 Orca III/ Orca III T Operation and Maintenance Manual Safety C AU T IO N C AU T IO N C L E A N IN G H E A T E D R O L L E R S C A N...
- Page 25 Safety Orca III/ Orca III T Operation and Maintenance Manual 1.12 Label locations W A R N IN G A C H T U N G Posted at various locations on the Orca III/ Orca III T Laminator are important safety labels. Pay...
- Page 26 Orca III/ Orca III T Operation and Maintenance Manual Safety S AF E T Y IN S T R U C T IO N S S IC H E R H E IT S - R IC H T L IN IE N...
- Page 27 Safety Orca III/ Orca III T Operation and Maintenance Manual Figure 1.12.1 Label placement W A R N IN G A C H T U N G M ISE EN G A R D E W A R N IN G...
-
Page 28: Section 2.0 Warranty
( 1 ) year parts and 90 days labor from the date of installation. This warranty is the only warranty made by GBC Films Group and con not be modified or amended. THE WARRANTY MADE HEREIN IS IN... - Page 29 Warranty Orca III/ Orca III T Operation and Maintenance Manual 2. Damage to the machine caused by lifting, tilting and/ or any attempt to position the machine other than rolling on the installed castors on even surfaces. 3. Improper use of the machine.
-
Page 30: Section 3.0 Specifications
Orca III/ Orca III T Operation and Maintenance Manual Specifications 3.0 Specifications Specifications provide all of the technical data for the Orca III/ Orca III T Laminator. 3.1 General Description: • High level, wide format color finisher for the sheet fed ink jet and electrostatic market. -
Page 31: Consumables
Specifications Orca III/ Orca III T Operation and Maintenance Manual 3.2 Consumables Film types: • Pressure sensitive laminates • Pressure sensitive adhesives • Low melt laminates • Thermal laminates • Thermal adhesives Film diameters: • Up to a 10 in. roll diameter ( 25.4 cm ) Core size: •... -
Page 32: Function
Orca III/ Orca III T Operation and Maintenance Manual Specifications Function Speed: • 0 - 15 ft / min ( 0 - 4.6 m / min ) Motor: • 1/4 horse power drive motor • Bi-directional D.C. motor Heating capabilities: •... -
Page 33: Electrical
Specifications Orca III/ Orca III T Operation and Maintenance Manual 3.4 Electrical United States and Canada: • 230 - 240 VAC, 50/60 Hz, single phase, 55 amps. Europe: • 230 - 240 VAC, Wye 3 phase, 25 amps/ phase B.T.U. output: •... -
Page 34: Dimensions
Orca III/ Orca III T Operation and Maintenance Manual Specifications 3.5 Dimensions Weight: • 2800 lbs. ( 1270 kg. ) Crated: • 2300 lbs. ( 1043 kg. ) Uncrated: Dimensions • 75 in. (H) x 43 in. (W) x 102 in. (L) - Page 35 Specifications Orca III/ Orca III T Operation and Maintenance Manual Figure 3.5.1 Dimensions ( both machines have the same dimensions ) 82 in . ( 20 8 cm ) 60 in . ( 15 2 cm ) 33 in .
-
Page 36: Section 4.0 Installation
As a result, we are providing these instructions so you can insure that your new Orca III/ Orca III T Laminator is properly and Have you contacted a certified electrician to both securely unpacked, moved, and installed. - Page 37 Installation Orca III/ Orca III T Operation and Maintenance Manual The laminator requires 230 to 240 vac, 50/ 60 Hz, 55 amps. Or, in Europe only, 3-N phase, 240 vac, 32 amps/ phase. W AR N IN G T he O rca III/ O rca III T L am inator is a large and heavy piece of equipm ent.
- Page 38 Orca III/ Orca III T Operation and Maintenance Manual Installation Figure 4.1.1 Suggested Floor Layout 4 ft. x 6 ft. 8 ft 8 in (101.6 x 152 cm ) ( 220 cm ) W ork table on wheels A ir com pressor...
-
Page 39: Know Your Machine
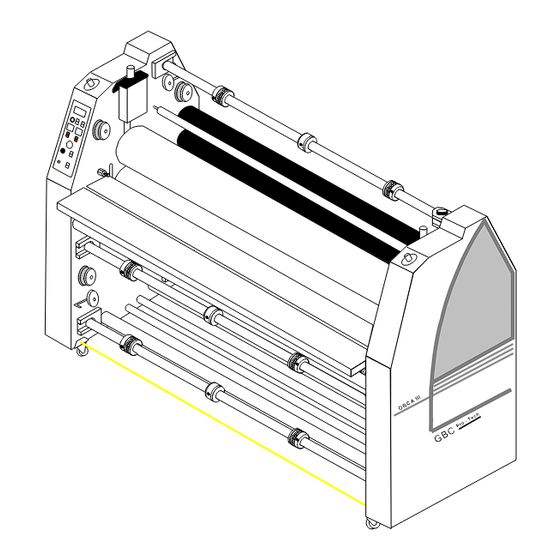
Installation Orca III/ Orca III T Operation and Maintenance Manual Figure 4.2.3 Front view 4.2 Know your machine M o to r F ro n t Before performing any procedure within this C a rd b o a rd E -S T O P... -
Page 40: Unpacking
Orca III/ Orca III T Operation and Maintenance Manual Installation With regards to your shipping method, use one of 4.3 Unpacking the following procedures described to safely and properly unwrap / uncrate your laminator. INFORMATION 4.4 Shrink Wrapped A L L S H I P M E N T S A R E E X - W O R K S . At our dock, title passes to the buyer. -
Page 41: Crated
Installation Orca III/ Orca III T Operation and Maintenance Manual 4.5 Crated 4.5.1 Uncrate the laminator W AR N IN G a) Remove the top of the crate and then the sides in the order shown in Figure 4.5.1 T he O rca III/ O rca III T L am inator is a large and heavy piece of equipm ent. - Page 42 Orca III/ Orca III T Operation and Maintenance Manual Installation Figure 4.5.1 Disassembling of the crate 4.5.3 Moving the laminator a) Have the laminator removed off of the skid one of two methods: 1) Rolled off the skid and placed on the floor by licensed riggers using the included ramps.
- Page 43 Installation Orca III/ Orca III T Operation and Maintenance Manual b) Remove any plastic strapping and/or packing e) Consider the following when determining where paper taped to the rollers. to locate your machine; W AR N IN G CAUTION Do not use a knife or other sharp object to T he operating environm ent m ust be free of dust, flam m able liquids and vapors.
-
Page 44: Accessory Pack
Installation 4.6 Accessory pack 4.7 Electrical Connection Once the Orca III/ Orca III T Laminator has been The Orca III/ Orca III T laminator requires 220 unpacked and moved into final position, open the accessory ~ 240 VAC electrical power for proper operation. The pack and verify the contents. - Page 45 Installation Orca III/ Orca III T Operation and Maintenance Manual Figure 4.7.1 Single phase ( 3 wire ) 4.7.1 Preparation B lu e W ires R ed W ires a) Ensure the power at the junction box is in the L 6 L 4 L 2 L 5 L 3 OFF position.
-
Page 46: Air Connection
GBC suggests that the best approach to the air requirement is to provide a dedicated small compressor for the laminator. A standard light duty 1/2 to 3/4 horse power (1 kW) electric air compressor with 1.5 to 2.5 cfm output with a 5 gallon... -
Page 47: Installing Levelers
Installation Orca III/ Orca III T Operation and Maintenance Manual 4.9 Installing levelers IN F O R M AT IO N T he upper m ain roller and the upper pull Leveling of the machine is a customer option. If roller should be in the raised position. -
Page 48: Leveling
Orca III/ Orca III T Operation and Maintenance Manual Installation c) Place the leveler on the control side frame, not 4.10 Leveling the top of the cabinet, and level the machine from front to rear. Leveling of the machine is an important step in assuring that the equipment will run at it’s optimal speed... -
Page 49: Unwind/ Rewind Brake
Installation Orca III/ Orca III T Operation and Maintenance Manual d) Save the center piece from the brake pad for use 4.11 Unwind/ rewind brake later in Section 4.12 Slitter assemblies. The unwind/ rewind brake is used when you e) Remove the rewind tube. -
Page 50: Slitter Assemblies
Orca III/ Orca III T Operation and Maintenance Manual Installation b) Place the pieces ( 1,2,3 & 4 ) on the slitter idler 4.12 Slitter assemblies stand offs as illustrated below. S tan d o ffs C AU T IO N... -
Page 51: Calibrations
The following calibrations should be performed of the m odified 1/4 in. allen w rench by a qualified GBC technician before the machine is to be operated. These calibrations may not be performed by the operator. Improper calibrations can result in poor lamination output. -
Page 52: Section 5.0 Operations
Orca III/ Orca III T Operation and Maintenance Manual Operations 5.0 Operations 5.1 Power on/ off E L E C T R IC AL WARNING S H O C K Do not wear ties, loose fit clothing or D o not turn pow er on if the pow er cord dangling jewelry while operating or is dam aged or frayed. -
Page 53: Front Control Panel
( 4.5 meters per minute ). Turn the dial clockwise to increase speed and counter clockwise to reduce speed. The control panel on the Orca III/ Orca III T Laminator is located at the front operating position of FW D A U T O the machine on the left ( control ) side cabinet. - Page 54 Orca III/ Orca III T Operation and Maintenance Manual Operations ( 5 ) Temperature Control Unit ( Top ): This unit is ( 8 ) Bottom Heater on / off Switch: Turns the used to set the desired heating temperature of the top temperature controller unit for the lower main roller main roller.
- Page 55 Operations Orca III/ Orca III T Operation and Maintenance Manual ( 10 ) Main Roll Pressure Gauge: Displays the air ( 13 ) Fan Table ON/ OFF Switch: This switch pressure supplied to the main roller air cylinders. controls the optional vacuum table. When pressed to the ( I ) position, the fans on the vacuum table turn on.
-
Page 56: Figure 5.2.1 Front Control Panel
Orca III/ Orca III T Operation and Maintenance Manual Operations Figure 5.2.1 Front control panel P R O T E C H E N G IN E E RIN G D E FO R E S T W I. U .S .A . -
Page 57: Rear Control Panel
Operations Orca III/ Orca III T Operation and Maintenance Manual ( 2 ) Clutch Pressure Gauge: Displays the air pressure 5.3 Rear control panel supplied to the pneumatic clutch. The rear control panel enables the operator to P R E S S U R E control the clutch operation, the upper pull roller operation, the cooling fans and the motor auto/ stop. - Page 58 Orca III/ Orca III T Operation and Maintenance Manual Operations ( 4 ) Pull Roller Pressure Adjustment: Adjusts air ( 6 ) Pull Roller UP/ DOWN Switch: Signals the pressure supplied to the pull roller air cylinders. Pull solenoid air valve for the pull roller air cylinders to...
- Page 59 Operations Orca III/ Orca III T Operation and Maintenance Manual IN F O R M AT IO N T he m otor m ust be engaged for the cooling fans to turn on. If the fan sw itch is in the "on"...
-
Page 60: Figure 5.3.1 Rear Control Panel
Orca III/ Orca III T Operation and Maintenance Manual Operations Figure 5.3.1 Rear control panel P R E S S U R E P .S .I. A D J PU LL R O LL C LU T C H P R E S S U R E... -
Page 61: Setting Temperature
Operations Orca III/ Orca III T Operation and Maintenance Manual c) Decrease main roller pressure, lower the upper 5.4 Setting temperature main roller, set a slow speed and press AUTO to allow the rollers to roll for an even heating surface. -
Page 62: In Case Of An Emergency
Orca III/ Orca III T Operation and Maintenance Manual Operations b) Resolve the emergency situation. 5.5 In case of an emergency c) If an E-STOP was depressed, turn the knob Four E-STOP buttons, two located on the left counter clockwise to disengage the E-STOP and right side from the front operating position and button. -
Page 63: Load A Roll Of Film
5.6 Film loading/ unloading a) Adjust the core chucks to fit within the roll of The Orca III/ Orca III T utilizes a swing out film being used. The roll of film should be unwind arm for simple loading and unloading of film. - Page 64 Orca III/ Orca III T Operation and Maintenance Manual Operations d) With respect to the adhesive side of the roll, b) Pull up on the clevis pin. slide the roll of film onto the unwind arm. c) Swing the unwind shaft out away from the e) Swing unwind arm back into the unwind arm laminator.
-
Page 65: Main Roller Nip
Operations Orca III/ Orca III T Operation and Maintenance Manual 5.7 Main roller nip 5.8 Pull roller nip To set the main roller nip for use with To set the pull roller nip for use with substrates substrates can easily be obtained by setting the shim can easily be obtained by setting the shim dials on the dials on the main roller to the desired opening. -
Page 66: Unwind Brake Tension
Orca III/ Orca III T Operation and Maintenance Manual Operations 5.9 Unwind brake tension 5.10 Rewind brake tension The unwind brakes are uniquely designed to The rewind brakes control the tension of the allow you to change rolls of film without changing rewind tubes. -
Page 67: Shutdown Procedure
Operations Orca III/ Orca III T Operation and Maintenance Manual 5.11 Shutdown procedure Perform the steps below to properly shutdown your machine. a) Unweb the laminator and clean the rollers as described in Section 8.2 Cleaning the rollers. b) Set the left and right shim dials of the main roller to greater than 1/2 inch ( 1.27 cm ). -
Page 68: Temperature Chart
Orca III/ Orca III T Operation and Maintenance Manual Applications The process control charts and web diagrams 6.0 Applications illustrated in this section are reference points only. Parameters will vary with regards to laminate thickness, laminate widths, laminate types, print... -
Page 69: Helpful Hints
Orca III/ Orca III T Operation and Maintenance Manual Mounting 6.2 Helpful hints Mounting on the Orca III/ Orca III T can be achieved from the front operating position using the main rollers or from the rear operating position using the pull Pressure sensitive materials rollers. - Page 70 Orca III/ Orca III T Operation and Maintenance Manual Applications Brake tension IN F O R M AT IO N Brake tension should always be minimal. Brake tension should always be even from the top roll of film to the lower roll of film.
- Page 71 Applications Orca III/ Orca III T Operation and Maintenance Manual Figure 6.3.1 Temperature conversion chart 70.6 20.6 45.6 95.6 120.6 21.1 46.1 71.1 96.1 121.1 46.7 71.7 96.7 21.7 121.7 22.2 47.2 72.2 97.2 122.2 22.7 47.8 72.8 97.8 122.8 23.3...
- Page 72 Figure 6.4.1 Poly in/ Poly out diagrams This section contains a blank process control chart and diagram for the Orca III/ Orca III T as well as com- T h e rm a l P o ly - o u t T h e rm a l P o ly - in pleted charts for the basic operations of the laminator.
- Page 73 Applications Orca III/ Orca III T Operation and Maintenance Manual Chart - 0 P R O C E S S C O N T R O L C H A R T O rca III / O rc a III T L a m in a to r...
- Page 74 Orca III/ Orca III T Operation and Maintenance Manual Applications Diagram - 0 Legend C ooling tube P erm an ent idler R em ova ble idler S litter Id ler Table Id ler Tie bar R ew ind S litters ©...
- Page 75 Applications Orca III/ Orca III T Operation and Maintenance Manual Chart - 1 P R O C E S S C O N T R O L C H A R T - 1 O rca III/ O rca III T L a m in ato r...
- Page 76 Orca III/ Orca III T Operation and Maintenance Manual Applications Diagram - 1 T h e rm a l m o u n t P rin t L in e r H o t S u b s tra te C o ld ©...
- Page 77 Applications Orca III/ Orca III T Operation and Maintenance Manual Chart - 2 P R O C E S S C O N T R O L C H A R T - 2 O rca III/ O rca III T L a m in ato r...
- Page 78 Orca III/ Orca III T Operation and Maintenance Manual Applications Diagram - 2 P S A L am in ate L in er O v e r th e P rin t id le r o p tio n W arm...
- Page 79 Applications Orca III/ Orca III T Operation and Maintenance Manual Chart - 3 P R O C E S S C O N T R O L C H A R T - 3 O rca III/ O rca III T L a m in ato r...
- Page 80 Orca III/ Orca III T Operation and Maintenance Manual Applications Diagram - 3 P S A L am in ate L in er O v e r th e id le r o p tio n W arm C o ld...
- Page 81 Applications Orca III/ Orca III T Operation and Maintenance Manual Chart - 4 P R O C E S S C O N T R O L C H A R T - 4 O rca III/ O rca III T L a m in ato r...
- Page 82 Orca III/ Orca III T Operation and Maintenance Manual Applications Diagram - 4 D e c a l Ap p ly p re s s u re h e re R e le a s e lin e r W a rm...
- Page 83 Applications Orca III/ Orca III T Operation and Maintenance Manual Chart - 5 P R O C E S S C O N T R O L C H A R T - 5 O rca III/ O rca III T L a m in ato r...
- Page 84 Orca III/ Orca III T Operation and Maintenance Manual Applications Diagram - 5 D e c a l Ap p ly p re e s u re h e re H o t R e le a s e lin e r...
- Page 85 Applications Orca III/ Orca III T Operation and Maintenance Manual Chart - 6 P R O C E S S C O N T R O L C H A R T - 6 O rca III/ O rca III T L a m in ato r...
- Page 86 Orca III/ Orca III T Operation and Maintenance Manual Applications Diagram - 6 T h erm al L am in ate O v e r th e P rin t id le r o p tio n H o t...
- Page 87 Applications Orca III/ Orca III T Operation and Maintenance Manual Chart - 7 P R O C E S S C O N T R O L C H AR T - 7 O rc a III/ O rc a III T L a m in a to r...
- Page 88 Orca III/ Orca III T Operation and Maintenance Manual Applications Diagram - 7 T h erm al L am in ate O v e r th e P rin t id le r o p tio n H o t...
- Page 89 Applications Orca III/ Orca III T Operation and Maintenance Manual Chart - 8 P R O C E S S C O N T R O L C H A R T - 8 O rca III/ O rca III T L a m in ato r...
- Page 90 Orca III/ Orca III T Operation and Maintenance Manual Applications Diagram - 8 T h erm al lam in ate O v e r th e id le r o p tio n H o t H o t R o ll o f p rin ts...
- Page 91 Applications Orca III/ Orca III T Operation and Maintenance Manual Chart - 9 P R O C E S S C O N T R O L C H A R T - 9 O rca III/ O rca III T L a m in ato r...
- Page 92 Orca III/ Orca III T Operation and Maintenance Manual Applications Diagram - 9 P S A lam in ate L in er O v e r th e P rin t id le r o p tio n W arm...
- Page 93 Applications Orca III/ Orca III T Operation and Maintenance Manual Chart - 10 P R O C E S S C O N T R O L C H A R T - 1 0 O rca III/ O rca III T L a m in ato r...
- Page 94 Orca III/ Orca III T Operation and Maintenance Manual Applications Diagram - 10 P S A lam in ate L in er O v e r th e id le r o p tio n W arm W arm R o ll o f p rin ts...
- Page 95 Applications Orca III/ Orca III T Operation and Maintenance Manual Chart - 11 P R O C E S S C O N T R O L C H A R T - 1 1 O rca III/ O rca III T L a m in ato r...
- Page 96 Orca III/ Orca III T Operation and Maintenance Manual Applications Diagram - 11 P S A la m in a te L in e r H o t H o t L in e r F in is h e d...
- Page 97 Applications Orca III/ Orca III T Operation and Maintenance Manual Chart - 12 P R O C E S S C O N T R O L C H A R T - 1 2 O rca III / O rc a III T L a m in a to r...
- Page 98 Orca III/ Orca III T Operation and Maintenance Manual Applications Diagram - 12 T rim P ap er take-u p take-u p H o t C o ld R o ll o f tran sfer im ag es F in is h e d...
- Page 99 Applications Orca III/ Orca III T Operation and Maintenance Manual Chart - 13 P R O C E S S C O N T R O L C H A R T - 1 3 O rca III / O rc a III T L a m in a to r...
- Page 100 Orca III/ Orca III T Operation and Maintenance Manual Applications Diagram - 13 R o ll o f tran sfer im ag es P ap er take-u p H o t C o ld F in is h e d...
- Page 101 Applications Orca III/ Orca III T Operation and Maintenance Manual Chart - 14 P R O C E S S C O N T R O L C H A R T - 1 4 O rca III/ O rca III T L a m in ato r...
- Page 102 Orca III/ Orca III T Operation and Maintenance Manual Applications Diagram - 14 V in yl o v e r- la m in a te L in e r H o t H o t T ra n s fe rre d...
- Page 103 Applications Orca III/ Orca III T Operation and Maintenance Manual Chart - 15 P R O C E S S C O N T R O L C H A R T - 1 5 O rca III / O rc a III T L a m in a to r...
- Page 104 Orca III/ Orca III T Operation and Maintenance Manual Applications Diagram - 15 P ap er L in er take-u p H o t C o ld R o ll o f tran sfer im ag es F in is h e d...
- Page 105 Applications Orca III/ Orca III T Operation and Maintenance Manual This page intentionally left blank. Page 6 - 38 © GBC Films Group February 2001...
-
Page 106: Wave Problems
Orca Orca III/ Orca III T Operation and Maintenance Manual Troubleshooting Problem: D waves in the image but not in the laminate 7.0 Troubleshooting WARNING Do not wear ties, loose fitting clothing or dangling jewelry while operating or servicing the laminator. These items can get caught in the nip and choke you or you can be crushed or burned. - Page 107 Troubleshooting Orca III/ Orca III T Operation and Maintenance Manual Problem: Straight waves in the output Problem: Angled waves in the output on both sides Hints: • Check for insufficient main roller pressure Hints: • Check operational settings for materials •...
-
Page 108: Film Problems
Orca Orca III/ Orca III T Operation and Maintenance Manual Troubleshooting Problem: Delamination 7.2 Film problems Hints: • Check operating temperatures • Check operating speed The following is a list of common film problems • Laminate compatibility with ink you may encounter. -
Page 109: Machine Problems
Problem : I press AUTO and the motor will not turn. My Orca III/ Orca III T Laminator serial # is: Hints : • Ensure nothing is blocking the PHOTO-EYE. • Ensure an E-STOP has not been pushed... - Page 110 Orca Orca III/ Orca III T Operation and Maintenance Manual Troubleshooting Coiling 7.4 Glossary A term used to describe an image rolling up on itself. This is caused by differences in the brake tension used between the upper and lower laminates during and application process.
- Page 111 Troubleshooting Orca III/ Orca III T Operation and Maintenance Manual Film Media A two part material consisting an adhesive Term used to describe the materials used to print layer and a substrate. The adhesive and the substrate may an image, i.e. the papers, inks, toners, etc.
- Page 112 Orca Orca III/ Orca III T Operation and Maintenance Manual Troubleshooting Pull rollers Silvering These rolls provide tension of the laminated media. A term used to describe one of two occurrences; Tensioning of the laminated media helps to make it flat 1) air bubbles trapped between the product and a thermal and smooth.
- Page 113 Troubleshooting Orca III/ Orca III T Operation and Maintenance Manual This page intentionally left blank. Page 7 - 8 © GBC Films Group February 2001...
-
Page 114: Maintenance Schedule
Orca III/ Orca III T Operation and Maintenance Manual Maintenance 8.0 Maintenance 8.1 Maintenance Schedule INFORMATION GBC Films Group laminators require minimal maintenance. However, regular maintenance is essential to keep any piece of precision machinery at peak Below is a recommended maintenance performance. -
Page 115: Cleaning The Rollers
Maintenance Orca III/ Orca III T Operation and Maintenance Manual 8.2 Cleaning the rollers Semi-Annual • Lubricate the grease fittings, chain, and gears. Tools required ( See lubrication in this section ) • Check wire termination tightness. • Adhesive coated boards... - Page 116 Orca III/ Orca III T Operation and Maintenance Manual Maintenance 8.3 Dust - Pre-coated boards 8.4 Dirt and PSA adhesive - Alcohol and cloth a) The main rollers must be below 110 F ( 43 C ). a) Allow the laminator to cool slightly to no higher...
- Page 117 Maintenance Orca III/ Orca III T Operation and Maintenance Manual d) Set a slow speed of less than 3 ft/ min. ( 91 cm/ 8.5 Thermal adhesive min. ). a) Allow the laminator to cool slightly, no higher e) Put on the rubber gloves and use the isopropyl...
- Page 118 Orca III/ Orca III T Operation and Maintenance Manual Maintenance d) Set a slow speed of less than 3 ft/ min. ( 91 cm/ 8.6 Clean the laminator min. ). C AU T IO N ELECTRICAL S H O C K...
-
Page 119: Chain Tensioning
Maintenance Orca III/ Orca III T Operation and Maintenance Manual 8.7 Clean the control panels 8.8 Chain tensioning If the motor should stall, stutter or if the chain makes a popping/ snapping sound, check the chain for ELECTRICAL proper tensioning. When the chain is properly tensioned, S H O C K you should see approximately 1/4 inch ( 0.64 cm ) of... - Page 120 Orca III/ Orca III T Operation and Maintenance Manual Maintenance b) Loosen the nut behind the self tensioning ( love- joy ) idler with a 13 mm wrench. IN F O R M AT IO N U se a the 3/8 inch w rench on the SO 1...
- Page 121 Maintenance Orca III/ Orca III T Operation and Maintenance Manual Tensioning of the secondary ( outer ) chain 8.9 Lubrication a) Loosen the nut to the adjustable tensioning idler Bearings should be greased once every six months. for the secondary ( outer ) chain.
- Page 122 Orca III/ Orca III T Operation and Maintenance Manual Maintenance Figure 8.9.1 Grease fitting points T o p M a in R o ll C o n tro l S id e D riv e S id e B o tto m M a in R o ll...
- Page 123 Maintenance Orca III/ Orca III T Operation and Maintenance Manual This page intentionally left blank. Page 8 - 10 © GBC Films Group February 2001...
Need help?
Do you have a question about the ORCA III and is the answer not in the manual?
Questions and answers