Table of Contents
Advertisement
Quick Links
WIRELESS 433 MHz TEMPERATURE STATION
Instruction Manual
INTRODUCTION:
Congratulations on purchasing this Temperature Station with wireless 433 MHz
transmission of outdoor temperature and display of indoor temperature. It is further
featuring a DCF-77 radio controlled clock with calendar display and two alarms.
With eight easy to use function keys, this innovative product is ideal for use in the
home or office.
FEATURES
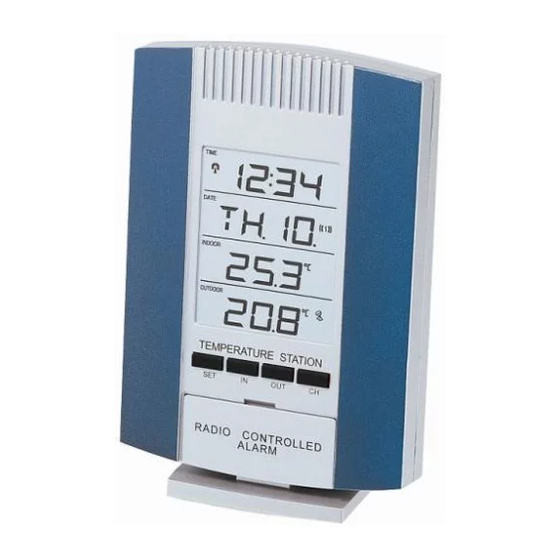
The Temperature Station
LCD
Display
Function
keys
DCF-77 Radio controlled time with manual setting option
24 hour display
Hour and minute display, seconds indicated by flashing dot
Timezone option ±9 hours
Features 2 alarms with snooze function
Weekday with date or date with month calendar display
Indoor temperature reading in °C with minimum and maximum recording
Outdoor temperature reading (for up to 3 transmitters) in °C with minimum
and maximum recording
All minimum and maximum recordings show date and time received and can
be reset
Can take up to three outdoor transmitters
Low battery indicator
Wall mountable or table standing
The Outdoor Temperature Transmitter
Holder
SETTING UP:
1.
First, insert the batteries into the Temperature Station (see "How to install
and replace batteries in the Temperature Station" below). Once the
batteries are in place, all segments of the LCD will light up briefly and a short
signal tone will sound. Then the indoor temperature, the time as 0:00 and the
Hanging Hole
date as 1.1. will be displayed. If the indoor temperature is not displayed after
a few seconds, remove the batteries and wait for at least 10 seconds before
reinserting them. Once the indoor data is displayed proceed to step 2.
2.
Within 3 minutes of activating the Temperature Station, place the batteries
into the Temperature Transmitter (see "How to install and replace batteries
in the Temperature Transmitter" below).
Battery cover
3.
After inserting the batteries into the transmitter, the Temperature Station will
start receiving transmissions from the transmitter. The outdoor temperature
should then be displayed on the Temperature Station. If this does not
happen within 15 minutes, the batteries will need to be removed from both
units and reset from step 1.
Detachable
4.
The Temperature Station can take up to 3 remote transmitters. If you have
Stand
purchased additional transmitters, follow step 2 for all extra transmitters.
However, ensure that you leave 10 seconds in between the reception of the
last transmitter and the set-up of the following transmitter. The Temperature
Station will number the transmitters in the order of set-up, i.e. the first
transmitter will have the temperature displayed with the number 1 against it
and so on.
5.
When all the transmitters are set up, there is a testing period, during which
the display switches quickly between all the received transmitters at random,
according to which random transmission it receives. Pressing any key will
stop this process and the display will show the temperature for the first
transmitter. The process also stops automatically if no keys are pressed for a
few minutes.
6.
Once the remote temperature has been received and is displayed on the
Temperature Station, the DCF-77 time code reception is automatically
Remote transmission
of outdoor
temperature to
Temperature Station
by 433 MHz signals
Wall mounting case
Advertisement
Table of Contents

Related Manuals for Technoline WS7073


Summary of Contents for Technoline WS7073
- Page 1 WIRELESS 433 MHz TEMPERATURE STATION Wall mountable or table standing Instruction Manual The Outdoor Temperature Transmitter Remote transmission INTRODUCTION: of outdoor Congratulations on purchasing this Temperature Station with wireless 433 MHz temperature to transmission of outdoor temperature and display of indoor temperature. It is further Temperature Station featuring a DCF-77 radio controlled clock with calendar display and two alarms.
-
Page 2: How To Install And Replace Batteries In The Temperature Station
started. This takes typically between 3-5 minutes in good conditions. This BATTERY CHANGE: time period is an excellent opportunity to locate the transmitter(s) in suitable It is recommended to replace the batteries in all units on an annual basis to ensure location(s) outdoors. -
Page 3: Lcd Screen And Settings
Changes the minute and month setting when in set mode For better distinctness the LCD screen is split into 4 sections displaying the informations for time, date, indoors and outdoors. Changes the minute setting in alarm setting mode Used to activate the snooze function for the alarm LCD 1 RADIO CONTROLLED TIME: CH key (Channel) The time base for the radio controlled time is a Cesium Atomic Clock operated by... - Page 4 Either press the SET key once more to enter the set mode for the time zone Press the SET key again to enter the month and date display (flashing). and date section or do not touch any buttons for around 30 seconds to Using the OUT key, set the month required.
- Page 5 Twice to show the maximum temperature values with time and date recorded. The range of the Temperature Transmitter may be affected by the temperature. At Three times to return to the current time, date and temperature levels. cold temperatures the transmitting distance may be decreased. Please bear this in To reset the minimum and maximum temperature data and the times at which mind when positioning the transmitter.
-
Page 6: Care And Maintenance
Outdoor : -30ºC to +70ºC with 0.1ºC resolution POSITIONING THE OUTDOOR TEMPERATURE TRANSMITTER (“OFL” displayed if outside this range) The Temperature Transmitter is supplied with a holder that may Indoor Temperature checking interval : every 10 seconds be attached to a wall with the three screws supplied. To attach Outdoor Temperature reception : every 5 minutes...
Need help?
Do you have a question about the WS7073 and is the answer not in the manual?
Questions and answers