Advertisement
Available languages
Available languages
Quick Links
Funktionen:
Empfang der DCF-Funkuhrzeit
12/24 Stunden Zeitanzeige wählbar
Weckalarm und Schlummerfunktion
Kalender (Datum/Monat, 2018-2099 mit Grundeinstellung 2018)
Innentemperatur, Außentemperatur und Luftfeuchtigkeit
Anzeige von Außentemperaturtrend und Luftdrucktrend
Batterieendanzeige für Station und Außensender
Wettervorhersage: sonnig, teilweise sonnig, bewölkt, regnerisch, stürmisch und Schneefall
Maximale und minimale Temperatur//Luftfeuchtigkeit
Sieben Sprachen für Wochentage (GER, ITA, DUT, SPA, DAN, ENG, FRE)
WS6446 Bedienungsanleitung
DE1
Advertisement

Related Manuals for Technoline WS6446


Summary of Contents for Technoline WS6446
- Page 1 WS6446 Bedienungsanleitung Funktionen: Empfang der DCF-Funkuhrzeit 12/24 Stunden Zeitanzeige wählbar Weckalarm und Schlummerfunktion Kalender (Datum/Monat, 2018-2099 mit Grundeinstellung 2018) Innentemperatur, Außentemperatur und Luftfeuchtigkeit Anzeige von Außentemperaturtrend und Luftdrucktrend Batterieendanzeige für Station und Außensender ...
- Page 2 Zeitzone:-12/+12 Stunden Hintergrundbeleuchtung...
- Page 3 Bestandteile:...
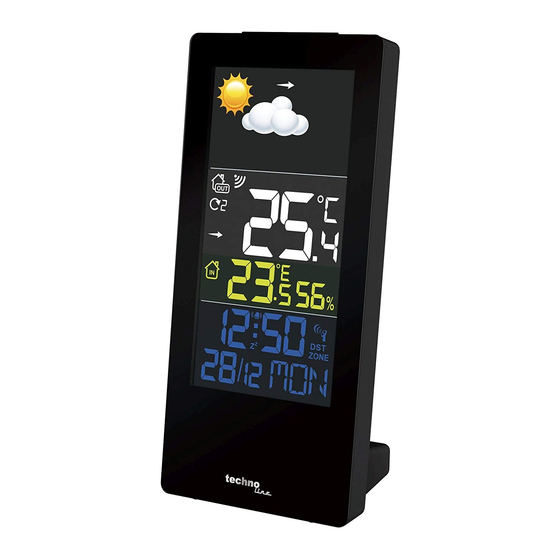
- Page 4 A – Anzeige und Vorderseite A1 – Wettervorhersage A2 – Funkempfang-Symbol A3 – Ausgewählter Außensenderkanal A4 – Temperaturtrend-Symbol A5 – Innentemperatur A6 – Alarmsymbol...
- Page 5 A7 – Uhrzeit A8 – Schlummersymbol A9 – Datum und Monat A10 – Luftdrucktrend-Symbol A11 – Außentemperatur A12 – Innenluftfeuchtigkeit A13 – DCF-Symbol A14 – DST-Symbol A15 – Wochentag B – Tasten und Rückseite B1 – SNOOZE/LIGHT Taste B2 – MODE Taste B3 –...
- Page 6 C – Temperatur-Außensender C1 – Kontroll-LED C2 – Aufhängeöse C3 – TX Taste C4 – CH-Schalter (Kanal 1/2/3) C5 – Batteriefach Inbetriebnahme: In Betrieb nehmen: Öffnen Sie das Batteriefach des Außensenders und legen Sie 2 x AAA Batterien unter Beachtung der Polarität (+/-) ein.
- Page 7 Batterien für Back-up (Optional): Öffnen Sie das Batteriefach Der Basisstation und legen Sie 3 x AAA Batterien unter Beachtung der Polarität (+/-) ein. Schließen Sie das Batteriefach mit der Abdeckung. Empfang des Aussensenders: Funkempfangs-Symbol Nach der Inbetriebnahme sucht die Station das Aussensender-Signals. ...
- Page 8 wurde oder um manuell nach dem Sensor des ausgewählten Kanals zu suchen. Drücken Sie dann die TX Taste am Sensor um das Signal manuell zu senden. Bei weiteren Empfangsproblemen: Wiederholen Sie bitte die Schritte der Inbetriebnahme erneut. Hinweis: Der Außensensor muss vor direkter Sonneneinstrahlung und Regen geschützt aufgestellt werden.
- Page 9 Kein Turmsymbol wird angezeigt, wenn die Station zu diesem Zeitpunkt kein Signal empfangen konnte. Positionieren Sie die Station für einen besseren Signalempfang neu oder warten Sie eine Nacht, da das Signal über Nacht meist besser empfangen werden kann. ...
- Page 10 Manueller Empfang der DCF-Funkuhrzeit: Drücken Sie im normalen Anzeigemodus die RCC Taste, um die Zeitsignalsuche zu aktivieren/deaktivieren. Das DCF-Empfangssymbol blinkt, während der Empfang des DCF-Signals aktiv ist und das Symbol wird nicht mehr angezeigt, wenn der Empfang ausgeschaltet wird. Manuelle Einstellung: - Halten Sie die MODE Taste im normalen Anzeigemodus gedrückt, um in den Einstellungsmodus zu gelangen:...
- Page 11 wählen Sie 00 und für das Vereinigte Königreich wählen Sie die -01). Drücken Sie die MODE-Taste um fortzufahren. STUNDEN: Die Stunde blinkt auf der Anzeige. Drücken Sie die + oder die - Taste, um die Stundenziffer einzustellen. Drücken Sie die MODE-Taste um fortzufahren. ...
- Page 12 SPRACHE: Die Wochentagsprache mit der Standardeinstellung GER blinkt auf der Anzeige. Drücken Sie die + oder die - Taste, um eine Sprache auszuwählen: Englisch (ENG), Deutsch (GER), Französisch (FRE), Italienisch (ITA), Niederländisch (DUT), Spanisch (SPA), Dänisch (DAN). Drücken Sie die MODE-Taste um fortzufahren. ...
- Page 13 gedrückt, um den Einstellungsprozess zu beschleunigen. Der Wochentag wird automatisch eingestellt, nachdem JAHR, MONAT und DATUM eingestellt sind und wird wie folgt angezeigt: DE13...
- Page 14 Alarmeinstellung: - Drücken Sie die MODE Taste einmal, um in den Alarmanzeigemodus zu gelangen. Drücken Sie die + oder die - Taste, um den Alarm zu aktivieren / deaktivieren. Das Alarmsymbol wird angezeigt, während der Alarm aktiviert ist. Drücken Sie die MODE Taste erneut, um zum normalen Anzeigemodus zurückzukehren. - Drücken und halten Sie die MODE Taste in der Alarmanzeige um die Alarmzeit einzustellen.
- Page 15 Hinweise: Wenn innerhalb von 20 Sekunden keine Tasten gedrückt werden, wird der Alarmeinstellungsmodus beendet und in den normalen Anzeigemodus zu wechseln. Dabei werden alle vom Benutzer vorgenommenen Einstellungen vor Ablauf des Zeitlimits berücksichtigt. Tasten +/-: Drücken Sie einmal, um den Wert um 1 Einheit anzupassen oder und halten Sie diese Taste gedrückt, um den Einstellungsprozess zu beschleunigen.
- Page 16 Um den Alarm für einen Tag zu stoppen, drücken Sie eine beliebige Taste außer SNOOZE / LIGHT, während der Alarm ertönt oder sich im Schlummermodus befindet. Das Alarmsymbol wird dauerhaft angezeigt und der Alarm ertönt am nächsten Tag. MAX/MIN Anzeige: ...
- Page 17 Die MIN / MAX-Werte werden auch automatisch um Mitternacht (0:00) gelöscht. Wettervorhersage: Die Station zeigt eines von 6 Wettervorhersagesymbolen an: sonnig, teilweise sonnig, bewölkt, regnerisch, stürmisch und verschneit: SONNIG TEILWEISE SONNIG BEWÖLKT DE17...
- Page 18 REGNERISCH STÜRMISCH VERSCHNEIT Trendanzeige für Außentemperatur und Luftdruck: The Die Wetterstation kann den Temperaturtrend und den Luftdrucktrend anzeigen. Folgende Symbole werden dargestellt: Die Außentemperatur / der Luftdruck steigt. Die Außentemperatur / der Luftdruck ist konstant. DE18...
- Page 19 Die Außentemperatur / der Luftdruck fällt. Außensender-Kanäle: Die Station kann bis zu 3 Sensoren auf 3 unterschiedlich angezeigten Kanälen empfangen. Jeder Außensender kann seine gemessene Daten nur an einen bestimmten Kanal übertragen. Drücken Sie die CH Taste an der Station, um eine von 4 möglichen Kanalanzeigeoptionen einzustellen: Kanal 1, Kanal 2, Kanal 3 oder konstante Rotation aller 3 Kanäle.
- Page 20 Hintergrundbeleuchtung: • Mit Netzteil: Das Display ist jederzeit beleuchtet. • Nur mit Batterie: Drücken Sie die SNOOZE / LIGHT Taste, um die Hintergrundbeleuchtung für 10 Sekunden zu aktivieren. Batterieendanzeige: • Das Batteriesymbol neben der Innentemperatur zeigt an, dass die Batterien in der Station gewechselt werden sollten.
- Page 21 Technische Daten: Batterien: Station: 3 x AAA Micro MR03 TX960 Senderr: 2 x AAA Micro MR03 Abmaße Station:85mm(L)x65mm(B)x185mm(H) Sender:40mm(L)x22mm(B)x100(H) Innentemperatur: Betriebsbereich - Temperatur = -9.9 °C bis 50 °C (14 °F bis 122 °F) Genauigkeit ± 1 Grad Celsius 0 °C bis 50 °C (14 °F bis122 °F) DE21...
- Page 22 Auflösung = 0.1 Grad Celsius Oberhalb von 50 °C (122 °F) wird HI auf dem LCD angezeigt Unterhalb von - 9.9 °C (14 °F) wird LO auf dem LCD angezeigt Innenluftfeuchtigkeit: Betriebsbereich – Luftfeuchtigkeit =20% RH bis 95% ...
- Page 23 Genauigkeit ± 1,5 Grad Celsius -40 °C bis 0 °C (-40 °F bis 32 °F) und 50 °C bis 60 °C (122 °F bis 140 °F) Auflösung = 0.1 Grad Celsius Oberhalb von 60 °C (140 °F) wird HI auf dem LCD angezeigt ...
- Page 24 nahe Autobahnen, Gleisen, Flughäfen, Hochspannungsleitungen, etc. nahe Baustellen inmitten hoher Gebäude in Betonbauten nahe elektrischer Geräte (Computer, Fernseher, etc) und metallischer Gegenstände in bewegten Fahrzeugen Platzieren Sie die Station an einem Ort mit optimalem Empfang, z.B. in der Nähe von Fenstern und entfernt zu metallischen oder elektrischen Gegenständen.
- Page 25 Vermeiden Sie den Kontakt mit ätzenden Materialien. Werfen Sie das Gerät nicht ins Feuer. Es könnte explodieren. Öffnen Sie nicht das Gehäuse und manipulieren Sie nicht bauliche Bestandteile des Geräts. Batterie-Sicherheitshinweise Verwenden Sie nur Alkali-Batterien, keine wiederaufladbaren Batterien. ...
- Page 26 Verwenden Sie das Produkt ausschließlich für den vorgesehenen Zweck! Hinweispflicht nach dem Batteriegesetz Altbatterien gehören nicht in den Hausmüll. Wenn Batterien in die Umwelt gelangen, können diese Umwelt- und Gesundheitsschäden zur Folge haben. Sie können gebrauchte Batterien unentgeltlich bei ihrem Händler und Sammelstellen zurückgeben. Sie sind als Verbraucher zur Rückgabe von Altbatterien gesetzlich verpflichtet! Hinweispflicht nach dem Elektronikgerätegesetz Laut Elektro- und Elektronikgerätegesetz (ElektroG) gehört Elektroschrott nicht in den...
- Page 27 WS6446 Instruction manual Features: DCF radio clock receiver function 12/24h selectable Alarm and snooze function Calendar (date/month,2018-2099 default year 2018) Indoor temperature, indoor humidity and outdoor temperature Outdoor temperature trend and barometric pressure trend ...
- Page 28 Time zone:-12/+12HR Backlight...
- Page 29 Overview:...
- Page 30 A – Display and frontside A1 – Weather forecast A2 – Outdoor reception icon A3 – Selected outdoor channel A4 – Temperature trend icon A5 – Indoor temperature A6 – Alarm icon A7 – Time A8 – Snooze icon A9 – Date and month A10 –...
- Page 31 A11 – Outdoor temperature A12 – Indoor humidity A13 – DCF icon A14 – DST icon A15 – Week day B – Buttons and backside B1 – SNOOZE/LIGHT button B2 – MODE button B3 – + / MAX/MIN button B4 – - / RCC button B5 –...
- Page 32 C5 – Battery compartment Initial operations: To power on: Open the battery compartment of the outdoor sensor and insert 2 x AAA batteries under consideration of polarity (+/-). Close the battery compartment with the battery door again. Connect the AC/DC adapter (HX0180500150D2E) with the main station to an household power outlet. Display will be fully displayed for a short time and then start operation.
- Page 33 polarity (+/-). Close the battery compartment with the battery door again. Outdoor sensor reception: Outdoor reception icon After powering, the station automatically searches for the outdoor sensor signal. The strength signal icon will flash until the sensor signal is received or for 3 minutes if no signal available.
- Page 34 Note: The outdoor sensor needs to be placed away from direct sunlight and rain. Automatic reception of DCF: DCF RECEPTION ICON with full signal strength will appear on screen if the reception of radio-controlled time is successful. The tower icon is displayed permanently when the display has received the DCF signal. ...
- Page 35 If the unit received DST signal, the unit will display “DST” icon. If the unit did not received radio-controlled time signal, the “DST” icon does not disappear unless it received no DST signal. If there is no signal or too much interference the receiver will only be on for 2 minutes. ...
- Page 36 24/12-HOUR: 24Hr will flash. Press the + or - button to select the 24-hour or 12-hour time display. Press the MODE button to continue. Time zone: Time zone will display and the selected time zone will blink. Press the + or - button to set the time zone( setting range is 0~+12,0~-12, German time is 00 and UK time is -01 ).
- Page 37 DATE: The date will flash. Press the + or - button to select the date. Press the MODE button to continue. LANGUAGE: Language for weekday will display, the default is GER. Press the + or - button to select the language: English (ENG), German (GER), French (FRE), Italian (ITA), Dutch (DUT), Spanish (SPA), Danish (DAN).
- Page 38 Alarm setting: - Press the MODE button once to enter alarm display mode. Press the + or - button to activate/deactivate the alarm. The alarm icon is displayed while the alarm is activated. Press the MODE button again to return to EN12...
- Page 39 normal display mode. - Press and hold the MODE button in alarm display mode to enter alarm setting mode: ALARM HOUR: The hour will flash. Press the + or - button to select the hour. Press the MODE button to continue.
- Page 40 completely. The alarm icon is blinking while the alarm sounds. Snooze function: When alarm sounds, press the SNOOZE/LIGHT button to trigger snooze duration of 10 minutes. The alarm icon and the snooze icon (Zz) both flash when the snooze duration is active. ...
- Page 41 Press and hold the MAX/MIN button in the corresponding interface 2 seconds to clear the MAX or MIN record. After 5 seconds the MAX/MIN display will return back to the normal display mode. The MIN/MAX values will also be automatically cleared at every midnight (0:00). Weather forecast: The station will display one of 6 weather forecast symbols: Sunny, Partly sunny, Cloudy, Rainy, stormy and Snowy...
- Page 42 RAINY STORMY SNOWY Trend display for outdoor temperature and barometric pressure: The weather station can display the temperature trend and the barometric pressure trend. You may see the following displays: The outdoor temperature / barometric pressure rises The outdoor temperature / barometric pressure remains constant. EN16...
- Page 43 The outdoor temperature / barometric pressure falls Outdoor sensor channels: • The station can receive up to 3 sensors on 3 differently displayed channels and each outdoor sensor can only transmit measured data to one specific channel. • Press the CH button on the station to set one of 4 possible channel display options: channel 1, channel 2, channel 3 or constant rotation of all 3 channels.
- Page 44 Backlight: • With power adapter: Display is lighted at all times. • With battery only: Press the SNOOZE/LIGHT button to activate the backlight for 10 seconds. Low battery indicator: • Battery icon displayed near indoor temperature indicates to change the batteries in the station. •...
- Page 45 TX960 sensor: 2 x AAA Micro MR03 Dimensions Station:85mm(L)x65mm(W)x185mm(H) Sensor:40mm(L)x22mm(W)x100(H) Indoor temperature: Operating temperature range = -9.9 °C to 50 °C (14 °F to 122 °F) Accuracy ± 1 degrees Celsius 0 °C to 50 °C (14 °F to122 °F) ...
- Page 46 Indoor Humidity: Operating humidity range =20% RH to 95% Accuracy +/- 5% RH (@25oC , 30%RH to 80%RH) Accuracy +/- 8% RH (@25oC , 20%RH to29%RH 80%RH to 95%RH) Resolution = 1 % RH Outdoor temperature: ...
- Page 47 When below -40 °C (-40 °F), the LCD will display LO. Transmission range: 30m (open area) Safety information: Environmental reception effects The station obtains the accurate time with wireless technology. Same as all wireless devices, the reception is maybe affected by the following circumstances: ...
- Page 48 near electrical appliances (computers, TV’s, etc) and metallic structures inside moving vehicles Place the station at a location with optimal signal, i.e. close to a window and away from metal surfaces or electrical appliances. Precautions This main unit is intended to be used only indoors, the outdoor sensor is intended for outdoors. ...
- Page 49 Use only alkaline batteries, not rechargeable batteries. Install batteries correctly by matching the polarities (+/-). Always replace a complete set of batteries. Never mix used and new batteries. Remove exhausted batteries immediately. Remove batteries when not in use. ...
- Page 50 distributors and other collecting points! Consideration of duty according to the law of electrical devices This symbol means that you must dispose of electrical devices separated from the General household waste when it reaches the end of its useful life. Take your unit to your local waste collection point or recycling centre.
- Page 51 Mode d’emploi du WS6446 Caractéristiques : Station météo radio-pilotée par signal DCF Format horaire 12 ou 24 heures Alarme avec fonction de rappel d’alarme Calendrier (jour/mois, 2018-2099, année par défaut 2018) Température et humidité intérieure/extérieure ...
- Page 52 Fuseau horaire : -12 à +12 Heures Rétroéclairage...
- Page 53 Vue d’ensemble :...
- Page 54 A - Écran et face avant A1 - Prévisions météo A2 - Icône de réception extérieure A3 - Canal extérieur sélectionné A4 - Icône Tendance de la température A5 - Température intérieure A6 - Icône de réveil A7 - Heure A8 - Icône de rappel A9 - Jour et mois A10 - Icône Tendance de la pression...
- Page 55 atmosphérique A11 - Température extérieure A12 - Humidité intérieure A13 - icône DCF A14 - Icône DST A15 - Jour de semaine B - Touches et face arrière B1 - Touche SNOOZE/LIGHT B2 - Touche MODE B3 - Touche +/MAX/MIN B4 - Touche -/RCC B5 - Touche CH B6 - Compartiment à...
- Page 56 C3 - Touche TX C4 - Touche CH (canal 1/2/3) C5 - Compartiment à piles Première utilisation: Pour allumer : Ouvrez le compartiment à piles du capteur extérieur et y insérez 2 piles AAA en respectant les polarités (+/-). Refermez le couvercle du compartiment à piles. Branchez l’adaptateur secteur (HX0180500150D2E) dans la station principale.
- Page 57 Ouvrez le compartiment à piles de la station et y insérez 3 piles AAA en respectant les polarités (+/-). Refermez le couvercle du compartiment à piles. Réception des capteurs extérieurs: Icône de réception du signal extérieur Une fois allumée, la station se met à rechercher automatiquement le signal du capteur extérieur. ...
- Page 58 capteur pour envoyer le signal manuellement. En cas d’autres problèmes de réception : répéter les étapes de la mise en marche initiale. Remarque : Le capteur extérieur doit être placé à l’abri de la lumière directe du soleil et de la pluie. Réception automatique du signal DCF : L’ICÔNE DE RÉCEPTION DCF avec une force de signal totale apparaît à...
- Page 59 Tous les jours à 1 heure : 00,2 : 00,3 : 00,4 : 00,5 : À 0 heure l’horloge reçoit automatiquement l’heure, une fois reçue, l’horloge ne recherche de nouveau le signal que le jour suivant. Si l'unité reçoit un signal DST, l'icône «DST» sera affiché. Si l’unité n’a pas reçu le signal de l'heure radio-pilotée, l’icône «DST»...
- Page 60 Configuration manuelle: - En mode affichage normal, maintenez appuyée la touche MODE pour accéder au mode réglage : 24/12 heures : 24Hr se met à clignoter. Utilisez les touches +/- pour choisir le format d'affichage de l'heure, 24 ou 12 heures. Appuyez sur la touche MODE pour continuer. ...
- Page 61 ANNÉE : L'année se met à clignoter. Appuyez sur la touche + ou - pour choisir l'année. Appuyez sur la touche MODE pour continuer. MOIS : Le mois se met à clignoter. Appuyez sur la touche + ou - pour choisir le mois. Appuyez sur la touche MODE pour continuer.
- Page 62 Remarques : Si aucune touche n’est appuyée pendant 20 secondes, le mode réglage sera interrompu et il y aura retour au mode affichage normal, reflétant les réglages effectués par l'utilisateur Touches de déplacement Haut/Bas : Appuyez une fois pour rajouter/soustraire 1, maintenez appuyée pour aller rapidement.
- Page 63 Réglage de l’alarme : - Appuyez sur la touche MODE pour accéder au mode affichage d’alarme. Utilisez les touches +/- pour activer ou désactiver l’alarme. L'icône d'alarme est affiché lorsque l'alarme est activée. Appuyez à FR13...
- Page 64 nouveau sur la touche MODE pour retourner au mode affichage normal. - En mode affichage normal, maintenez appuyée la touche MODE pour accéder au mode réglage de l'alarme : HEURE D’ALARME : L’heure se met à clignoter. Appuyez sur la touche + ou - pour choisir l'heure. Appuyez sur la touche MODE pour continuer.
- Page 65 pour aller rapidement. Le son de l’alarme augmente progressivement. Lorsque l’alarme se déclenche, elle reste active pendant 2 minutes, puis s’arrête. L’icône d’alarme clignote pendant que l’alarme sonne. Rappel d’alarme : Lorsque l’alarme se déclenche, appuyez sur la touche SNOOZE/LIGHT pour lancer un rappel d’alarme dans 10 minutes.
- Page 66 Utilisation de MAX/MIN : En mode affichage normal, appuyez sur la touche MAX/MIN pour afficher la température et l’humidité maximales intérieures et extérieures (l’icône MAX est affiché). Appuyez à nouveau sur la touche MAX/MIN pour afficher la température et l’humidité minimales intérieures et extérieures (l’icône MIN est affiché).
- Page 67 pluvieux, orageux et neigeux ENSOLEILLÉ PARTIELLEMENT NUAGEUX ENSOLEILLÉ PLUVIEUX ORAGEUX NEIGEUX FR17...
- Page 68 Affichage de la tendance de la température extérieure et de la pression atmosphérique : La station météo peut afficher la tendance de la température extérieure et de la pression atmosphérique. Les symboles peuvent être affichés : La température extérieure/pression atmosphérique est en hausse La température extérieure/pression atmosphérique est constante La température extérieure/pression atmosphérique est en baisse FR18...
- Page 69 Canaux du capteur extérieur : La station peut recevoir jusqu’à 3 capteurs sur 3 canaux différents et chaque capteur extérieur peut ne transmettre des données mesurées qu’à un canal spécifique. Appuyez sur la touche CH de la station pour régler l’une des 4 options d’affichage de canal possibles : canal 1, canal 2, canal 3 ou rotation constante des 3 canaux.
- Page 70 10 secondes. Indicateur piles faibles : L’icône de pile affiché près de la température intérieure indique que les piles de la station doivent être changées. L’icône de pile affiché près de la température extérieure indique que les piles du capteur doivent être changées.
- Page 71 Capteur TX960 : 2 x pile AAA MR03 Dimensions Station 85 (L) x 65 (P) x 185 mm (H) Capteur : 40 (L) x 22 (P) x 100 mm (H) Température intérieure : Plage de température de fonctionnement = -9,9 à 50 °C (14 à 122 °F) ...
- Page 72 Humidité intérieure : Plage de l’humidité de fonctionnement = de 20 % à 95 % HR Précision +/- 5 % HR (à 25° C, de 30 % HR à 80 % HR) Précision +/- 8 % HR (à 25° C, de 20 % HR à 29 % HR/de 80 % HR à 95 % HR) ...
- Page 73 Portée de transmission : 30m (dans un espace dégagé) Informations de sécurité : Effets de l'environnement sur la réception La station utilise la technologie sans fil pour obtenir l'heure précise. Comme pour tout appareil sans fil, la réception peut être affectée dans les cas suivants : ...
- Page 74 À l'intérieur de véhicules mobiles. Placez votre station météo dans un endroit avec des signaux optimaux, par exemple près d'une fenêtre, loin des surfaces métalliques et des appareils électriques. Précautions Cette unité principale est destinée uniquement à un usage intérieur, le capteur extérieur est destiné à un usage extérieur.
- Page 75 Avertissements de sécurité concernant les piles Utilisez uniquement des piles alcalines non rechargeables. Installez les piles en respectant les polarités (+/–). Remplacez toujours toutes les piles en même temps. Ne mélangez pas des piles usagées avec des piles neuves. ...
- Page 76 Obligation légale concernant la mise au rebut des piles Ne jetez pas les piles usagées avec les ordures ménagères, car elles sont nuisibles à la santé et à l'environnement. Vous pouvez ramener les piles usagées sans frais à votre revendeur et aux points de collecte. En tant que consommateur, vous êtes obligés par la loi de ramener les piles usagées aux revendeurs et aux points de collecte ! Respect de l'obligation de la loi sur les appareils électriques Ce symbole signifie que les appareils électriques ne doivent pas être jetés aux ordures...
- Page 77 Note: Instruction manual in 8 languages In addition to this printed user manual, you can download the user manual in 8 languages from the official website www.technoline.de . Remarque: Mode d'emploi en 8 langues En plus de ce manuel d'utilisation imprimé, vous pouvez télécharger le manuel d'utilisation en 8 langues sur le site officiel www.technoline.de .
Need help?
Do you have a question about the WS6446 and is the answer not in the manual?
Questions and answers