Table of Contents
Advertisement
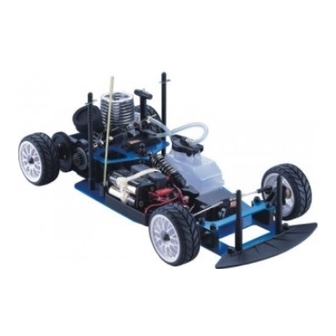
1/10 2WD On-Road Nitro Racer
No.6711
JD6211
Thunder Tiger Corporation guarantees this model kit to be free from defects in both material and workmanship.
The total monetary value under warranty will in no case exceed the cost of the original kit purchased. This warranty
does not cover any components damaged by use or modification. Part or parts missing from this kit must be
reported within 60 days of purchase. No part or parts will be sent under warranty without proof of purchase.
To receive part or parts under warranty, the service center must receive a proof of purchase and/or the defective
part or parts. Should you find a defective or missing part, contact the authorized Thunder Tiger Service/Distributor
nearest you. Under no circumstances can a dealer or distributor accept return of a kit if assembly has started.
Advertisement
Table of Contents

Related Manuals for THUNDER TIGER uno


Summary of Contents for THUNDER TIGER uno
- Page 1 No.6711 JD6211 Thunder Tiger Corporation guarantees this model kit to be free from defects in both material and workmanship. The total monetary value under warranty will in no case exceed the cost of the original kit purchased. This warranty does not cover any components damaged by use or modification. Part or parts missing from this kit must be reported within 60 days of purchase.
-
Page 2: Items Required For Opera Tion
INTRODUCTION Thank you for the purchase of this Thunder Tiger product. You should enjoy many hours of trouble free use from this advanced R/C product. Thunder Tiger strives to bring you the highest level of quality and service we can provide. We race and test our products around the world to bring you state-of-the-art items. - Page 3 INSTALLING THE RADIO GEAR skip if already assembled Install the servos with tap screws. Notice the orientation of the steering and throttle servo output shafts. Install the receiver switch into the front of the battery mount with its original screws. Properly plug the connectors/wires into the receiver: steering servo connector/wire into channel 1 slot, throttle servo connector/wire into channel 2 slot, and battery switch connector/wire into battery slot.(Hint: You can use small zip tie to arrange the rest of wires.)
-
Page 4: Charging The Glow Plug Igniter
Install the servo horn onto throttle servo output shaft. CHARGING THE GLOW PLUG IGNITER Thunder Tiger Optional Part #2165, 1300MAH Glow Starter w/220V Charger. Thunder Tiger Optional Part #2166, 1300MAH Glow Starter w/110V Charger. Plug the charger into an AC outlet, and then pull on the igniter lever to accept the charging adapter. -
Page 5: Preparing The Radio
PREPARING THE RADIO Check the frequency printed on the transmitter crystal. Check the frequency printed on the receiver crystal, and make sure it matches with the transmitter crystal. Make sure no one will operate on the same frequency when you are. When there is a radio glitch, it will most likely be caused by improper crystal, damaged crystal, or people operating on the same frequency. -
Page 6: Operating Radio Steering Function
OPERATING RADIO STEERING FUNCTION Check the radio steering functions. With the radio transmitter and receiver on, turn the steering wheel/stick to the left. The front tires/wheels should turn left accordingly. If not, flip the steering servo reverse switch. Return the steering wheel/stick to neutral. The front tires/wheels should point straight forward. If not, use the steering trim lever to correct it. -
Page 7: Adjusting Throttle / Brake Linkage
ADJUSTING THROTTLE / BRAKE LINKAGE To set the throttle/brake linkage, first the radio should be on and neutral; thus, the servo is at neutral position. With the servo at neutral, turn and adjust the brake collar to a point where the brake lever almost engages the brake system, but not yet. -
Page 8: Preparing The Engine
(replace with new one). After checking, reinstall the glow plug. The glow plug used for this engine can be: Thunder Tiger 9281, McCoy #9 / #59, Novarossi C4S / C5S / C6S,OS #8 / #A3 / #A5, and Picco P6S / P7S. -
Page 9: Starting The Engine
7. Thunder Tiger assumes and accepts no responsibility for personal and/or property damages resulting from the use of improper building materials, equipment and operations. By the act of assembling or operating this product, the user accepts all resulting liability. If the buyer is not prepared... - Page 10 9437 PRO-12BXS Shown No. DESCRIPTION 9437 PRO-12BXS 1 PROP NUT AA0199B 3 DRIVE WASHER SET AA0245 4 CRANKSHAFT AA0244 5 CRANKCASE AN0195 6 BACKPLATE ****** 7 CONNECTING ROD AN0433 8 WRIST PIN ASSEMBLY AN0188 10 CYLINDER & PISTON AN0547 11 CYLINDER HEAD AA1000 12 GASKET SET PN0009...
- Page 11 All Touring car bodies are molded from crystal clear lexan and various designs are available to meet your extreme demand. Thunder Tiger Corp. guarantees that the items can fit all TS-N and UNO car series. VOLVO S-40 ALFA ROMEO...
- Page 12 UNO 1/10 2WD On-Road Nitro Racer Thunder Tiger's new on-road nitro racer brings the feel and excitement of nitro racing to parking lot racers everywhere! Not only will this be the economical nitro combo, it will also be the most convenient. With 100% assembly, this new racer is ready to hit the asphalt when it comes out of the box.
Need help?
Do you have a question about the uno and is the answer not in the manual?
Questions and answers