Alpine iLX-700 Owner's Manual
Car multimedia system
Hide thumbs
Also See for iLX-700:
- Quick reference manual (96 pages) ,
- Quick reference manual (13 pages)
Table of Contents
Advertisement
Quick Links
Download this manual
See also:
Quick Reference Manual
FOR CAR USE ONLY/NUR FÜR AUTOMOBIL GEBRAUCH/POUR APPLICATION AUTOMOBILE UNIQUEMENT/PARA USO EN
AUTOMÓVILES/SOLO PER L'UTILIZZO IN AUTOMOBILE/ENDAST FÖR BILBRUK/ALLEEN VOOR GEBRUIK IN DE AUTO/ТОЛЬКО
ДЛЯ ИСПОЛЬЗОВАНИЯ В АВТОМОБИЛЯХ/DO UŻYCIA TYLKO W SAMOCHODZIE
• OWNER'S MANUAL
Please read before using this equipment.
• BEDIENUNGSANLEITUNG
Lesen Sie diese Bedienungsanleitung
bitte vor Gebrauch des Gerätes.
• MODE D'EMPLOI
Veuillez lire avant d'utiliser cet appareil.
• MANUAL DE OPERACIÓN
Léalo antes de utilizar este equipo.
• ISTRUZIONI PER L 'USO
Si prega di leggere prima di utilizzare il
attrezzatura.
ALPINE ELECTRONICS MARKETING, INC.
1-7, Yukigaya-Otsukamachi, Ota-ku,
Tokyo 145-0067, JAPAN
Phone: 03-5499-4531
ALPINE ELECTRONICS OF AMERICA, INC.
19145 Gramercy Place, Torrance,
California 90501, U.S.A.
Phone 1-800-ALPINE-1 (1-800-257-4631)
ALPINE ELECTRONICS OF AUSTRALIA PTY. LTD.
161-165 Princes Highway, Hallam
Victoria 3803, Australia
Phone 03-8787-1200
iLX-700
• ANVÄNDARHANDLEDNING
Innan du använder utrustningen bör du läsa
igenom denna användarhandledning.
• GEBRUIKERSHANDLEIDING
Lees deze aanwijzingen aandachtig alvorens
dit toestel te gebruiken.
• РУКОВОДСТВО ПО ЭКСПЛУАТАЦИИ
Прочтите настоящее руководство перед
началом использования оборудования.
• INSTRUKCJA OBSŁUGI
Prosimy zapoznać się z tą instrukcją przed
przystąpieniem do użytkowania urządzenia.
ALPINE ELECTRONICS GmbH
Wilhelm-Wagenfeld-Str. 1-3, 80807 München, Germany
Phone 089-32 42 640
ALPINE ELECTRONICS OF U.K. LTD.
Alpine House
Fletchamstead Highway, Coventry CV4 9TW, U.K.
www.alpine.co.uk
ALPINE ELECTRONICS FRANCE S.A.R.L.
(RCS PONTOISE B 338 101 280)
98, Rue de la Belle Etoile, Z.I. Paris Nord Il,
B.P. 50016, 95945 Roissy Charles de Gaulle
Cedex, France
Phone +33-(0)1-48638989
R R
ALPINE ITALIA S.p.A.
Viale Cristoforo Colombo, 8
20090 Trezzano sul Naviglio MI, Italy
Phone +39 02 484781
ALPINE ELECTRONICS DE ESPAÑA, S.A.
Portal de Gamarra 36, Pabellón, 32
01013 Vitoria (Alava)-APDO 133, Spain
Phone 945-283588
Designed by ALPINE Japan
68-24567Z82-A
EN
Advertisement
Table of Contents

Related Manuals for Alpine iLX-700


Summary of Contents for Alpine iLX-700
- Page 1 01013 Vitoria (Alava)-APDO 133, Spain Phone 1-800-ALPINE-1 (1-800-257-4631) Phone 945-283588 ALPINE ELECTRONICS FRANCE S.A.R.L. ALPINE ELECTRONICS OF AUSTRALIA PTY. LTD. (RCS PONTOISE B 338 101 280) 161-165 Princes Highway, Hallam 98, Rue de la Belle Etoile, Z.I. Paris Nord Il, Victoria 3803, Australia B.P.
-
Page 3: Table Of Contents
ENGLISH Contents Receiving Traffic Information Manually ..13 PTY (Programme Type) Tuning .....13 Priority News ..........13 Operating Displaying Radio Text ........13 Instructions Apple CarPlay (Optional) Access to Apple CarPlay ........13 WARNING Auxiliary Device (Optional) Operating Auxiliary Devices (Optional) ..14 WARNING ..........5 CAUTION .......... - Page 4 Setting the Parking sensor interrupt time ..25 Mounting the Microphone ......32 Setting the Vehicle type ....... 25 Installing the Unit ........32 About iLX-700 ..........25 Fix the Cables etc........32 Displaying the Product Information .... 25 Connections ............ 34 Initializing the System .........
-
Page 5: Operating Instructions
Failure to do so may cause personal injury or damage to the DO NOT OPERATE ANY FUNCTION THAT TAKES YOUR product. Return it to your authorized Alpine dealer or the nearest ATTENTION AWAY FROM SAFELY DRIVING YOUR VEHICLE. Alpine Service Centre for repairing. -
Page 6: Notice
This will restrict operation of these functions to times when the vehicle is parked. This ensures the focus of the driver’s attention will be on the road and not on the iLX-700. This has been done for the safety of the driver and passengers. -
Page 7: Features
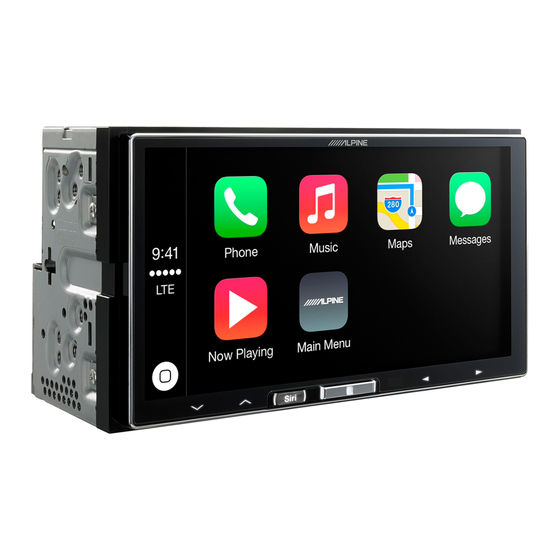
Features About Apple CarPlay Apple CarPlay allows your iPhone 5 or later to operate smoothly from this head unit. About Home Screen The Home Screen for this unit gives direct access to those applications designed to work with Apple CarPlay. The Apple CarPlay icon will indicate whether the appropriate iPhone is connected. -
Page 8: Getting Started
• The unit can be turned on by pressing Home button or Siri button. • The iLX-700 is a precision device. Careful handling of the unit button should provide you with years of trouble-free operation. -
Page 9: Turning The System On
Turning the System On Operating an Item in a List With the Alpine system, when the ignition key is turned to ACC or ON, To scroll through a list, touch the screen and slide the opening screen will be automatically displayed. -
Page 10: Parking Assist Interrupt Function
Alpine’s TuneIt database stored in the Cloud. Using the TuneIt App, You can adjust the interrupt time for Parking Assist screen by “Setting customized parameters can also be uploaded for others to share and rate. -
Page 11: Radio
Radio Presetting Stations Manually Tune in a desired radio station you wish to store in the preset memory by manual or automatic seek Display example for Radio main screen tuning. Touch and hold any one of the preset buttons for at least 2 seconds. -
Page 12: Rds
Tips • If the unit receives the PTY31 (Emergency Broadcast) signal, the unit will show “Alarm” in the display only when PTY31 is set to On. For operation, refer to “Setting PTY31 (Emergency Broadcast) Reception” (page 28). Display example for RDS Information •... -
Page 13: Receiving Traffic Information Manually
Apple CarPlay takes the things you want to do with your iPhone while traffic information. driving and puts them right on iLX-700. You can get directions, make calls, send and receive messages, and listen to music, all in a way that •... -
Page 14: Auxiliary Device (Optional)
Auxiliary Device (Optional) Operating Auxiliary Devices (Optional) To operate devices connected to the AUX terminals of iLX-700, follow the procedure described below. • Turn on the “AUX In”. Refer to “Setting the AUX Mode” (page 27). Calls up the Display Setup screen. (see “Display Setup Operation”... -
Page 15: About The Dvb-T Operation Screen
About the DVB-T operation screen Camera Operation When you touch the screen in the DVB-T mode, the operation screen is displayed. For details on how to operate, refer to the Owner’s Manual of (Optional) the connected Digital TV Receiver (DVB-T). Menu operation mode screen display example The video from an optional camera can be viewed from this head unit’s display. -
Page 16: Guide Display On/Off Setting
Guide Display On/Off Setting About the Rear Camera Guide Touch the screen when the image from the camera is To display the guide, set “Guide Display On/Off Setting” (page 16) to displayed. On. Also, to adjust the guide, refer to “Adjusting the Rear Camera The operation screen is displayed on the screen. - Page 17 Distance guidance mark Error between the screen and the actual road surface In the following conditions, errors are produced between the screen The distance guides represent the ground level distance from the rear guidance and the actual road surface. (The illustrations represent a case bumper.
-
Page 18: Other Camera Operation
When there is a steep downward slope behind the Setup car (example) <Screen> Audio Setup Audio Setup Operation The following steps 1 to 5 are common operations to each <Situation of the car> “Setting item” of Audio Setup. Refer to each section for details. Touch [ ] on the Home screen. -
Page 19: Adjusting Balance (Between Left And Right)
Setting the Subwoofer installed to your iPhone. It is also possible to download specific parameters for certain vehicles from Alpine’s TuneIt database. Turning Subwoofer ON/OFF Using the TuneIt App, customized parameters can also be uploaded for others to share and rate. -
Page 20: Setting The Bass Engine Sq Type
Setting item: Media / Phone Calls / Ringtones & Alerts / Setting the Bass Engine SQ Type Notifications & Guidance / Siri Setting contents for Media: -14 to +14 (Initial setting: 0) You can set your favorite Bass Engine SQ type. Setting contents for Phone Calls / Ringtones &... -
Page 21: Display Setup
Switching Display Modes Display Setup Setting item: Display Mode Setting contents: WIDE (Initial setting) / NORMAL Display Setup Operation The Parking Brake must be engaged to access the Display mode screen. Attempting to access this screen while driving will display the warning-Unable to operate while driving. -
Page 22: Adjusting Picture Quality
Adjusting Picture Quality General Setup Setting item: Sharpness Setting content: -3 to +3 (Initial setting: 0) General Setup Operation Picture quality adjustment range is -3 to +3. “SOFT” and “HARD” appear as the minimum and maximum values. Saving and Calling the Adjusted Picture The Parking Brake must be engaged to access the General mode screen. -
Page 23: Time Setting
Time Setting Key Sound Setting Setting the Clock Display Touch Sound Feedback On/Off setting You can select the clock display type, 12-hour or 24-hour, depending on Setting item: Touch Sound Feedback Setting contents: On (Initial setting) / Off your preference. On: Turn on the touch sound feedback. -
Page 24: Button Backlighting Adjustment
Button Backlighting Adjustment Security Code Setting You can adjust the brightness of the button lighting at night with the dimmer. Setting Security code Setting item: Key Illumination Level Setting level: -2 to +2 (Initial setting: 0) You can set the system to be unusable without entering a password. When you turn this setting to “On”... -
Page 25: Vehicle Function Setting
Make note of this information and You can adjust the display time for Climate screen by this setting. refer to it whenever you contact Alpine Tech Support or an Alpine- authorized dealer. Setting item: Climate screen interrupt time... -
Page 26: Application Setup
Application Setup Camera Setting [Camera] is selected on the Application setup menu in step 3. Refer to “Application Setup Operation” (page 26). Application Setup Operation Setting the Camera Input The Parking Brake must be engaged to access the Application With an optional camera connected, its video is output to the monitor. mode screen. -
Page 27: Setting The Camera Interrupt
Adjusting guides simultaneously Setting Direct Touch Operation If DVB-T is set as the AUX Name, this setting is available. Touch [Link]. Setting item: DirectTouch The 3 vertical guides of the currently-selected guide link Setting contents: On (Initial setting) / Off together, allowing them to be adjusted simultaneously. -
Page 28: Radio Setting
Setting PTY31 (Emergency Broadcast) Radio Setting Reception [Radio] is selected on the Source setup menu in step 3. Refer to PTY31 (Emergency Broadcast) reception can be set to On/Off. “Application Setup Operation” (page 26). Setting item: PTY31 Setting contents: On (Initial setting) / Off PI SEEK Setting •... -
Page 29: Information
• The antenna is not the proper length. The software installed in the product contains opensource software. - Extend the antenna fully; replace it if it is broken. See the following Alpine website for details on the open source software. • The antenna is poorly grounded. http://www.alpine.com/e/oss/download - Make sure the antenna is grounded properly at its mounting location. -
Page 30: Specifications
CHASSIS SIZE Specifications Width 178 mm (7") Height 100 mm (3 – 15/16") MONITOR SECTION Depth 75.5 mm (3") Screen Size 7.0" • Due to continuous product improvement, specifications and design LCD Type Transparent type TN LCD are subject to change without notice. •... -
Page 31: Installation And Connections
Do not tap into these leads to provide power for this safety-related system), or tanks should NEVER be used for unit. When connecting the iLX-700 to the fuse box, make sure installations or ground connections. Using such parts could disable the fuse for the intended circuit of the iLX-700 has the control of the vehicle and cause fire etc. -
Page 32: Installation
Installation Microphone Note on installation • Install at an angle between horizontal and 30°. Note that Cable clamp installing at an angle outside of this range will result in a (Sold separately) loss of performance and possible damage. Installing the Unit Remove the Face Plate from the unit. - Page 33 • The diagram and the fuse amperage shown above are in the case when iLX-700 is used individually. • If the switched power (ignition) lead of the iLX-700 is connected directly to the positive (+) post of the vehicle’s battery, the iLX-700 draws some current (several hundred milliamperes) even when its switch is placed in the OFF position, and the battery may be discharged.
-
Page 34: Connections
Connections AUX INPUT To Video/Audio (R, L) Output terminal REMOTE OUT To remote output lead (Brown) CAMERA IN To camera CAN Connector To CAN Interface box Antenna Microphone (Included) Rear Left Amplifier Rear Right Front Left Amplifier Front Right Subwoofers Amplifier REMOTE TURN-ON To amplifier or equalizer... - Page 35 It can be used as Front Output RCA Connectors. Subwoofer RCA Connectors Steering Remote Control Interface Connector To steering remote control interface box. For details about connections, consult your nearest Alpine dealer. AUX/CAMERA/CAN Connector MIC Input Connector To Microphone (Included).
-
Page 36: System Example
System Example Connection of an iPhone iPhone* (Sold separately) USB Extension Cable (Included) Lightning to USB Cable (Included with iPhone) USB Connector * About iPhone models usable with this unit, refer to Apple CarPlay section (page 13). • Do not leave an iPhone in a vehicle for a long time. Heat and humidity may damage the iPhone and you may not be able to play it again. - Page 37 Connection of an External device AUX/CAMERA/CAN Connector To Video Output Terminal (Yellow) (Red) DVD Player, DVB-T, etc. (sold separately) (White) To Audio Output Terminal 1 Video/Audio Input Connector (AUX INPUT) 3 RCA Extension Cable (Sold Separately) • When you use this connector, an optional AV/RCA interface cable should be used.
- Page 38 Connection of an External Amplifier Power Supply Connector REMO REMOTE ON (Blue/White) (Blue/White) Power Cable Amplifier 4 ch (Sold separately) Input Front speaker Input Rear speaker REMOTE ON (Blue/White) Subwoofer Input Amplifier for subwoofer (Sold separately) 1 Front Output RCA Connectors 3 Subwoofer RCA Connector RED is right and WHITE is left.
- Page 39 Connection of camera AUX/CAMERA/CAN Connector To Video Output terminal Camera with RCA video output (sold separately) HCE-C105, etc. CAMERA Cable 1 CAMERA Input Connector 2 RCA Extension Cable (sold separately) • When a rear camera is used, make sure REVERSE cable is connected correctly.
- Page 40 About the Rules of Bluetooth Electromagnetic Radiation Regulation Declaration of Conformity...
-
Page 41: Declaration Of Conformity
Phone: +81-246- 36-4111 Fax: +81-246-36-6090 AJ140017 Declaration of Conformity We, authorized representative in Europe , Alpine Electronics (Europe) GmbH Wilhelm Wagenfeld Strasse 1-3, 80807 Munich, Germany certify and declare under our sole responsibility that the following product(s) Product name Display Unit Manufacturer Alpine Electronics, Inc.
Need help?
Do you have a question about the iLX-700 and is the answer not in the manual?
Questions and answers