Table of Contents
Advertisement
Advertisement
Table of Contents

Related Manuals for Navig8r NAVSPORT1080


Summary of Contents for Navig8r NAVSPORT1080
- Page 1 NAVSPORT1080 USER GUIDE...
- Page 2 IMPORTANT SAFETY INSTRUCTIONS AND PRECAUTIONS Read all instructions carefully before use Retain this product manual for future reference. Use this product only in the manner described. Only use a water-dampened soft-cloth to clean the surface of the camera including the lens.
-
Page 3: Table Of Contents
ACCESSORIES IN THE BOX PRODUCT CONNECTION AND BUTTONS CHARGING THE BATTERY WATERPROOF CASE HANDLEBAR / SEAT POST MOUNT HELMET MOUNTING KIT MOUNTING EXAMPLES INSERTING THE MICRO SD CARD START-UP/SHUTDOWN SWITCH BETWEEN FUNCTION MODES START RECORDING / TAKE PHOTO VIDEO MODE SCREEN ICONS PHOTO MODE SCREEN ICONS PLAYBACK MODE PLAYBACK VIDEO: OPTIONS... -
Page 4: Accessories In The Box
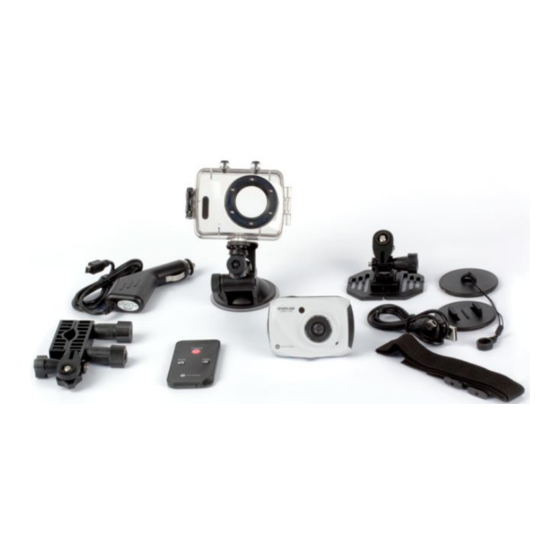
ACCESSORIES IN THE BOX 1x FHD Sports Camera, 1x Waterproof Housing, 1x Remote Control, 1x Handle Bar Mount, 1x Suction Cup Mount, 1x Helmet Mount and Strap, 1x Watercraft Mount (detach mount from helmet mount) – includes 1 adhesive mount and 1 adhesive safety tether, 1x In-Car 12V Charger, 1 x USB Cable, 1x User manual (The below images are for reference only) Common mount Common mount... -
Page 5: Product Connection And Buttons
PRODUCT CONNECTION AND BUTTONS: Busy/Charging Light Infrared Light Screen Off Switch Screen Camera Lens Screen Off Light HDMI Interface Micro SD Card Slot USB Interface Reset key Mounting point Microphone Shutter button Power On/Off Button... -
Page 6: Charging The Battery
CHARGING THE BATTERY Turn the camera off and connect the USB cable to the camera and to your power source (i.e. in-car charger, PC USB port or USB Mains Power Adaptor) The charging indicator light will turn RED. When the battery charge is full, the light will turn BLUE. -
Page 7: Handlebar / Seat Post Mount
HANDLEBAR / SEAT POST MOUNT -20 Screw “Screw Locking Wheel Tilt Knob Bar Clamp Bar Clamp Nuts Connect the bar clamp to your handlebar (4). Connect your camera to the ¼”screw (1) securely. Loosen the tilt knob (5) and adjust. After positioning tighten all clamp nuts. -
Page 8: Mounting Examples
MOUNTING EXAMPLES HANDLE BAR Mount HELMET Mount SUCTION CUP Mount INSERTING THE MICRO SD CARD Carefully push the memory card into the card slot, as shown in the diagram below (using your fingernail). The Micro SD card will “click into place”. To take the memory card out, gently press the end of the memory card inward using your fingernail until a click is heard. -
Page 9: Start-Up/Shutdown
START-UP/SHUTDOWN 1. START-UP: Press and hold the power button until the welcome screen is displayed. Note: The remote control cannot turn on the camera. You must use the power button on the camera 2. SHUTDOWN: Press and hold the power button until the Goodbye screen is displayed. Note 1: The camera will automatically shut down after 5 minutes of inactive use to conserve power. -
Page 10: Start Recording / Take Photo
START RECORDING / TAKE PHOTO When the camera is turned on, it will automatically enter video mode. Either select another mode or start recording videos by simply pressing the shutter button Note: The preview must be ON. To stop video recording, press the shutter button again. -
Page 11: Playback Mode
PLAYBACK MODE After turning on the camera and enabling the preview screen, press the playback icon. Select what type of file to playback by using the Video, Photo and Car icons. (Refer to the image below left of page) A file screen will then appear with a preview thumbnail image. -
Page 12: Connecting To A Hd Tv
CONNECTING TO A HD TV Connect the camera to a high-definition TV (or HDMI equipped monitor) with a Mini HDMI to HDMI cable (as shown below). The HDMI signal will carry Full HD video and 2 channel stereo. Once connected and playback has begun, the camera LCD screen will also display the playback image (as below) REMOTE CONTROL Infrared... -
Page 13: Faq
Try installing the CODEC pack supplied on the Windows media player can not play the install CD, otherwise we find most customers recorded video files? have better luck with VLC Player. The car recorder mode uses cyclical recording, In car recorder mode, I can not record to my which means it requires some buffer memory SD card even though there is space on it. -
Page 14: Technical Specifications
TECHNICAL SPECIFICATIONS Image sensor 5 million pixel (CMOS) Record Video Functions Take photos In-Car Crashcam / Black Box recorder. Camera lens F3.1 f=2.9mm Zoom 4 X Digital Shutter Electronic LCD display screen 2.4-inch Touch Screen 12M (4000 × 3000), 10M (3648x2736), 8 M Image resolution (3264x2448), 5M (2560×1920) Video resolution... - Page 15 Warranty against Defects Laser Corporation Pty Ltd (“Laser”) warrants your new product to be free from defects in materials and workmanship for 12 months, from the date of purchase, provided that the product is used in accordance with accompanying recommendations or instructions where provided.
Need help?
Do you have a question about the NAVSPORT1080 and is the answer not in the manual?
Questions and answers