Table of Contents
Advertisement
Quick Links
Advertisement
Table of Contents

Related Manuals for Navig8r NAVSPORTMINI


Summary of Contents for Navig8r NAVSPORTMINI
- Page 1 NAVSPORTMINI USER GUIDE...
-
Page 2: Table Of Contents
CONTENTS ACCESSORIES IN THE BOX PRODUCT CONNECTION AND BUTTONS CHARGING THE BATTERY WATERPROOF CASE OPERATION HANDLEBAR / SEAT POST MOUNT HELMET MOUNTING KIT MOUNTING EXAMPLES INSERTING THE MICRO SD CARD START-UP/SHUTDOWN VIDEO RECORDING CAPTURE MODE PLAYBACK MODE CONNECTING TO A COMPUTER CONNECTING TO A TV TECHNICAL SPECIFICATIONS... - Page 3 IMPORTANT SAFETY INSTRUCTIONS AND PRECAUTIONS Read all instructions carefully before use Retain this product manual for future reference. Use this product only in the manner described. Only use a water-dampened soft-cloth to clean the surface of the camera including the lens.
-
Page 4: Accessories In The Box
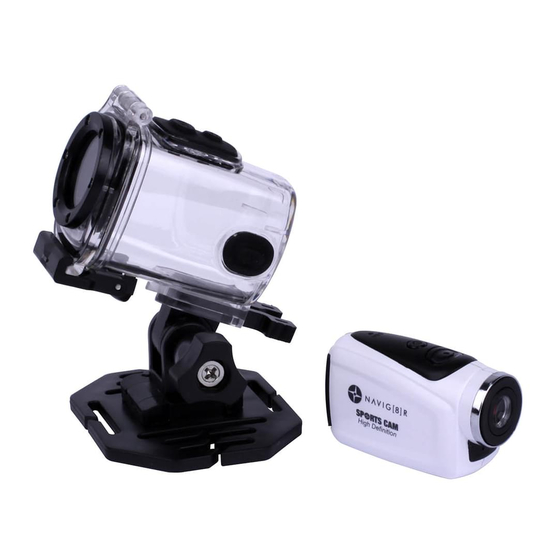
ACCESSORIES IN THE BOX 1x HD Sport Camera, 1 x Waterproof case, 1x Handle Bar Mount, 1x Helmet Mount and Strap, 1 x AV cable, 1 x USB Cable, 1x User Manual PRODUCT CONNECTION AND BUTTONS Digital menu screen Mode Button - Press to switch between “Hi” and “Lo” resolutions in both Video and Photo modes. -
Page 5: Charging The Battery
CHARGING THE BATTERY Turn the camera off and connect the USB cable to the camera and to your power source (i.e. in-car charger, PC USB port or USB Mains Power Adaptor) The charging indicator light will turn RED. When the battery charge is full, the light will turn BLUE. -
Page 6: Helmet Mounting Kit
HELMET MOUNTING KIT 1. Helmet Belt 3. Camera clip mount 4. Tilt Knob 2. Helmet Mount Note: This bracket will only work with vented Helmets such as bicycle helmets. Use the supplied strap to loop through the holes in your helmet and then through the long slots on the helmet mount. -
Page 7: Startup/Shutdown
STARTUP/SHUTDOWN 1. START-UP: Press and hold the power button. 2. SHUTDOWN: Press and hold the power button again. Note 1: This camera will automatically shut down after 5 minutes of inactive use to conserve power. Note 2: If there is not enough power the low power battery icon will flash. When power has been exhausted the camera will shutdown. -
Page 8: Playback Mode
PLAYBACK MODE After connecting to an external monitor, the camera will automatically enter the replay mode. Simply press the MODE button to select a photo or a recorded video file. Then press the shutter button to begin playback. During playback, press the shutter button to stop playback. To delete a file, press on hold the shutter button to enter the delete file screen. -
Page 9: Faq
Try installing the CODEC pack supplied on the Windows media player can not play the install CD, otherwise we find most customers recorded video files? have better luck with VLC Player. A full charge can take up to 2 hours and will record How long does a full charge take and how long will up to 60 minutes of video, depending on your it last? -
Page 10: Technical Specifications
TECHNICAL SPECIFICATIONS Image sensor 1.3 million pixel (CMOS) Taking video Function mode Taking photos Camera lens F/1.0 – 4.1mm Shutter Electronic 1.3MP 1280 x 960pixels Image resolution 5.0MP 2560 x 1920pixels 640×480pixels 60fps Video resolution 1280 x 720pixels 30fps White balance Automatic Exposure Automatic... - Page 11 Warranty against Defects Laser Corporation Pty Ltd (“Laser”) warrants your new product to be free from defects in materials and workmanship for 12 months, from the date of purchase, provided that the product is used in accordance with accompanying recommendations or instructions where provided.
Need help?
Do you have a question about the NAVSPORTMINI and is the answer not in the manual?
Questions and answers