Table of Contents
Advertisement
Advertisement
Table of Contents

Subscribe to Our Youtube Channel
Related Manuals for Navig8r NAVSPORTPRO


Summary of Contents for Navig8r NAVSPORTPRO
- Page 1 NAVSPORTPRO USER GUIDE P a g e...
- Page 2 Do not put the sports camera close to objects that emit radio waves, such as an antenna. Do not expose the sports camera to high temperature, extreme heat or direct sunlight. During continuous use, the surface temperature of your NAVSPORTPRO may increase. This is part of normal operation.
-
Page 3: Table Of Contents
INDEX SPORTS CAMERA AND ACCESSORIES IN THE BOX Page 4 OPTIONAL ACCESSORIES Page 4 PRODUCT BUTTONS AND CONNECTIONS Page 5 CHARGING Page 6 MOUNTING PRECAUTIONS Page 6 INSTALLING THE WATERPROOF HOUSING Page 6 INSTALLING THE REMOTE CONTROLLER Page 7 INSERTING A MICRO SD CARD Page 7 FORMATTING MICRO SD CARD’S Page 7... -
Page 4: Sports Camera And Accessories In The Box
50 metres from the camera (line of sight) View our full range of SPORTS CAM accessories at www.navig8r.com.au. Accessories are sold separately. P a g e... -
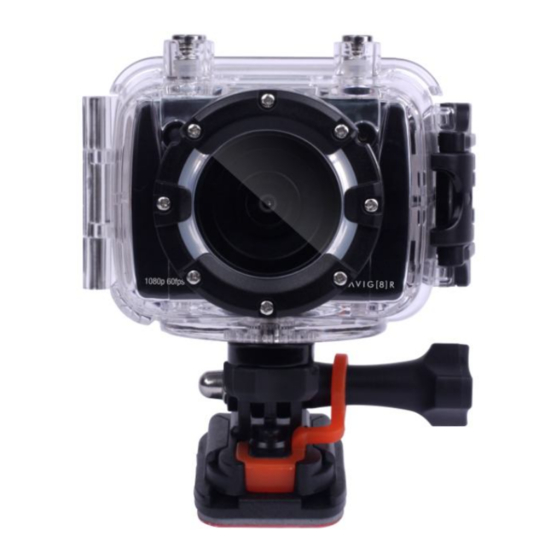
Page 5: Product Buttons And Connections
PRODUCT BUTTONS AND CONNECTIONS PRODUCT BUTTONS AND CONNECTIONS 18. Operating/ 7. OK 23. Video/Photo 13. AV Out/ 1. LCD screen Recharging (confirmation)key Audio in indicator Green indicator (Red) 8. accessory 19. LCD enu key 14. Record key 24. Laser pointer release button status display 3. -
Page 6: Charging
CHARGING Before using your NAVSPORTPRO, check whether the battery has sufficient charge. If the power level is low, use the supplied USB cable to recharge the battery/s. Once connected, the red indicator lamp will blink slowly. When fully charged the red indicator will be constantly on. A full charge time takes approximately three hours. -
Page 7: Installing The Remote Controller
FORMATTING MICRO SD CARD’S Before video/audio recording and shooting pictures, format the Micro SD card on the NAVSPORTPRO camera. If a Micro SD card has been used on other devices, it should also be formatted on-board before use. Note: Before formatting, make sure the files in the memory and Micro SD card are not needed. -
Page 8: Storage And Play Of A File
“VLC” is recommended for playing recorded files. Otherwise you may need to download the relevant codec to enable Windows Media Player to function. Note: Turn your NAVSPORTPRO on to transfer data. When finished turn your NAVSPORTPRO off before disconnecting the cable. -
Page 9: Main Unit And Lcd Screen Icons
MAIN UNIT AND LCD SCREEN ICONS Note: Please connect the LCD screen for the following. Icon Function If visible, the camera is currently powered on. If not, the camera is (Main Unit) either turned off or in stand-by mode. Main Unit Battery power indicator (Shown when unit is turned on). (Main Unit) Note: When the video camera is in the standby or power-off state, the power icon is not displayed. -
Page 10: Main Menu Screen
MAIN MENU SCREEN From the preview screen, press the key to display the main menu options. < > Use the keys to move across between Video, Camera & System Settings. – Use the keys to move up and down within each setting screen. To enter an option press OK. -
Page 11: Camera Menu Settings
Turn On or Off. (Pre video buffers approx 5 seconds of video. When selected, press the record button once to activate the feature. Then press a Pre Video second time when ready to begin recording, which includes the previous 5 seconds. -
Page 12: System Menu Settings
SYSTEM MENU SETTINGS Warning tone Turn key tones (clicks) ON or OFF Status indicator Turn ON or OFF Video content ON = Recording files auto-saved at 15 min intervals loop OFF = Recording files auto-saved at 30 min intervals Select between OFF, 2, 5 or 10 mins. Note: Press the Video, Photo or Stop to Auto to standby wake. -
Page 13: Playing An Audio File
When playing a video file, the shortcut key functions are: Description Description Increase volume Decrease volume. < Long press and hold to slow > Long press and hold to slow forward rewind Short press and hold to fast forward Short press and hold to fast rewind Resets and plays a file from the Starts or Pauses file playback... -
Page 14: Deleting, Protecting, And Auto-Playback
DELETING, PROTECTING, AND AUTO-PLAYBACK From the playback mode, press the M key to access the following options: Deleting a file From the video, photo or video/photo mode, highlight or open a file and press the M key Then select between “delete single” (Delete current file only) or “delete all” (deletes all unprotected files). -
Page 15: Av Output
AV OUTPUT From the preview mode, connect the camera to a display device (like a TV) using the supplied AV cables. During playback all camera functions can be used normally. HDMI OUTPUT From the preview mode, connect the camera to a HDMI compatible display device (like a HD TV or monitor) using the supplied HDMI cable. -
Page 16: Technical Specifications
TECHNICAL SPECIFICATIONS Option Specifications View angle 175° ultra-wide-angel f/2.8 lens Number of pixels Rechargable 1000 mAh lithium battery + 1100 Battery mAh backup battery Power consumption 650 mA @ 3.7 V (Max.) Maximum video recording time Up to 4 hours Maximum audio recording time Up to 7 hours Standby duration... - Page 17 Warranty against Defects Laser Corporation Pty Ltd (“Laser”) warrants your new product to be free from defects in materials and workmanship for 12 months, from the date of purchase, provided that the product is used in accordance with accompanying recommendations or instructions where provided.
Need help?
Do you have a question about the NAVSPORTPRO and is the answer not in the manual?
Questions and answers