Table of Contents
Advertisement
O
WNER'S
LED TV
with Android™
39L4300 Series
50L4300 Series
©2013 TOSHIBA CORPORATION
All Rights Reserved
M
ANUAL
Owner's Record
You will find the model number and serial number on
the back of the TV. Record these numbers in the spaces
provided below. Refer to them whenever you call upon
your TOSHIBA dealer regarding this product.
Model number:
Serial number:
TD/J
VX1A00288700
Advertisement
Table of Contents

Related Manuals for Toshiba 39L4300 Series


Summary of Contents for Toshiba 39L4300 Series
- Page 1 You will find the model number and serial number on the back of the TV. Record these numbers in the spaces 39L4300 Series provided below. Refer to them whenever you call upon your TOSHIBA dealer regarding this product. 50L4300 Series Model number: Serial number: ©2013 TOSHIBA CORPORATION...
-
Page 2: Table Of Contents
Welcome to Toshiba • Thank you for purchasing this Toshiba LED TV. This manual will help you use the exciting features of your new TV. • Instructions in this manual are based on using the remote control. • You also can use the controls on the TV if they have the same name as those referred to on the remote control. -
Page 3: Introduction / Getting Started
Leave the bottom of the unit protruding over the edge of the surface and assemble as indicated. NOTE: Extreme care should always be used when attaching the pedestal stand to avoid damage to the LCD panel. 39L4300 Series 39L4300 Series M5 × 2 ×... - Page 4 Introduction / Getting started 4) Always connect the power plug to an Important Safety Instructions appropriate electrical outlet equipped with Be sure to observe the following instructions and 110-240V AC, 50/60Hz. precautions to ensure safe use of this TV. Never use the TV outside the specifi ed voltage range.
- Page 5 Introduction / Getting started 11) Precautions for installing on outdoor aerial 6) Never cut, break, modify, twist, bunch up An outside aerial system should not be located or bent the cord or apply excessive force or in the vicinity of overhead power lines, or other tension to it.
- Page 6 Exemptions 1) Remove the power plug before cleaning. Never use solvents such as benzine or thinner to • Toshiba is not liable for any damage caused by clean the TV. fi res, natural disaster (such as thunder, earthquake, • These solvents may distort the cabinet or etc.), acts by third parties, accidents, owner’s...
-
Page 7: Connecting An Aerial
The exact type and positioning of the aerial will depend upon your particular area. Your Toshiba dealer or service personnel can best advise you on which aerial to use in your area. Before connecting the aerial cable, turn off all main power switches. -
Page 8: Tv Panel Controls
• Connect a USB HDD to the USB 1 port if it needs video and standard stereo audio input (- page power supply. 28). • The USB port also has to be used with the “TOSHIBA Dual Band WLAN Adaptor” in order to access a wireless network (- page 37). -
Page 9: Learning About The Remote Control
Introduction / Getting started 10 A (aerial input terminal) — Analogue aerial 13 o RGB/PC (input terminal) — For use when signal input (- page 7). connecting a personal computer (PC) (- page 11 o PC/HDMI 1 (AUDIO) (input terminal) — 30). - Page 10 Introduction / Getting started Easy remote control Using the pointing key Move the pointer Tilt the pointing key to move the screen pointer in the tilted direction. Pointing key Select/Confi rm Press the pointing key to confi rm the selection. Hold and move Press, hold, and then tilt the pointing key to hold and move the selected item.
-
Page 11: Tuning The Tv For The Fi Rst Time
To set up the TV Application next, select the Skip this step when no Set up the icon on the lower part of the screen, and press the "TOSHIBA Dual Band WLAN wireless LAN pointing key to start the TV. Adaptor" is connected. - Page 12 Introduction / Getting started Press or to select the programme position Press OK to display the Intelligent AutoView menu (- page 19). you want to arrange and press OK to display the Press or to select Yes or No. breakdown menu.
- Page 13 Introduction / Getting started I. Signal Booster NOTE: If the receiving signal is weak/strong and the • The Quick Setup, Location, Auto Tuning, Manual picture is noisy, the picture may be improved Tuning menu can also be display at any time from when using this function.
-
Page 14: Basic Operations
• Select 1 on the home screen and confi rm. Press 1 on the Easy remote control, and the ! power indicator lights up in green. The TOSHIBA logo is displayed, and then the home screen appears. Using the TV itself Press ! on the TV left side panel, and the ! power indicator lights up in green. -
Page 15: Using The Tv's Features
Using the TV’s features Use the TV remote control while watching TV broadcasts (or external input). Learning about the menu system We suggest you familiarize yourself with the display charts before using the menu system: • Press MENU to display menu, then press or to select main menu headings. •... -
Page 16: Using The Quick Menu
Using the TV’s features Using the Quick Menu Watching TV programmes Quick Menu helps you access some options quickly, Selecting the country such as Picture Mode, Media Player etc. Press QUICK to display the Quick Menu and use You can select a country. or ... -
Page 17: Picture Adjustment
Using the TV’s features Sorting positions Picture adjustment Ex.: To swap channel ABCD (Prog.1) for channel • Most of the picture controls and functions are MNOP (Prog.4): available. However, features not available will be greyed out. From the SETUP menu, press or to select Selecting the Picture Size Manual Tuning menu, and then press OK. - Page 18 Using the TV’s features Subtitle Dot by Dot When subtitles are included on a letterbox format “Dot by Dot” is a non-scaling display. Depending on broadcast, this setting will raise the picture so that the input signal format, the picture is displayed with most of the text is displayed.
- Page 19 Using the TV’s features NOTE: Activating the picture preferences If you use this function except for the purpose of your You can customise current Picture Mode settings as private viewing and listening, it may infringe the desired. For example, while selecting "Dynamic", if copyright protected by the copyright laws.
- Page 20 Using the TV’s features Adjusting the Colour Temperature Resetting the Picture Settings Colour Temperature increases the warmth or This feature resets the Picture Settings to the coolness of the picture by setting the red, green or factory settings. blue tint. NOTE: If no picture settings have been changed, Reset is not From the Picture Settings menu, press ...
-
Page 21: Sound Adjustment
Using the TV’s features Resetting the Base Colour Adjustment Selecting the Dual 1 or Dual 2 mode The reset function adjusts the base colour You can hear only Dual 1 or Dual 2 sound selected, adjustment to the factory settings. whenever bilingual programmes are received. - Page 22 Using the TV’s features Press s to select a monaural mode that is Using the Power Bass Booster easy to hear. e Mono 1 and e Mono 2 appear Power Bass Booster helps to create rich bass. cyclically to the screen. NOTE: From the Advanced Sound Settings menu, press ...
-
Page 23: Other Features Settings
Using the TV’s features When all the details have been entered, select Using the Dynamic Range Control Done and press OK to start the timer. This feature allows control of compression for Dolby To cancel the On Timer Digital. From the SOUND menu, press or to select From the On Timer menu, select Enable On the Dynamic Range Control. -
Page 24: Selecting The Video Input Source To View
Using the TV’s features Activating Blue Screen Resetting the TV When Blue Screen is set to On, the screen will turn Reset TV will reset all TV settings, including stored blue and the sound will be muted when no signal is channels, to their original factory values. -
Page 25: Setting The Colour System
Using the TV’s features Setting the Colour System Channel List This feature is available in Standard video Press LIST. The Channel List will appear. (composite) inputs mode. Channel List Press MENU, and then press or to display the SETUP menu. SETUP Country Singapore... - Page 26 For further information on your particular text the teletext screen is displayed to display system(s), see the broadcast teletext index page or subtitles. While the subtitles are displayed, press consult your local Toshiba dealer. SUBTITLE again to change the setting.
- Page 27 Using the TV’s features Using List mode Teletext buttons on the remote control Below is an introduction to the teletext buttons on Press TEXT to access teletext. your remote control and their functions. TEXT M00 14:58:55 To display a page of teletext: Press TEXT to display teletext.
-
Page 28: Back Connections
Using the TV’s features Connecting HDMI or DVI devices Back connections • When turning on your electronic components, turn on the TV fi rst, and then the HDMI and DVI Connection example device. • When turning off your electronic components, TV back view turn off the HDMI and DVI device fi rst, and then the TV. -
Page 29: Selecting The Pc/Hdmi 1 Audio Mode
Using the TV’s features • L-PCM: Linear-Pulse Code Modulation Selecting the PC/HDMI 1 Audio mode • Supported Audio format: L-PCM, Dolby Digital You can select PC audio or HDMI audio when using sample rate 32/44.1/48 kHz this function. Connecting an HDMI device From the PREFERENCES menu and press ... -
Page 30: Connecting A Computer
Using the TV’s features • Depending on the specifi cation of the PC you are Connecting a computer playing the DVD-Video on, and the DVD’s title, some scenes may be skipped, or you may not be able to To connect a PC to the RGB/PC terminal on the TV: pause during multi-angle scenes. -
Page 31: Using The Pc Settings
Using the TV’s features Adjusting the Sampling Clock Pin No. Signal name Pin No. Signal name If the Sampling Clock does not match with the dot clock frequency of the PC, blurred picture detail will Ground occur, or screen width will change, or drift patterns in vertical lines may be apparent. -
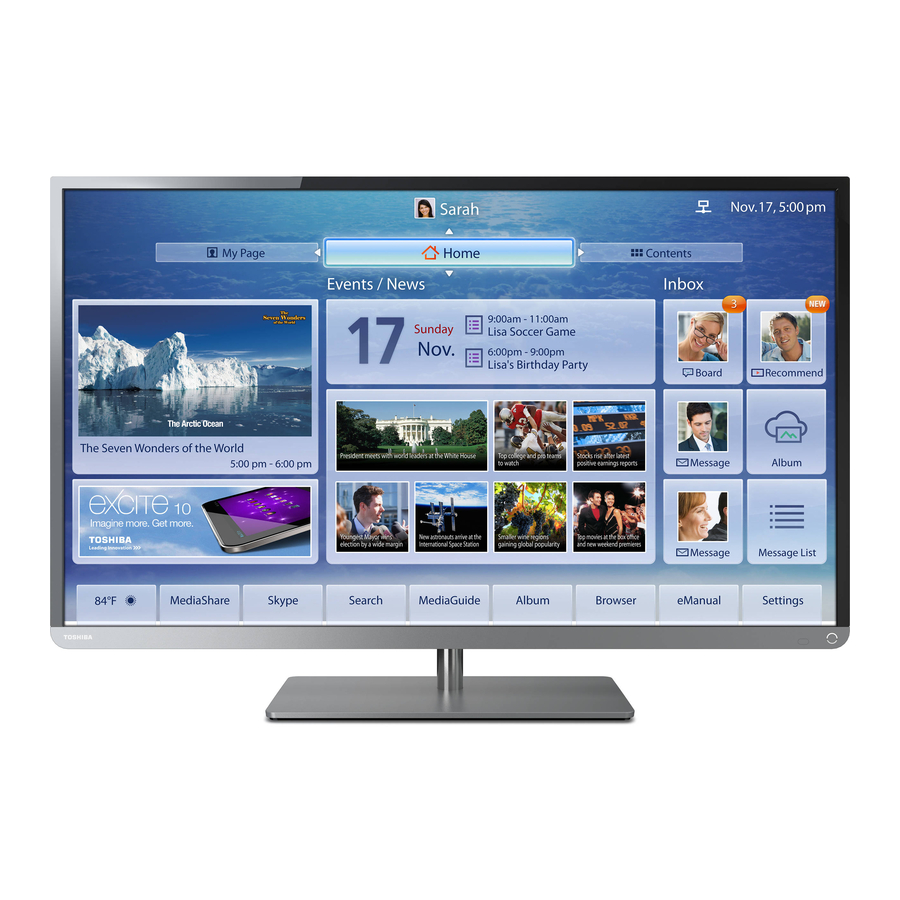
Page 32: Using The Android Features
The TV window, Media Player, YouTube™, Browser, Screen Mirroring, the Google Play Store app, and TOSHIBA Information icons are aligned on the desktop area of the home screen. • The desktop area of the home screen cannot be changed. The other desktop areas can be customized. - Page 33 Using the Android features The desktop area of the home screen Moving between desktop areas The TV window and fi xed icons are located on the Select the screen slide button, and press the desktop area of the home screen. pointing key.
-
Page 34: Notes On Using The Android Features
• When a keyboard is connected to the USB port, the features on the TV, it is recommended that you software keyboard is not displayed. use a TOSHIBA Dual Band WLAN Adaptor and connect via wireless LAN. Dock bar "Connecting a network" (- page 36) •... -
Page 35: Connecting To The Internet
Using the Android features Press, hold and tilt the pointing key to the left Connecting to the Internet or right to display the desktop to place the application or widget on. Select the Browser icon, and press the pointing key. Move the application or widget to any position, and release the pointing key. -
Page 36: Using The Screen Mirroring Function
Using the Screen Mirroring function Connecting a network You can view the screen of your tablet, smartphone The LAN port allows your Toshiba TV to connect to or PC on the TV. your home network. • This function is available when a "TOSHIBA Dual NOTE: Band WLAN Adaptor"... - Page 37 CAUTION: To connect the TV to a network - Wireless • Bluetooth™ and Wireless LAN devices operate within To connect to a wireless network, use a TOSHIBA the same radio frequency range and may interfere Dual Band WLAN Adaptor. with one another. If you use Bluetooth™ and Wireless LAN devices simultaneously, you may occasionally Please refer to “Setting up the Network”...
-
Page 38: Setting Up The Wireless Lan
Using the Android features Setting up the wireless LAN Assisted Setup Confi gure the TV so it can be connected to a Select the Settings icon on the home screen, wireless LAN access point wirelessly. and press the pointing key. NOTE: The Settings screen appears. -
Page 39: Checking And Changing Other Settings
If you select the owner icon and then press the copyright infringement of right holder's rights. pointing key, the Profi le screen appears. You can Toshiba asks you to respect the intellectual property customize the profi le. rights of third parties. - Page 40 Using the Android features Location access Date & time Set the location information. Set the date and time. To display the setup screen, select Location access To display the setup screen, select Date & time and and then press the pointing key. then press the pointing key.
-
Page 41: Updating The System
Media Player is displayed (- page 42). EXIT Return to the home screen. Updating the system Use TOSHIBA Service Station to update the system. Display the APPS screen (- page 34). Select and start TOSHIBA Service Station. Follow the on-screen instructions. -
Page 42: Using The Media Player
You must obtain any required permission from copyright owners to download or use Title : xxxxxxxxxxxxxxxxxxxxxx.jpg Date : xxxx xxx xxxxx xxxxx copyrighted content. TOSHIBA cannot and does xxxxxxxx xxxxxxxx xxxxxxxx xxxxxxxx Size : 1920 x 1080 not grant such permission. -
Page 43: Exiting Media Player
Using the Media Player Starting Media Player from the home screen Exiting Media Player When the top screen of Media Player is displayed Select the Music, Photos, or Videos icon on the or you are operating Media Player, perform the home screen, and press the pointing key. -
Page 44: Viewing Photo Fi Les
Using the Media Player Viewing photo fi les Slide Show This view allows you to watch a slide show of File Compatibility your photos. In this mode, only fi les located in the See page 50. selected directory will be played. Using the TV remote control to operate To start slideshow, press OK in the Single View mode. -
Page 45: Viewing Video Fi Les
Using the Media Player Using the Easy remote control to operate Viewing video fi les Multi View File Compatibility See page 50. Photos Using the TV remote control to operate /xxxxxxxxxxxxxxx/ 5/999 You can select videos from a List View of available xxxxxxxxxxxxxxx xxxxxxxx xxxxxxxx... - Page 46 Using the Media Player Z within 2 seconds after the content starts to To close the Movie Viewer return to the beginning of the previous content. Press EXIT. • Press to display the fi le status information (content number, video title, progress time etc.). The top screen of the Media Player appears.
- Page 47 Using the Media Player To playback DivX Plus HD content: Using the Easy remote control to operate • To play in fast reverse or fast forward directions, List View press CC or cc during playback. Each time you press CC or cc, the playback speed will change. •...
-
Page 48: Playing Music Fi Les
Using the Media Player Playing music fi les During playback: • Press W to pause. File Compatibility • To resume normal playback, press c (play). PAUSE may not be available depending on the See page 51. contents. Using the TV remote control to operate •... - Page 49 Using the Media Player Using the Easy remote control to operate List View Music /USB/ Total Time 5/999 xxxxxxxx xxxx 00:20:00 03:00:00 xxxx.ccc.abc 03:00:00 xxxx.ccc.abc xxxx.ccc.abc 03:00:00 xxxx.ccc.abc 03:00:00 Artisut : xxxxxxxxxxxxxxxxxxxxxx.mov 03:00:00 xxxx.ccc.abc Album : xxxxx xxxx xxxxx xxxxx 03:00:00 xxxx.ccc.abc xxxx.ccc.abc...
-
Page 50: Reference Section
Reference section APPENDIX Media Player Supported Formats Media Media File Video/Audio codec Note Player Format Extention JPEG .jpg JPEG Data compatibility: JPEG Exif ver 2.1 .jpeg Maximum number of files: 4096 per folder *) Some fi les may not be played .png Photo .bmp... - Page 51 Reference section Media Media File Video/Audio codec Note Player Format Extention .mov Video) H.264 (MPEG-4 AVC) MPEG-4 part2 MJPEG Audio) MPEG-1/2 Layer3 MPEG-2/4 LC AAC .mp4 Video) H.264 (MPEG-4 AVC) .m4v Audio) MPEG-1/2 Layer3 MPEG-2/4 LC AAC .asf Video) MPEG-4 part2 .wmv VC-1 (WMV9) .xvid...
- Page 52 Reference section Signal Class Table C mode RF Frequency [MHz] RF Frequency [MHz] RF Frequency [MHz] 663.25 161.25 44.25 671.25 168.25 48.25 679.25 231.25 55.25 687.25 238.25 62.25 695.25 245.25 175.25 703.25 252.25 182.25 711.25 259.25 189.25 719.25 266.25 196.25 727.25 273.25 203.25...
-
Page 53: Troubleshooting
Reference section Troubleshooting Some pixels of the screen do not light up • The LCD display panel is manufactured Before calling a service technician, please check the using an extremely high level of precision following table for a possible cause of the symptom technology, however, sometimes some pixels and some solutions. -
Page 54: Broadcast System
Reference section Broadcast system Specifi cations LED TV Broadcast transmission systems of each country or region Model 39L4300 Series, 50L4300 Series Asia M.E. Power source 110V-240V AC, 50/60Hz Country or region Colour Sound Power consumption Bahrain, Kuwait, Israel, Oman, 39" : 107 W, 0.6 W (standby) Qatar, 50"... - Page 55 PAL, SECAM, NTSC 3.58/4.43 39L4300 Series Owner’s manual (1), Remote control (2), Aspect ratio Batteries (2), TOSHIBA Dual Band WLAN Adapter 16 : 9 (WLM-40U), Clip (1) (- page 4), Screw (1) Visible size (diagonal) (- page 4), Pedestal stand (1), Screws (M4 x 39"...
- Page 56 Reference section Trademark Information • THIS PRODUCT IS LICENSED UNDER THE MPEG- 4 VISUAL PATENT PORTFOLIO LICENSE FOR • The terms HDMI and HDMI High-Defi nition THE PERSONAL AND NON COMMERCIAL USE Multimedia Interface, and the HDMI Logo are OF A CONSUMER FOR (i) ENCODING VIDEO trademarks or registered trademarks of HDMI IN COMPLIANCE WITH THE MPEG-4 VISUAL Licensing LLC in the United States and other...
- Page 57 YOU BY TOSHIBA IN WHATEVER FORM OR MEDIA thereof will remain the exclusive property of (COLLECTIVELY, “SOFTWARE”), WILL CONSTITUTE Toshiba and/or its licensors, and you will not by YOUR ACCEPTANCE OF THESE TERMS. IF SEPARATE this EULA acquire any rights to the Software or...
- Page 58 7. Limitation of Liability. TOSHIBA’ AND/OR ITS or government claims, incurred by TOSHIBA as a LICENSORS’ ENTIRE LIABILITY AND YOUR SOLE result of or in any way arising from such use.
- Page 59 TOSHIBA as to the subject matter remaining provisions hereof shall not in any way hereof and supersedes all prior agreements, be aff ected or impaired.
Need help?
Do you have a question about the 39L4300 Series and is the answer not in the manual?
Questions and answers