Table of Contents
Advertisement
Quick Links
Advertisement
Table of Contents

Related Manuals for Avermedia AVerDiGi EB1504 MPEG4+


Summary of Contents for Avermedia AVerDiGi EB1504 MPEG4+
- Page 1 ® AVerMedia AVerDiGi EB1504 MPEG4 Real-time Security DVR Operation Manual...
- Page 2 The information contained in this documentation is subject to change without notice. In no event will AVerMedia be liable for direct, indirect, special, incidental, or consequential damages arising out of the use or inability to use this product or documentation, even if advised of the possibility of such damages.
- Page 3 WARNING TO REDUCE RISK OF FIRE OR ELECTRIC SHOCK, DO NOT EXPOSE THIS APPLIANCE TO RAIN OR MOISTURE CAUTION IF THERE IS ANY DAMAGE, SHORTAGE OR INAPPROPRIATE ITEM IN THE PACKAGE, PLEASE CONTACT WITH YOUR LOCAL DEALER. WARRANTY VOID UNAUTHORIZED PRODUCT MODIFICATION.
-
Page 4: Table Of Contents
Table of Contents Chapter 1 Introduction ..............1 Package Content..................2 Features and Specifications ............... 2 Front & Side Panel ..................3 Back Panel....................5 Setting Up the DVR Unit ................5 1.5.1 Installing the Hard Disk................5 1.5.2 Connecting Devices................8 1.5.3 Connecting the Sensor/Relay device............. -
Page 5: Chapter 1 Introduction
Chapter 1 Introduction AVerDiGi EB1504 MPEG4 is a 4-channel stand-alone DVR unit that provides real-time monitoring and digital recording of surveillance video. Up to four video cameras and four sensor devices can be hooked up to this DVR unit. It also provides one audio input and output channel. -
Page 6: Package Content
Package Content (1) AVerMedia® AVerDiGi EB1504 MPEG4 unit (2) Remote Control (batteries included) (3) Quick Installation Guide (4) Software CD (User Manual included) (5) DVR accessories (including 4 screws and 1 hook) (6) Removable hard disk drawer accessories (with spare screws) -
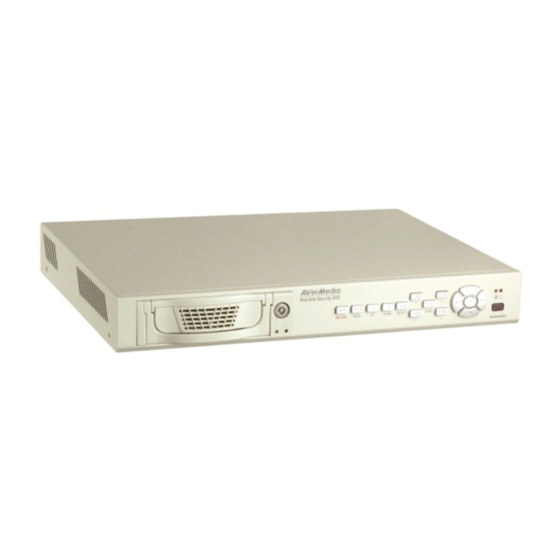
Page 7: Front & Side Panel
MPEG4 video compression Auto-detect NTSC or PAL video system Supports 2 hard drives (not included) Full-screen resolution: Display: 720 x 480 (NTSC), 720 x 576 (PAL) Recording: 720 x 480 (NTSC), 720 x 576 (PAL) Display frame rate: Total of 120/100 fps (NTSC/PAL) Recording frame rate: D1 mode (720 x 480): total of 60/50 fps (NTSC/PAL) CIF mode (360 x 240): total of 120/100 fps (NTSC/PAL) - Page 8 Name Function 1/2/3/4/Quad Use these buttons in playback mode to switch to display each channel in full screen or view all channels at the same time Use the buttons in setting password of OSD menu to: : For ”1” : For “2” : For “3”...
-
Page 9: Back Panel
Back Panel Name Function Audio Out Output the audio signal to a speaker Audio In Input the audio signal from a microphone or audio output device. The audio is embedded with channel 1 VGA OUT Output the video signal to a CRT or LCD monitor Video Out Output the video signal to a TV (BNC) - Page 10 Follow the illustrated instructions below to install the hard disk: 1. Loosen all screws 2. Push the cover backward and lift 3. Loosen the hard disk rack 4 screws 4. Secure the brackets on the hard disk (slave) 5. Connect the end of the IDE cable 6.
- Page 11 9. Connect the power connector to the 10. Carefully insert the hard disk in the hard disk (master) removable rack then replace the removable rack cover 11. Slide the drawer back 12. Lock the removable keylock 13. You may now connect all the cables. When the power is connected, the Power LED light turns on Before removing the removable hard disk drawer, the DVR Unit must be...
-
Page 12: Connecting Devices
1.5.2 Connecting Devices The back panel of the DVR unit, you can connect up to 4 video cameras, 4 sensor devices, 1 alarm device and output video to a TV or CRT/LCD monitor. Connecting the unit to a PC, through USB connection, the bundled software enables you to transfer, playback and segment the video. -
Page 13: Connecting The Sensor/Relay Device
1.5.3 Connecting the Sensor/Relay device The Sensor and Alarm ports enable you to connect (4) sensor inputs and (1) relay outputs. Just connect the external sensor and relay pin directly to the pinhole. Check the table below and locate which pinhole is assigned to sensor input and relay output. -
Page 14: Chapter 2 Operating The Eb1504 Mpeg4
Chapter 2 Operating the EB1504 MPEG4 Using the EB1504 MPEG4 for the First Time Upon connecting the power, the unit automatically detects the status of the hard disk. The hard disk must be formatted before you can use it with EB1504 MPEG4 If you are prompt to format the hard disk, press (select) for YES to format the hard disk and... -
Page 15: Playback The Video
When you are in full screen preview, press the following buttons on the remote control and control panel to switch to different channel, or preview all 4 channels: CIF mode: CH1: Camera 1 CH2: Camera 2 CH3: Camera 3 CH4: Camera 4 4-Channel Playback the Video If the unit is recording the video, you may have to stop video recording in order to... - Page 16 EVENT LIST (search by condition): EVENT LIST HARD DISK : MASTER In the selected HARD DISK, press . Then, use the buttons to select MASTER or SLAVE. Press again to make the selection. EVENT LIST Use the HARD DISK : MASTER buttons to select from the list.
-
Page 17: Chapter 3 Osd Navigation Tree
Chapter 3 OSD Navigation Tree Menu Function If the unit is currently recording the video, user may have to stop video recording to change the settings. To navigate in the OSD menu, press to call up and exit from the main menu or sub-menu display. Then use the buttons to go up and down and select the items in the menu list or change the settings. - Page 18 move the selection to the left and right. The red frame turns yellow when users are making a selection. OSD MENU Description MAIN MENU CAMERA SELECT : CAMERA SELECT Enable/disable the channel number to display the video RECORD SELECT QUAD RECORD MODE on the surveillance screen.
- Page 19 OSD MENU Description RECORD SCHEDULE RECORD SCHEDULE: 00 : 00 - 01 : 00 ALWAYS REC By default, in 24 hours, the recording schedule is set to 01 : 00 - 02 : 00 ALWAYS REC 02 : 00 - 03 : 00 ALWAYS REC always record every hour.
- Page 20 OSD MENU Description SUBMENU AUTO RECORD : PASSWORD CHANGE VIDEO ADJUSTMENT Enable/disable auto continue recording when DATE 2006 / 04 / 20 interrupted (i.e., power breakdown, video playback or TIME 17 : 54 : 50 AUTO RECORD configuration setup). It continue recording after 10 AUTO SCAN second of idleness.
- Page 21 OSD MENU Description 3. To move the selection to the left and right, use buttons. CHECK PASSWORD ENTER PASSWORD 4. After entering the last number, if the PASSWORD CORRECT appears, you are now authorized to format the hard disk. HARD DRIVE SETUP OVERWRITE ENABLED HD1 SIZE 78MB...
- Page 22 OSD MENU Description SENSOR SETUP SENSOR REC TIME : SENSOR REC TIME 010 SEC ALARM OUT TIME 010 SEC Set the amount of time (in second) to record when the CHANNEL - 1 NOT INSTALLED sensor has been triggered. CHANNEL - 2 NOT INSTALLED CHANNEL - 3 NOT INSTALLED...
-
Page 23: Chapter 4 Using The Usb Player
Chapter 4 Using the USB Player Recommended system requirements Pentium®4 2.4GHZ or above Windows®2000/ XP DDR 256 MB Graphic function must support DirectDraw Audio card or built-in Speaker 1 available USB2.0 port Installing the USB Playback Application To install the USB Playback Application: Place Installation CD into the CD-ROM drive. -
Page 24: Running The Usb Playback Application
Running the USB Playback Application To run the application, click the USB Player icon on the PC desktop (10) (14) (13) (12) (11) Name Function Minimize Reduce the application to a button on the taskbar Exit Close the application Snapshot Capture and save the image either in *.jpg or *.bmp format Print Print the image... -
Page 25: To Cut And Save The Portion Of The Recorded Video
Name Function Channel number Switch and display one channel (10) Speed up/down Adjust speed of video playback Backward one frame: Go back one frame Backward Play: Play the video file in reverse (11) Playback Pause: Briefly stop playing the video file Controller Play: Start/continue playing the video file Forward one frame: advance one frame... -
Page 26: Chapter 5 Backup And View Recorded Video File
Chapter 5 Backup and View Recorded Video File Recommended system requirements Pentium®4 2.4GHZ or above Windows®2000/ XP DDR 256 MB Graphic function must support DirectDraw Audio card or built-in Speaker 1 available USB2.0 port To Backup Recorded Video File Connect PC with EB 1504 MPEG 4 through the USB cable Place Installation CD into the CD-ROM drive. - Page 27 (10) Name Function All recorded video events list No.: the list order number Record: the record type(see also Chapter 2.3.1) Begin Time: the beginning of record time End Time: the end of record time Display first frame of each recorded channel video which user had selected.
-
Page 28: To View The Backup File
Select the event which user wants to backup. Or mark the Select All to select all listed recorded video event Locate on where user want to save the backup file 10. Click Start to process backup 11. To stop the backup progress, click Stop To View the Backup File QLog Viewer is used to view the backup file of recorded video. -
Page 29: To Cut And Save The Recorded Video
Name Function Save the screen shot Save a portion of the video in *.mpg or *.avi format Select a portion of the video and it will repeat playing(see also Chapter 5.3.1 : Go to the beginning of the video : Go back one frame : Wind back the video playback at the speed of 1/2x, 1/4x or 1/8x Playback... - Page 30 In the Save As dialog box, locate on where user wants to save the file, type the filename, and select the video format...
-
Page 31: Chapter 6 Imageverification
Chapter 6 ImageVerification Image Verification is a watermark-checking program to identify the authenticity of a saved image (e.g. by snapshot). This program can only verify uncompressed bmp image files. To Run the ImageVerification Place Installation CD into the CD-ROM drive. When the installation main screen appears, click Utility →... -
Page 32: Chapter 7 Video Enhancer
Chapter 7 Video Enhancer The bundled Video Enhancer is a video editing tool and can only be used with *.dvr video file. It allows you to adjust the video picture quality, segment and save the wanted portion of the video, zoom in and out the image, and print or save the screen shot. - Page 33 Name Function (6) Segment Mark the beginning and the end of the wanted portion of the video. Two triangle marks will appear on the slider. To cancel video segmentation, click this button again. (7) Zoom Buttons Enlarge, reduce, and set the image back to normal size. (8) Full Screen Use the entire screen to only display the video.
-
Page 34: Chapter 8 Warranty Notice
Any other cause which does not relate to a product defect. 3. Cartons, cases, batteries, cabinets, tapes, or accessories used with product. 4. AVerMedia does not warrant that this product will meet your requirements; it is your responsibility to determine the suitability of this product for your purpose.
Need help?
Do you have a question about the AVerDiGi EB1504 MPEG4+ and is the answer not in the manual?
Questions and answers