Table of Contents
Advertisement
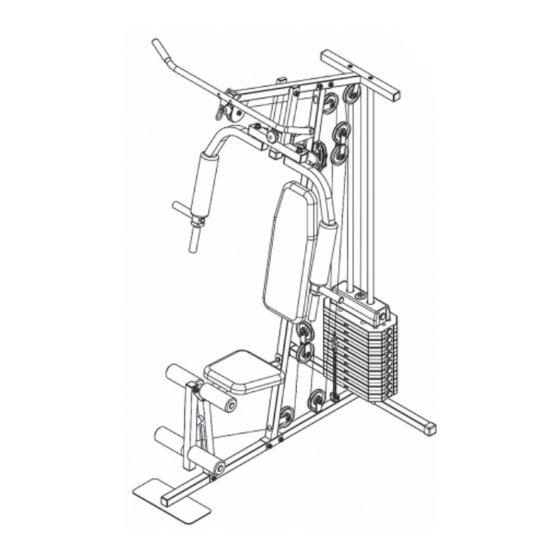
EV500 Home Gym
Assembly & User Instructions - Please keep for future reference
335/8474
Important
These instructions contain important information which will help you get the best from your
equipment and ensure safe and correct assembly, use and maintenance.
If you need help or have damaged or missing parts, call the Customer Helpline: 0845 6000 464
Issue 1 - 28/05/11
Advertisement
Table of Contents

Related Manuals for Everlast EV500


Summary of Contents for Everlast EV500
- Page 1 EV500 Home Gym Assembly & User Instructions - Please keep for future reference 335/8474 Important These instructions contain important information which will help you get the best from your equipment and ensure safe and correct assembly, use and maintenance. If you need help or have damaged or missing parts, call the Customer Helpline: 0845 6000 464...
-
Page 2: Table Of Contents
Contents Safety Information Components - Parts Assembly Instructions 6-13 Exercising Information 14-17 Before starting to exercise Muscle chart Warming up and cooling down exercises Exercise Chart 18-19 Care and Maintenance Exploded Parts Diagram Exploded Diagram Parts List... -
Page 3: Safety Information
Safety Information – Please read fully before assembly or using To reduce the risk of serious injury, read the entire manual before you assemble or operate the Everlast Home Gym. In particular, note the following safety precautions: • Only one person at a time should use the Assembly equipment. -
Page 4: Components - Parts
Components - Parts If you have damaged or missing components, call the Customer Helpline: 0845 6000 464 Please check you have all the parts listed below Note: Some of the smaller components may be pre-fitted to larger components. Please check carefully before contacting Argos regarding any missing components. - Page 5 Components - Fixings Please check you have all the fixings listed below Note: Some of the fixings are pre-fitted to the larger components. Please check carefully before contacting Argos regarding any missing fixings. Pulley U x 1 Single Pulley Block x 2 Reverse U x 1 Lat Bar x 1 Foam Tube x 2...
- Page 6 Components - Fixings Please check you have all the fixings listed below Note: Some of the fixings are pre-fitted to the larger components. Please check carefully before contacting Argos regarding any missing fixings. 25mm Round Cap x 1 Handle Grip x 6 38mm Square End Cap x 8 40mm Square End Cap x 2 38mm Square Cap x 3...
-
Page 7: Assembly Instructions
Assembly Instructions UNPACK THE CARTON AND PLACE ALL PARTS ON THE FLOOR CAREFULLY REMOVE ALL PACKING MATERIAL AND CHECK EACH PART AS THE MANUAL FIRST, REMEMBER SOME PARTS ARE PRE-FITTED TO LARGER COMPONENTS. IMPORTANT ASSEMBLE WITH ALL NUTS AND BOLTS LOOSE AT FIRST, ONLY TIGHTEN AFTER COMPLETING ALL ASSEMBLY STEPS. - Page 8 Assembly Instructions Step 2 a. Slide the two Rubber Rings (22) c. Slide Selector Shaft Bushing (44) e. Slide Top Weight Plate (23) down onto the two Weight Guide Tubes down Selector Shaft (5) at First Selector Shaft (5). Insert Weight (3).
- Page 9 Assembly Instructions Step 3 Attach the Support Frame (8) to the Front Base frame (2) using two Hex Bolts (56), four Washers (64) and two Nylock nuts (67). Remove two Bolt (69)from two Weight Guide Tubes (3). Attach the Upper Cross Beam (9) to the two Weight Guide Tubes (3) using two Bolts (69).
- Page 10 Assembly Instructions Step 4 NOTE: Oil Bushing (small) (38) c. Attach the Right Butterfly Arm f. Attach the Handle Tube (18) to have been Pre-assembled into (12) and Left Butterfly Arm (11) the Right Butterfly Arm (12) and Upper Cross Bar (9). to the Press Bar (10) using two Left Butterfly Arm (11) using two Washers (63) and two Nylock Nuts...
- Page 11 Assembly Instructions Step 5 a. Attach the Back Cushion (29) to the Support Frame (8), using two Hex Bolts (59) and two M8 Washers (65). b. Attach the Front Support Frame (4) to the Front Base Frame (2) using one Hex Bolts (56), two Washers (64) and one Nylock Nut (67).
- Page 12 Assembly Instructions Assembly 2310mm Upper Cable (35) a. With Upper Cable (35) in groove d. Install Big Pulley NO.4 (33) g. Install pulley NO.3 (32) to Pulley of Pulley No.1 (32) thread cable Upper Cross Beam (9) using one U (13) using one Hex Bolt (57), through Upper Cross Beam (9).
-
Page 13: 2750Mm Butterfly Cable
Assembly Instructions Assembly 2750mm Butterfly Cable (37) a. Attach both ends of Cable (short) b. Install Pulley NO.10&12 (32) to c. Install Pulley NO.11 (32) to (37) to left Butterfly Arm (11) and Single Pulley Block (14) using Reverse U (15) using one Hex right Butterfly Arm (12) using two two Hex Bolts (57), four Washers Bolt (57), two Washers (64) and... -
Page 14: Assembly 3840Mm Lower Cable
Assembly Instructions Assembly 3840mm Lower Cable (36) a. With the Lower Cable (long) (36) d. Install Pulley NO.7 (32) to g. Attach the end of Cable (36) to in groove of Pulley NO.6 (32) Reverse U (15) using one Hex the Front Base Frame (2) using thread cable through Support Bolt (57), two Washers (64) and... -
Page 15: Exercising Information
Exercising Information Before starting to exercise How you begin your exercise program depends on your physical condition. If you have been inactive for several years, or are severely overweight, you must start slowly and increase your time on the equipment; a few minutes per workout. -
Page 16: Muscle Chart
Exercising Information Muscle chart Aerobic Exercise Aerobic exercise improves the fitness of your lungs and heart - your body’s most important muscle. Aerobic exercise fitness is promoted by any activity that uses your large muscles (arms, legs, or buttock, for example). Your heart beats quickly and you breathe deeply. -
Page 17: Warming Up And Cooling Down Exercises
Exercising Information Warming up and Cooling down exercises Each workout should include the following three parts: 1. A warm-up, consisting of 5 to 10 minutes of stretching and light exercise. A proper warm-up increases your body temperature, heart rate, and circulation in preparation for exercise. 2. - Page 18 Exercising Information Calf/achilles stretch With one leg in front of the other, reach forward and place your hands against a wall. Keep your back leg straight and your back foot flat on the floor. Bend your front leg, lean forward and move your hips toward the wall.
-
Page 19: Exercise Chart
Exercise Chart BENCH PRESS Unscrew Plum Blossom Nut and rotate Tobacco Pipe to unlock bench press. Grip handles and push forward. BUTTERFLY Engage Tobacco Pipe / Plum Blossom Nut. From the seated position place elbows and forearms against the roll pads. Push with your elbows and not with your hands. - Page 20 Exercise Chart LEG EXTENSIONS Sit upright with your legs over the top roller pads and your feet hooked in behind the bottom roller pads. Lock your ankles and don’t point your toes. Extend legs fully and return to starting position. LEG CURLS Hook one ankle of your leg around the lower leg foam roller with your knee against the upper leg foam roller.
-
Page 21: Care And Maintenance
Care and Maintenance Using the Equipment 1. Examine the equipment may have parts missing, contact the equipment again until it is in periodically in order to detect any the manufacturer, their approved perfect working order. damage or wear which may have service agent or the Customer been produced. -
Page 22: Exploded Parts Diagram
Exploded Parts Diagram 35. Upper Cable x 1 36. Lower Cable x 1 37. Butterfly Cable x 1 32. Pulley(3.5") x 10 33. Pulley(4") x 1... -
Page 23: Exploded Diagram Parts List
Exploded Diagram Parts List Part Description Part Description Rear Base Frame Lower Cable (Length: 3840 mm) Front Base Frame Butterfly Cable (Length: 2750 mm) Weight Guide Tube Oil Bushing (Small) Front Support Frame Oil Bushing (Big) Selector Shaft Select Shaft End Cap Leg Extension Frame Wrench Seat Base Frame... - Page 24 AN AUTHORISED LICENCEE OF EVERLAST WORLD WIDE INC. FCSI LTD CUSTOMER HELPLINE : 0845 6000 464...
Need help?
Do you have a question about the EV500 and is the answer not in the manual?
Questions and answers
Hi, I've recently bought this machine secondhand but the selector shaft is missing. Is there anywhere I can find this part? Otherwise the machine is unfortunately useless and I've just wasted £100. Thanks ☺️
If you have a damaged or missing selector shaft for the Everlast EV500 machine, you should call the Customer Helpline at 0845 6000 464 for assistance with obtaining a replacement.
This answer is automatically generated