Table of Contents
Advertisement
Available languages
Available languages
Quick Links
CD PORTABLE SYSTEM
SISTEMA PORTÁTIL CON REPRODUCTOR DE CDs
RC-EX20S/RC-EX20A/
RC-EX20B
INSTRUCTIONS
MANUAL DE INSTRUCCIONES
PUSH
DISPLAY
For Customer Use:
Enter below the Model No. and Serial No.
which are located on the rear of the
cabinet.
Retain this information for future reference.
Model No.
Serial No.
LVT1225-001B
[J]
Advertisement
Chapters
Table of Contents

Related Manuals for JVC RC-EX20A


Summary of Contents for JVC RC-EX20A
- Page 1 CD PORTABLE SYSTEM SISTEMA PORTÁTIL CON REPRODUCTOR DE CDs RC-EX20S/RC-EX20A/ RC-EX20B INSTRUCTIONS MANUAL DE INSTRUCCIONES PUSH DISPLAY For Customer Use: Enter below the Model No. and Serial No. which are located on the rear of the cabinet. Retain this information for future reference.
- Page 2 Warnings, Cautions and Others Avisos, precauciones y otras notas CAUTION RISK OF ELECTRIC SHOCK DO NOT OPEN DO NOT EXPOSE TO RAIN OR MOISTURE NE PAS EXPOSER À LA PLUIE NI À L'HUMIDITÉ ATTENTION:RISQUE DE CHOC ELECTRIQUE, NE PAS OUVRIR The lightning flash with arrowhead symbol, within an equilateral triangle is intended to alert the user to the presence of uninsulated “dangerous voltage”...
- Page 3 WARNING: TO REDUCE THE RISK OF FIRE OR ELECTRIC SHOCK, DO NOT EXPOSE THIS APPLIANCE TO RAIN OR MOISTURE. CAUTION To reduce the risk of electrical shocks, fire, etc.: 1. Do not remove screws, covers or cabinet. 2. Do not expose this appliance to rain or moisture. PRECAUCIÓN Para reducir posibles riesgos de descargas eléctricas, incendios, etc, le recomendamos que:...
-
Page 4: Table Of Contents
CONTENTS FEATURES ... 1 SAFETY PRECAUTIONS ... 1 HANDLING PRECAUTIONS ... 2 POWER SUPPLY ... 3 NAMES OF PARTS AND CONTROLS ... 4 TURNING THE UNIT ON/OFF ... 5 SETTING THE CLOCK ... 6 ADJUSTING THE SOUND ... 7 FEATURES 1 Portable system incorporating CD player 8-cm (3-3/16") CD playback capability 2 Digital LCD (Liquid Crystal Display) indicates... -
Page 5: Handling Precautions
HANDLING PRECAUTIONS Do not use this unit in direct sunlight or leave the unit in a closed automobile (or yacht, etc.) where it would be exposed to high temperatures above 40°C (104°F). 1 Avoid using the unit in the following places: •... -
Page 6: Power Supply
AC IN CAUTIONS: • Use only with the JVC power cord provided with this unit to avoid malfunction or damage to the unit. Remove batteries when using the power cord. • Be sure to unplug the power cord from the outlet when going out or when the unit is not in use for an extended period of time. -
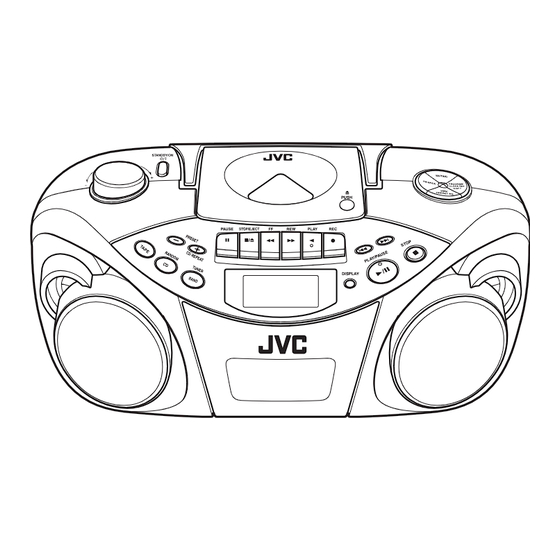
Page 7: Names Of Parts And Controls
NAMES OF PARTS AND CONTROLS Top and front sides 1 VOLUME knob 2 STANDBY/ON button 3 PRESET – button PRESET + / CD REPEAT button 4 Tape operation buttons PAUSE 8 button STOP/EJECT § button FF 1 button REW ¡ button PLAY 2 button REC ¶... -
Page 8: Rear Side
Rear side 15 Telescopic antenna 16 RESET button 17 BEAT CUT switch 18 PHONES jack Connect stereo mini headphones (3.5-mm (3/16") diameters, impedance of 16 to 32 ) to this jack. The speaker output is switched off with headphones connected. TURNING THE UNIT ON/OFF STANDBY/ON STANDBY/ON... -
Page 9: Setting The Clock
SETTING THE CLOCK Before operating the unit any further, first set the clock built in this unit. The clock uses 12-hour indication. “AM 12:00” indicates midnight, and “PM 12:00” indicates noon. 1 Press STANDBY/ON to turn off the unit, if it is turned on. -
Page 10: Adjusting The Sound
ADJUSTING THE SOUND PHONES (on the rear) Adjusting the volume Turn VOLUME clockwise to increase the volume or counterclockwise to decrease it. The volume level can be adjusted in 31 steps (00 VOL to 30 VOL). Caution: DO NOT turn off the unit with the volume set to an extremely high level;... -
Page 11: Playing Compact Discs
PLAYING COMPACT DISCS Notes on compact discs This unit has been designed only to play back the following CDs. • Digital audio CD • Recordable digital audio CD (CD-R) • Rewritable digital audio CD (CD-RW) When playing a CD-R or CD-RW You can play back finalized CD-R or CD-RW recorded in music CD format. -
Page 12: Basic Operation
Basic operation 1 Press CD/RANDOM to enter CD mode, if the unit is in TUNER or TAPE mode. 2 Press ) PUSH to open the disc door. 3 Load a disc with the label side facing up and close the disc door. •... -
Page 13: Repeat/Random Playback
Skipping • To skip back to the previous track During playback, press 4 once to return to the beginning of the current track, press twice to skip back to the beginning of the previous track. • To skip to the next track During playback, press ¢... -
Page 14: Programmed Playback
Programmed playback Up to 20 tracks can be programmed to play in any desired order. Note: There is a time limit in doing the following steps. If the setting is canceled before you finish, start from step 2 again. 1 Press CD/RANDOM to enter CD mode. 2 Press PROGRAM/CLOCK SET in stop mode. -
Page 15: Radio Reception
RADIO RECEPTION Tuning in a station 1 Press BAND/TUNER to enter the tuner mode. 2 Press BAND/TUNER to select the band, FM or 3 Press and hold 4 or ¢ for more than 1 second. The unit starts searching and stops when a station of sufficient signal strength is tuned in. -
Page 16: Presetting Stations
Presetting stations You can preset 10 FM and 10 AM stations. There is a time limit in doing the following steps. If the setting is canceled before you finish, start from step 3 again. Note: In some cases, test frequencies have been already memorized for the tuner since the factory examined the tuner preset function before shipment. -
Page 17: Cassette Playback
CASSETTE PLAYBACK Notes on cassette tapes • Use only type-I normal tapes. The recording/playback characteristics of this unit are those for normal tapes, which have different characteristics from CrO metal tapes. • The use of tapes longer than 120 minutes is not recommended, since characteristic deterioration may occur and these tapes easily jam in the pinch roller and the capstan. - Page 18 Basic operation 1 Press TAPE to enter the tape mode. 2 Load a cassette. Use only a type-I normal tape. 3 Press PLAY 2 to start playback. 4 Adjust the volume. To stop playback Press STOP/EJECT §. The tape also stops when it reaches the end. PUSH DISPLAY Fast-winding a tape...
-
Page 19: Recording
RECORDING Basic operation Standard recording 1 Prepare the recording source. • When recording from the radio: Set to the tuner mode and tune in a desired station. • When recording from a CD: Set to the CD mode and load a CD. 2 Load a blank or erasable cassette. - Page 20 Synchronized recording with CD playback You can make the CD player to start playback when the tape deck enters the recording mode. 1 Load a cassette. Use only a type-I normal tape. 2 Load a CD. 3 Press CD/RANDOM to enter CD mode. 4 Specify a track or point on the disc to start recording.
-
Page 21: Maintenance
MAINTENANCE Cleaning the heads, capstan and pinch roller Cleaning is important! When the tape is running, magnetic powder and dust naturally accumulate on the heads, capstan and pinch roller. When they become too dirty; • Sound quality deteriorates. • The sound output level drops. •... -
Page 22: Troubleshooting
TROUBLESHOOTING • If you are having a problem with your unit, check this list for a possible solution before calling for service. Symptom Power cannot be turned on. When PLAY 2 is pressed, tape does not move. Playback sound is at a very low level. REC ¶... -
Page 23: Specifications
SPECIFICATIONS CD player CD capacity : 1 CD Signal-to-noise ratio : 75 dB Dynamic range : 60 dB Tuner Frequency range : FM 87.5 – 108.0 MHz AM 530 – 1 710 kHz Antennas : Telescopic antenna for FM Ferrite core antenna for AM Cassette deck Frequency response : 60 Hz –... -
Page 24: Características
ÍNDICE CARACTERÍSTICAS ... 1 PRECAUCIONES DE SEGURIDAD ... 1 PRECAUCIONES DE MANEJO ... 2 SUMINISTRO ELÉCTRICO ... 3 NOMBRE DE LAS PIEZAS Y CONTROLES ... 4 CONEXIÓN/DESCONEXIÓN DE LA UNIDAD ... 5 AJUSTE DEL RELOJ ... 6 AJUSTE DEL SONIDO ... 7 CARACTERÍSTICAS 1 Sistema portátil con reproductor de CDs Capacidad de reproducción de discos compactos de... -
Page 25: Precauciones De Manejo
PRECAUCIONES DE MANEJO No utilice esta unidad cuando está expuesta directamente a los rayos del sol ni deje la unidad en un automóvil cerrado (o yate, etc.) donde pueda quedar expuesta a temperaturas superiores a 40ºC (104ºF). 1 Evite el uso de la unidad en los siguientes lugares: •... -
Page 26: Suministro Eléctrico
AC IN PRECAUCIONES: • Utilice sólo el cable de alimentación de JVC suministrado con esta unidad para evitar un mal funcionamiento o daño en la unidad. Quite las pilas cuando utilice el cable de alimentación. -
Page 27: Nombre De Las Piezas Y Controles
NOMBRE DE LAS PIEZAS Y CONTROLES Partes superior y frontal 1 Selector VOLUME 2 Botón STANDBY/ON 3 Botón PRESET – Botón PRESET + / CD REPEAT 4 Botones de funcionamiento de la cinta Botón PAUSE 8 Botón STOP/EJECT § Botón FF 1 Botón REW ¡... -
Page 28: Parte Posterior
Parte posterior 15 Antena telescópica 16 Botón RESET 17 Interruptor BEAT CUT 18 Toma PHONES Conecte los minialtavoces estéreo (diámetro 3,5mm (3/16"), impedancia de 16 a 32 ) a esta toma. Se desactiva la salida del altavoz cuando se conectan los altavoces. -
Page 29: Ajuste Del Reloj
AJUSTE DEL RELOJ Antes de utilizar la unidad, ajuste el reloj incorporado a esta unidad. El reloj utiliza una indicación de 12 horas. “AM 12:00” indica medianoche y “PM 12:00” indica mediodía. 1 Presione STANDBY/ON unidad, si está encendida. El reloj parpadea en el visualizador. 2 Mantenga presionado PROGRAM/CLOCK SET durante más de 2 segundos. -
Page 30: Ajuste Del Volumen
AJUSTE DEL SONIDO PHONES (en la parte posterior) PHONES (on the rear) Ajuste del volumen Gire VOLUME en el sentido de las agujas del reloj para subir el volumen, o en sentido contrario a las agujas del reloj para bajarlo. El nivel del volumen puede ajustarse en 31 pasos (00 VOL a 30 VOL). -
Page 31: Reproducción De Cds
REPRODUCCIÓN DE CDs Notas acerca de los discos compactos Esta unidad ha sido diseñada para reproducir únicamente los siguientes CDs. • CD de audio digital • CD de audio digital grabable (CD-R) • CD de audio digital regrabable (CD-RW) Cuando reproduzca un CD-R o CD-RW Puede reproducir discos CD-R o CD-RW finalizados grabados en formato de CD de música. -
Page 32: Funcionamiento Básico
Funcionamiento básico 1 Presione CD/RANDOM para entrar en el modo CD si la unidad está en modo TUNER (sintonizador) o TAPE (cinta). 2 Presione ) PUSH para abrir la tapa del disco. 3 Coloque un disco con el lado de etiqueta hacia arriba y cierre la tapa del disco. -
Page 33: Reproducción Repetida/Aleatoria
Salto • Para saltar a una pista anterior Durante la reproducción, presione 4 una vez para volver al principio de la pista actual y presione dos veces para volver al principio de la pista anterior. • Para saltar a la siguiente pista Durante la reproducción, presione ¢... -
Page 34: Reproducción Programada
Reproducción programada Se pueden programar hasta 20 pistas para reproducirlas en el orden deseado. Nota: Hay un tiempo límite para realizar los siguientes pasos. Si el ajuste se cancela antes de acabar, comience de nuevo por el paso 2. 1 Presione CD/RANDOM para entrar en el modo 2 Presione PROGRAM/CLOCK SET en modo parada. -
Page 35: Recepción De La Radio
RECEPCIÓN DE LA RADIO Sintonización de una emisora 1 Presione BAND/TUNER para entrar en el modo de sintonizador. 2 Presione BAND/TUNER para seleccionar la banda, FM o AM. 3 Mantenga presionado 4 o ¢ durante más de 1 segundo. La unidad empieza a buscar y se detiene cuando sintoniza una emisora de señal fuerte. -
Page 36: Presintonización De Emisoras
Presintonización de emisoras Puede presintonizar 10 emisoras de FM y 10 de AM. Hay un límite de tiempo para realizar los siguientes pasos. Si el ajuste se cancela antes de acabar, comience de nuevo desde el paso 3. Nota: En algunos casos, las frecuencias de prueba ya se han memorizado para el sintonizador, ya que la fábrica examinó... -
Page 37: Reproducción De Casetes
REPRODUCCIÓN DE CASETES Notas acerca de las cintas de casete • Utilice sólo cintas normales de tipo I. Las características de grabación/reproducción de esta unidad son las de las cintas normales, que tienen diferentes características a las de las cintas de CrO metal. - Page 38 Funcionamiento básico 1 Presione TAPE para entrar en el modo de cinta. 2 Coloque un casete. Utilice sólo cintas normales de tipo I. 3 Presione PLAY 2 para iniciar la reproducción. 4 Ajuste el volumen. Para detener la reproducción Presione STOP/EJECT §. La cinta también se detiene cuando llega al final.
-
Page 39: Grabación
GRABACIÓN Funcionamiento básico Grabación normal 1 Prepare la fuente de grabación. • Cuando grabe de la radio: Ajuste al modo de sintonizador y sintonice una emisora deseada. • Cuando grabe de un CD: Ajuste al modo CD y coloque un CD. 2 Coloque un casete virgen o borrable. - Page 40 Grabación sincronizada con la reproducción del CD Puede hacer que el reproductor de CDs comience a reproducir cuando la platina entra en el modo de grabación. 1 Coloque un casete. Utilice sólo cintas normales de tipo I. 2 Coloque un CD. 3 Presione CD/RANDOM para entrar en el modo 4 Especifique una pista o punto en el disco para iniciar la grabación.
-
Page 41: Mantenimiento
MANTENIMIENTO Limpieza de los cabezales, cabrestante y rodillo ¡La limpieza es importante! Cuando la cinta está en marcha, el polvo magnético y la suciedad se acumulan naturalmente en los cabezales, cabrestante y rodillo. Cuando se ensucian mucho; • Se deteriora la calidad del sonido. •... -
Page 42: Solución De Problemas
SOLUCIÓN DE PROBLEMAS • Si tiene problemas con su unidad, consulte las posibles soluciones de la siguiente lista antes de llamar a un centro de asistencia técnica. Síntoma No puede encenderse la El cable de alimentación está desenchufado. unidad. Cuando se presiona PLAY 2 PAUSE 8 está... -
Page 43: Especificaciones
ESPECIFICACIONES Reproductor de CDs Capacidad de CDs : 1 CD Relación señal-ruido : 75 dB Gama dinámica : 60 dB Sintonizador Gama de frecuencias : FM 87,5 – 108,0 MHz AM 530 – 1 710 kHz Antenas : Antena telescópica para FM Antena de núcleo de ferrita para AM Pletina... - Page 44 REASON FOR RETURN BE SURE TO ENCLOSE COMPLETED FORM, A COPY OF YOUR BILL OF SALE, PAYMENT (IF APPLI- CABLE), SUPPLIED ACCESSORIES, TOGETHER WITH THE PRODUCT AND RETURN TO THE JVC REPAIR/REPLACEMENT FACILITY NEAREST YOU. TO OBTAIN THE ADDRESS OF THE LOCATION NEAREST YOU <PLEASE CALL (800) 252-5722 OR VISIT OUR WEBSITE AT HTTP://WWW.JVC.COM...
-
Page 45: Limited Warranty
WHAT WE WILL DO: If this product is found to be defective within the warranty period, JVC will, at its option, either repair or replace the defective part(s) or replace the product with a new or refurbished functionally equivalent product. Within 90 days from date of retail sale, repair or replacement will be at no charge to the customer. - Page 46 EN, SP © 2004 Victor Company of Japan, Limited 0504MZMBICORI...
Need help?
Do you have a question about the RC-EX20A and is the answer not in the manual?
Questions and answers