
Related Manuals for DR ALL-TERRAIN


Summary of Contents for DR ALL-TERRAIN
- Page 1 ALL-TERRAIN FIELD and BRUSH MOWER Safety & Operating Instructions Please read instructions before operating machine...
- Page 2 FIELD and BRUSH MOWER! ® We have done our utmost to ensure that your DR ALL-TERRAIN FIELD and BRUSH MOWER will be one of the most trouble-free and satisfying pieces of equipment you have ever owned. Please let us know of any questions or problems you may have.
-
Page 3: Table Of Contents
Protecting Yourself ......................... 5 Operating the Machine Safely ......................5 Safety with Gasoline-Powered Machines ..................6 A Note to All Users ......................... 7 Chapter 3: Setting Up Your DR ALL-TERRAIN FIELD and BRUSH MOWER ..9 ALL-TERRAIN FIELD and BRUSH MOWER Controls and Features........10... - Page 4 ALL-TERRAIN FIELD and BRUSH MOWER Safety & Operating Instructions...
-
Page 5: Chapter 1: Introducing The Dr All-Terrain Field And Brush Mower
Thank you for the purchase of your new DR ALL-TERRAIN FIELD and BRUSH MOWER. This manual will help you set up and safely operate your new DR ALL- TERRAIN FIELD and BRUSH MOWER. Careful adherence to the safety and operating instructions in this manual will ensure many years of productive use. -
Page 6: Conventions Used In This Manual
Tools Needed: This indicates you will need a special tool to perform a maintenance function on your machine. Note: This information may be helpful to you. If you are ever unsure about an action you are about to take, contact Country Home Product’s toll-free support at 1-800-DR-OWNER (376-9637). ALL-TERRAIN... -
Page 7: Chapter 2: Safety Considerations
Taking the time to read and observe all safety instructions will ensure many years of productive use from your DR ALL-TERRAIN FIELD and BRUSH MOWER and help you avoid injury. Please take a few moments to read the following guidelines for safely operating your new machine. - Page 8 (#164371) This label reminds you about the importance of reading and understanding the Safety & Operating Instructions manual and of paying attention to the safety warnings. (#164521) ALL-TERRAIN FIELD and BRUSH MOWER Safety & Operating Instructions...
-
Page 9: Protecting Yourself
Always wear the protective goggles while mowing to protect your eyes from possible thrown objects. Wear shoes with non-slip treads when using your DR ALL-TERRAIN FIELD and BRUSH MOWER. If you have safety shoes, we recommend wearing them. Do not use the machine while barefoot or wearing open sandals. -
Page 10: Safety With Gasoline-Powered Machines
Do not, under any conditions, remove, bend, cut, fit, weld, or otherwise alter standard parts on the DR ALL-TERRAIN FIELD and BRUSH MOWER. This includes all shields and guards. Modifications to your machine could cause personal injuries and property damage and may void your warranty. -
Page 11: A Note To All Users
Under California law, and the laws of some other states, you are not permitted to operate an internal combustion engine using hydrocarbon fuels without an engine spark arrester. All DR ALL-TERRAIN FIELD and BRUSH MOWERS shipped to California and Washington State are provided with spark arresters. Failure of the owner/operator to maintain this equipment in compliance with state regulations is a misdemeanor under California law and may be in violation of other state and/or federal regulations. - Page 12 ALL-TERRAIN FIELD and BRUSH MOWER Safety & Operating Instructions...
-
Page 13: Chapter 3: Setting Up Your Dr All-Terrain Field And Brush Mower
Chapter 3: Setting Up Your DR ALL-TERRAIN FIELD and BRUSH MOWER This chapter outlines a few simple steps you will need to follow to set up your new machine before you use it. It may be helpful to familiarize yourself with the controls and features on your mower by reviewing the picture in the next section before beginning the steps outlined in this chapter. -
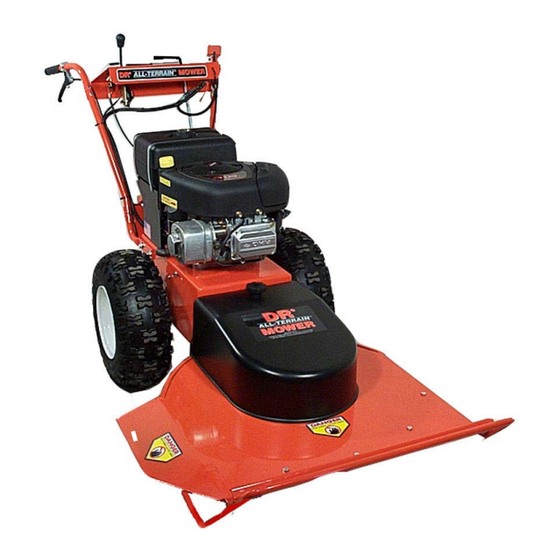
Page 14: Controls And Features
ALL-TERRAIN FIELD and BRUSH MOWER Controls and Features Note: The model shown in Figure 1 may look slightly different from your machine. Blade Shift Lever Control Throttle Operator Presence Control Control Key Switch Fuel Fill Parking Oil Fill... -
Page 15: Dr All-Terrain
Unpacking the Mower NOTE: Unpacking the DR ALL-TERRAIN FIELD and BRUSH MOWER is a two-person job. We recommend you have an extra set of hands available before you begin. Tools & Supplies Needed: • screwdriver • hammer • knife •... -
Page 16: To Install The Brush Deck
5. Replace the belt guard and secure in place with the black knob. Install Collar and Pin Install Belt Figure 2 Figure 3 Belt Tension Lever Figure 4 Figure 5 ALL-TERRAIN FIELD and BRUSH MOWER Safety & Operating Instructions... -
Page 17: Connecting The Battery Wire (Electric-Starting Models Only)
Tools Needed: (2) 5/16 wrenches or sockets 1. Connect the negative wire Connect Battery Wire to the negative terminal on the battery (Figure 6). Figure 6 ALL-TERRAIN FIELD and BRUSH MOWER Safety & Operating Instructions... -
Page 18: Adding Oil And Gasoline
Open the fuel shut-off valve (on the bottom of the gas tank) if your model is equipped with one. Check the Tire Pressure There should be 14 psi in each tire. ALL-TERRAIN FIELD and BRUSH MOWER Safety & Operating Instructions... -
Page 19: Chapter 4: Operating Your Dr All-Terrain Field And Brush Mower
Chapter 4: Operating Your DR ALL-TERRAIN FIELD and BRUSH MOWER This chapter covers the procedures for starting and stopping your new DR ALL- TERRAIN FIELD and BRUSH MOWER and discusses basic operation features. You ... -
Page 20: Before Starting The Engine
Grasp the recoil starter handle and slowly pull until you feel resistance. Let the cord retract a little bit, then pull the cord rapidly to start the engine. One or two pulls usually starts the DR ALL-TERRAIN FIELD and BRUSH MOWER. Move the throttle to the RUN position. -
Page 21: Engaging The Wheel Drive
ALL-TERRAIN WARNING! Always disengage the blade of the DR FIELD and BRUSH MOWER before shifting into reverse. Stopping the Blade Pull the blade control lever (see mower picture, Figure 1, on page 10) back to the DISENGAGED position. -
Page 22: Stopping The Engine
Note: If your machine is equipped with a fuel shut-off valve, close it when transporting or storing the mower. Obstacle Tips Dealing with obstacles in the terrain is easy with your new DR ALL-TERRAIN FIELD and BRUSH MOWER. The following section explains how to approach most common obstacles. -
Page 23: Slopes
"N" (Neutral), turn the engine off, set the brake and disconnect the spark plug wire(s). WARNING! DO NOT touch the exhaust areas when reaching for the spark plug(s)—they are very hot. ALL-TERRAIN FIELD and BRUSH MOWER Safety & Operating Instructions... -
Page 24: Cutting Brush & Saplings
1. Be very careful of your footing when mowing in wet conditions. Avoid steep slopes and other slippery areas. 2. Use a lower, slower speed when mowing in wet conditions. ALL-TERRAIN FIELD and BRUSH MOWER Safety & Operating Instructions... -
Page 25: Chapter 5: Maintaining The Dr All-Terrain
Replace Spark Plug(s) ▲ Replace Air Filter & Precleaner ▲ Check cable connections ▲ ® * The engine on your DR may not have a precleaner or oil filter. ALL-TERRAIN FIELD and BRUSH MOWER Safety & Operating Instructions... -
Page 26: Battery Care (For Electric-Starting Models Only)
Do not continue to crank your engine when the battery charge is low. Charging the Battery ® If the battery loses its charge, you'll need to use a trickle charger (like the DR Battery Charger) to recharge it. The charger should have an output of 12 volts at no more than 6-8 amps. -
Page 27: Lubrication
Lubrication Your DR ALL-TERRAIN FIELD and BRUSH MOWER is greased at the Factory. Tools & Supplies Needed: Flexible hose grease gun Lithium grease 1/2" wrench or socket (chain cover) ® FLUID FILM or comparable lubricant WARNING! Before performing any maintenance procedure, stop the engine and disconnect the spark plug wire(s). -
Page 28: Grease Fittings
Remove the chain cover, lubricate the chain and replace the cover Remove Chain Cover (Figures 11 and 12). Figure 11 Lubricate Chain Figure 12 ALL-TERRAIN FIELD and BRUSH MOWER Safety & Operating Instructions... -
Page 29: Removing And Replacing The Belts
WARNING! Before performing any maintenance procedure, stop the engine and disconnect the spark plug wire(s). Important! Use only DR belts on your machine. They have been thoroughly tested and proven for many hours of use. To Replace the Blade Belt 1. -
Page 30: To Replace The Drive Belt
Remove the pin and collar (Figure 15), and then pull the power unit away from the deck. 4. Tilt the power unit forward onto the attachment pin. Remove Pin & Collar Figure 15 ALL-TERRAIN FIELD and BRUSH MOWER Safety & Operating Instructions... - Page 31 9. Loosen the belt retainer bolts on the outside of the frame (one on each side) and slide the retainer back (Figure 18). 10. Remove the belt. 11. To mount the new belt, reverse the above procedure. Loosen Bolt and Slide Back Figure 18 ALL-TERRAIN FIELD and BRUSH MOWER Safety & Operating Instructions...
-
Page 32: Removing And Replacing The Blade
4. Mount the new blade, washer and lock nut. Note: Be sure the blade is seated completely over the small ridge in the spindle hub before tightening the lock nut. ALL-TERRAIN FIELD and BRUSH MOWER Safety & Operating Instructions... -
Page 33: Adjusting The Wheel Clutch
WARNING! If clutch is over tightened, machine may lurch forward when shifting into gear. Use caution when shifting into gear. Wheel Clutch Adjustment Figure 20 ALL-TERRAIN FIELD and BRUSH MOWER Safety & Operating Instructions... -
Page 34: Removing And Replacing The Drive Chain
5. Mount the new chain as Figure 22 shown in Figure 22. 6. Add the master chain link. Replace chain cover and tighten the lock nuts. Figure 23 ALL-TERRAIN FIELD and BRUSH MOWER Safety & Operating Instructions... -
Page 35: Adjusting The Blade Engagement Cable
(Figure 24). To tighten the cable, turn the center portion of the adjuster counter clockwise. To loosen the cable, turn the adjuster clockwise. Blade Engagement Cable Adjustment Figure 24 ALL-TERRAIN FIELD and BRUSH MOWER Safety & Operating Instructions... -
Page 36: Removing The Wheels
To adjust the parking brake, tighten or loosen the nut shown in Figure 26. Tightening the nut will increase pressure loosening the nut will decrease the pressure on brake Figure 26 ALL-TERRAIN FIELD and BRUSH MOWER Safety & Operating Instructions... -
Page 37: Transmission
Remove the pin and collar (Figure 29), and then pull the power unit away from the deck. Figure 27 Remove Pin & Collar Belt Removed Figure 29 Figure 28 ALL-TERRAIN FIELD and BRUSH MOWER Safety & Operating Instructions... -
Page 38: End Of Season & Storage
If your engine has a fuel filter, replace it. If your DR ALL-TERRAIN FIELD and BRUSH MOWER will be idle for more than 30 days, we recommend using a gas stabilizer. This will prevent sediment from gumming up the carburetor. -
Page 39: Chapter 6: Troubleshooting And Warranty
⇒ If your engine still won’t start, call 1(800) DR-OWNER (376-9637) for assistance. ... - Page 40 45 minutes at a time, the battery may need to be periodically charged. See the Battery Care section on page 22. ⇒ If your battery is charged and your DR still won’t start, call 1(800) DR-OWNER (376-9637) for assistance.
- Page 41 If it’s dirty, change it following the procedure in the engine manufacturer’s owner’s manual. ⇒ Check the oil level and adjust as needed. ⇒ If your engine still lacks power, call 1(800) DR- OWNER (376-9637) for assistance. ⇒ Check the oil level and adjust as needed.
- Page 42 ⇒ The spindle bearings may be bad. ⇒ Call 1(800) DR-OWNER (376-9637) for assistance. ⇒ The blade may not be seated properly on the hub. The blade is not Loosen the blade nut, reset the blade and tighten the cutting or is nut.
-
Page 43: Dr All-Terrain Field And Brush Mower Safety & Operating Instructions
Notes ALL-TERRAIN FIELD and BRUSH MOWER Safety & Operating Instructions... - Page 44 Notes ALL-TERRAIN FIELD and BRUSH MOWER Safety & Operating Instructions...
- Page 45 Technical Service Department for our Owners. You can access a Representative by dialing our TOLL-FREE Hotline at 1-800- DR-OWNER (376-9637). The sole job of our well-trained and friendly folks is to ensure that you get any help you need in a timely fashion.
- Page 46 Daily Checklist for the DR FIELD and BRUSH MOWER ® ® To help maintain your DR for optimum performance, we recommend you follow this checklist each time you use your machine. [ ] OIL: With the machine on a level surface, remove the oil fill cap and check the oil level.
Need help?
Do you have a question about the ALL-TERRAIN and is the answer not in the manual?
Questions and answers